Custom Properties are variables in CSS that are used to store and reuse values in stylesheet. These are same as variables in other programming languages.
Declaring Custom Properties in CSS
The following code show how to declare custom properties in CSS.
Here are few things to be considered when using custom properties in CSS.
You can define custom properties in any selectors in stylesheet, but if you define a custom property inside :root selector it will have scope across all over the stylesheet.
The var function is used to apply variable values to CSS properties on any elements.
CSS does not allow custom properties to be used in media queries or container queries, Also you cannot use them to set the name of a CSS property or selector.
Custom properties are case sensitive.
CSS Custom Properties Example
Following code shows example of using custom properties in CSS. Here you can see that we defined the color ‘#0044cc’ as blue, So developer can repetitively use this color by using variable blue.
Example
<!DOCTYPE html><html lang="en"><head><style>
:root {
--main-bg-color: #f0f0f0;
--main-text-color: #333;
--primary-font: 'Arial', sans-serif;
--padding: 10px;
--blue: #0044cc;
--header-text: #fff;
--container-bg: #fff;
}
body {
background-color: var(--main-bg-color);
color: var(--main-text-color);
font-family: var(--primary-font);
padding: var(--padding);
}
header {
background-color: var(--blue);
color: var(--header-text);
padding: var(--padding);
}
.container {
background-color: var(--container-bg);
padding: var(--padding);
}
</style></head><body><header><h1>Welcome to My Website</h1></header><div class="container"><p>
This is a container with a background color
defined using variables.
</p></div></body></html></pre>
Custom Property Fallback Values
We can define custom properties with fallback values to ensure that your CSS code is still valid and works even if the variable is not defined.
Fallback values are not used to make CSS custom properties work in older browsers. They are only used as a backup in browsers that support CSS custom properties, in case the variable is not defined or has an invalid value.
Example
In below example, we have only defined color shade for white, But are also using black variable. Since we are defining fallback-value for black color variable, there will not be any error.
<!DOCTYPE html><html><head><style>
:root {
--white-color: #f0f0f0;/* Shade for white */
/* Custom Property for black is not defined */
}
.box {
text-align: center;
padding: 20px;
background-color: var(--white-color, white);
color: var(--black-color, black);
}
.box1, .box2 {
display: inline-block;
background-color: var(--black-color, black);
color: var(--white-color, white);
width: 100px;
height: 50px;
}
</style></head><body><div class="box"><h2>Tutorialspoint</h2><p> How to code a website using HTML and CSS </p><div class="box1"> HTML </div><div class="box2"> CSS </div></div></body></html></pre>
Inheritance of Custom Properties
In CSS, custom properties are inherited by default from parent elements to child element. Any variable declared on a parent element will be available to all its descendants unless overridden.
.container{--main-bg-color: black;--text-color: white;}.child{/* Use inherited value from parent for background color*/background-color:var(--main-bg-color);/* Overrides the parents value for text color*/--text-color: lightgrey;color:var(--main-bg-color);}
Example
The following example demonstrates that the use of CSS custom properties with inheritance.
<!DOCTYPE html><html><head><style>
:root {
--white-color: #f0f0f0;
--black-color: rgb(0, 0, 21);
}
.box {
--box-background: var(--white-color);
background-color: var(--box-background);
text-align: center;
padding: 20px;
}
.box1, .box2 {
display: inline-block;
background-color: var(--black-color);
/* Box Background is defined at parent box */
color: var(--box-background);
width: 100px;
height: 50px;
}
</style></head><body><div class="box"><h2>Tutorialspoint</h2><p> How to code a website using HTML and CSS </p><div class="box1"> HTML </div><div class="box2"> CSS </div></div></body></html></pre>
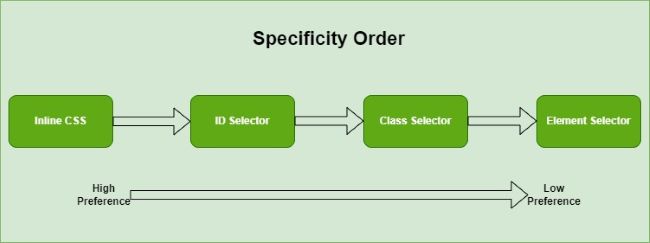
Imagine what will happen if we declare a property multiple times in CSS using different selectors. CSS uses specificity order for selectors in order to determine which selector have highest preference to be used.
For instance, if two or more CSS rules are specified on an HTML element using a class selector and ID selector, the property declared in the selector with highest specificity value(in this case Id selector) will be applied on that element.
Specificity Hierarchy
Every selectors in CSS have a specificity level. Following are specificity order of CSS selectors.
Inline Styles: The styles defined for an element using style attribute have highest priority.
<h1 style="color: blue;"> Example </h1>
Id Selectors: In Selectors, id selector have highest priority.
<style>
#mainDiv {
color: blue;
}
</style>
Classes, Attributes and Pseudo-classes: These are the next in line. Class selectors are prefixed with a ., attribute selectors use square brackets [], and pseudo-classes are prefixed with :
<style>
.subDivs {
color: blue;
}
</style>
Elements and Pseudo-elements: These have the lowest specificity. Element selectors use the element name directly, and pseudo-elements are prefixed with ::.
<style>
div {
color: blue;
}
</style>
How to Calculate Specificity?
To calculate specificity value you need memorize this values. Inline style gets a specificity value of 1000. ID selector gets a value of 100. For class selector, attribute selector and pseudo-classes the specificity value is 10. Finally for element selector and pseudo element specificity value is 1. Universal selectors does not have specificity value, we can consider value 0 for comparison purpose.
Selector
Specificity
Calculation
<div style=”color: green”></div>
1000
1000
#uniqueId
100
100
.mainClass
10
10
div
1
1
div #uniqueId
101
100+1
div .mainClass
11
10+1
div .mainClass .navbar
21
10+10+1
div #uniqueId .navbar
111
100+10+1
Specificity Rules Examples
Below example code will illustrate the CSS Specificity.
Selector with highest specificity value will take Effect
Following example uses multiple selectors to apply color property to a paragraph, In first case id selector take effect and in second case inline CSS take effect.
<!DOCTYPE html><html><head><style>
/*Multiple selectors for paragraph */
p {
color: black;
font-weight: bold;
}
.special {
color: blue;
}
#unique {
color: darkgreen;
}
</style></head><body><p id="unique" class="special">
This paragraph will be darkgreen. Id selector wins!!!!
</p><p class="special">
This paragraph will be blue. Class selector wins!!!!
</p><p class="special" style="color: darkblue;">
This paragraph will be darkblue. Inline style wins!!!!
</p></body></html></pre>
Equal specificity value, latest rule Wins
Following example shows that when two class selector target same paragraph and try to apply same style to it, the last defined class take effect.
<!DOCTYPE html><html><head><style>
p {
color: black;
font-weight: bold;
}
.special {
color: blue;
}
.superSpecial{
color: gold;
}
</style></head><body><p class="special superSpecial">
This paragraph is gold color. Class superSpecial wins!!!
</p></body></html></pre>
Internal CSS style Preferred over External Stylesheet
The selector defined using style tag inside a HTML document have higher preference over externally imported stylesheet.
/*From imported external CSS file:*/
#uniqueID {
color: red;
}
/*In HTML file:*/
<style>
#uniqueID {
color: yellow;
}
</style>
Yellow color will be set for element.
Override Specificity Rules
Following example demonstrates that the order of specificity gets irrelevant if a property is marked as !important.
Example
<!DOCTYPE html><html><head><style>
p {
color: black;
font-weight: bold;
}
.special {
color: blue;
}
#unique {
color: darkgreen;
}
p {
color: darkred !important;
}
</style></head><body><p id="unique" class="special">
This paragraph is darkred. The !important keyword wins
over every other selector!!!
</p><p class="special" style="color: green">
This paragraph is darkred. The !important keyword wins
even over inline style!!!
</p></body></html></pre>
CSS provides several properties to style images in a HTML webpages. In this tutorial we will learn how to style any type of image using CSS properties.
Table of Contents
How Style an Image in CSS
CSS Image Opacity
CSS Image Filter
CSS Image Shadow Effect
CSS Image As Background
CSS Image Border
CSS Image As Border
Position Text in Image
CSS Image Object Fit
Center an Image
Image Hover Overlay Effect
How Style an Image in CSS?
Setting the Size: In CSS, height and width properties can be used to adjust size of images in a webpage.
Style the Border: Borders with right thickness and color make image stand out. In CSS, border property can be used to set border color, style and thickness.
Shadow Effect: Adding a shadow effect around image using box-shadow property enhances image style.
Hover Effect: Interactive styling like hover effect change the appearance of image when user hover the mouse over images. This can include changes in opacity, size (using transforms), or applying filters.
Responsive Design: To render multiple images you can use flex or grid layout systems and by using media query you can adjust layout based on user’s screen width.
Set Image Dimensions
The height and width property is used to set the dimensions for an image. These properties can have a value in length(pixels, em) or percentage.
Pixel Value: Set dimensions in pixels
Percentage Value: Percentage of parents elements dimensions to occupy.
Value ‘auto’: Allows to maintain original aspect ratio of image.
Example
Here is an example shows how to set dimensions for an image.
<!DOCTYPE html><html><body><h2>Dimensions in length - 100px</h2><img style="height: 100px; width: 100px;"
src="/css/images/orange-flower.jpg"
alt="orange-flower"><h2>Dimensions in percentage - 30%</h2><!-- Occupy 30% height and width of body --><img style="height: 30%; width: 30%;"
src="/css/images/orange-flower.jpg"
alt="orange-flower"><h2>Dimensions - auto</h2><!-- Height adjusted in such a way that aspect
ratio of image maintained for width 100px --><img style="height: auto; width: 100px;"
src="/css/images/orange-flower.jpg"
alt="orange-flower"></body></html></pre>
CSS Image Opacity
The opacity property in CSS is used to adjust the transparency of an element.
The opacity value can range from 0.0 (completely transparent) to 1.0 (completely opaque).
The filter property in CSS is used to apply visual effects to an element, such as blurring, inverting colors, adjusting brightness and contrast, or applying filters like grayscale.
In CSS, the box-shadow property used to add shadow effect around images.
A box shadow is described by horizontal and vertical offsets relative to the element, blur and spread radius, and color. Following is the syntax of box-shadow:
img{box-shadow: inset horizontal vertical
blur-radius spread-color;}</pre>
Example
In this example we will create positive and negative shadows.
<!DOCTYPE html><html><head><style>
img{
object-fit: none;
height: 50px;
width: auto;
}
.img2{
box-shadow: 20px 20px 10px
rgb(247, 174, 187);
}
.img3{
box-shadow: -20px 20px 10px
rgb(247, 174, 187);
}
</style></head><body><h3>Box shadow on image: None</h3><img src="/css/images/scenery2.jpg"><h3>Box shadow on image</h3><img class="img2" src="/css/images/scenery2.jpg"><h3>Box shadow on image:negative value</h3><img class="img3" src="/css/images/scenery2.jpg"></body></html></pre>
CSS Image As Background
CSS allows an image to be set as a background for another element like div, span, body, paragraph etc.
The background-image property is used to set one or more than one image as a background.
Note: You can add multiple images as background. You just need to separate the images using comma.
Example
In this example we set background image for body.
<!DOCTYPE html><html lang="en"><head><style>
div{
background-color: rgba(255, 255, 255);
opacity: 70%;
padding: 20px;
}
body {
background-image: url(/css/images/logo.png);
height: 350px;
}
</style></head><body><div><h1>Welcome to My Website</h1><p>
This is an example of setting a
background image using CSS
</p></div></body></html></pre>
CSS Image Border
The border property is used to set style(solid or dashed), thickness and color for border of an image.
The border-radius property in CSS is used to define the rounded corners for border of an image. By adjusting the border-radius value, you can control the degree of roundness for each corner of an element or make them fully circular.
CSS also allows to set images as borders for other element like div, span, body, paragraph etc using border-image property .
Example
In this example we set border image for div.
<!DOCTYPE html><html lang="en"><head><style>
div{
background-color: #f0f0f0;
border: 20px solid transparent;
border-image: url(/css/images/border.png) 40;
padding: 20px;
}
body {
height: 350px;
}
</style></head><body><div><h1>Welcome to My Website</h1><p>
This is an example of setting a
background image using CSS
</p></div></body></html></pre>
Position Text in an Image
In CSS position property can be used to position text in different locations inside an image.
First we need to set position property for image container as position: relative and position property of text as position: absolute. Now you can position of text elements using top, left, right and bottom properties.
Example
<!DOCTYPE html><html><head><style>
.container {
position: relative;
border: 2px solid #ef2c2c;
}
.center {
position: absolute;
top: 45%;
width: 100%;
text-align: center;
}
.top-left {
position: absolute;
top: 12px;
left: 30px;
}
.top-right {
position: absolute;
top: 12px;
right: 30px;
}
.bottom-left {
position: absolute;
bottom: 12px;
left: 30px;
}
.bottom-right {
position: absolute;
bottom: 12px;
right: 30px;
}
img {
width: 100%;
opacity: 0.7;
}
</style></head><body><div class="container"><img src="/css/images/red-flower.jpg"
width="1000px" height="350px"><h3 class="center">
Text at Center
</h3><h3 class="top-left">
Text at Top Left
</h3><h3 class="top-right">
Text at Top Right
</h3><h3 class="bottom-left">
Text at Bottom Left</h3><h3 class="bottom-right">
Text at Bottom Right
</h3></div></body></html></pre>
CSS Image Object Fit
The object-fit property specifies how the image should be resized if its aspect ratio is not maintained. This property resizes an image to fit in its container.
Example
Here is an example that shows how to use this property.
CSS shape-outside property is used to define a shape around which inline content (such as text or images) should wrap. This property is particularly useful for creating non-rectangular or complex text wrapping shapes.
Possible Values
none − Inline content flows around the element’s margin box, while the float area remains unchanged.
margin-box − It represents the shape around the outside edge of the margin, with the corner radii specified by the border-radius and margin values.
content-box − It represents the shape around the outside edge of the content. The corner radius of the box is determined by taking the larger value between 0 and border-radius – border-width – padding.
border-box − It represents the shape around the outside edge of the border. The shape for the outside of the border follows the standard border radius shaping rule.
padding-box − It represents the shape around the outside padding edge. The shape for the inside of the border follows the standard border radius shaping rule.
<basic-shape> − The shape created with functions such as circle(), ellipse(), polygon(), or path() (introduced in the level 2 specification,) determines the float area.
url() − It identifies which image should be used to wrap text around.
linear-gradient() − To create gradient shapes that text and other inline content can wrap around.
The following example demonstrates the proeprty shape-outside: margin-box property defines that content should wrap around the outer edge of the element’s margin box −
Lorem ipsum dolor sit amet, consectetur adipiscing elit. Sed non arcu justo. Integer et ex ut justo auctor aliquam ac nec augue. Vivamus sit amet augue vitae mi scelerisque congue ac vel lacus.
</p><p>
Lorem ipsum dolor sit amet, consectetur adipiscing elit. Sed non arcu justo. Integer et ex ut justo auctor aliquam ac nec augue. Vivamus sit amet augue vitae mi scelerisque congue ac vel lacus.
</p></body></html></pre>
CSS shape-outside - content-box
The following example demonstrates the propertyshape-outside: content-box property defines that content should wrap around the element's content box −
Lorem ipsum dolor sit amet, consectetur adipiscing elit. Sed non arcu justo. Integer et ex ut justo auctor aliquam ac nec augue. Vivamus sit amet augue vitae mi scelerisque congue ac vel lacus.
</p><p>
Lorem ipsum dolor sit amet, consectetur adipiscing elit. Sed non arcu justo. Integer et ex ut justo auctor aliquam ac nec augue. Vivamus sit amet augue vitae mi scelerisque congue ac vel lacus.
</p></body></html>
CSS shape-outside - padding-box
The following example demonstrates the property shape-outside: padding-box property defines that content should wrap around the outer edge of the element's padding box −
Lorem ipsum dolor sit amet, consectetur adipiscing elit. Sed non arcu justo. Integer et ex ut justo auctor aliquam ac nec augue. Vivamus sit amet augue vitae mi scelerisque congue ac vel lacus.
</p><p>
Lorem ipsum dolor sit amet, consectetur adipiscing elit. Sed non arcu justo. Integer et ex ut justo auctor aliquam ac nec augue. Vivamus sit amet augue vitae mi scelerisque congue ac vel lacus.
</p></body></html>
CSS shape-outside - border-box
The following example demonstrates the property shape-outside: border-box defines the flow of the content around the shape defined by the outer border of the element −
Lorem ipsum dolor sit amet, consectetur adipiscing elit. Sed non arcu justo. Integer et ex ut justo auctor aliquam ac nec augue. Vivamus sit amet augue vitae mi scelerisque congue ac vel lacus.
</p><p>
Lorem ipsum dolor sit amet, consectetur adipiscing elit. Sed non arcu justo. Integer et ex ut justo auctor aliquam ac nec augue. Vivamus sit amet augue vitae mi scelerisque congue ac vel lacus.
</p></body></html>
CSS shape-outside - circle()
The following example demonstrates the property shape-outside: circle() property creates a circular shape, and the content wraps around the edge of the circle −
Lorem ipsum dolor sit amet, consectetur adipiscing elit. Sed ac mauris sit amet augue consectetur
vestibulum. Integer id tortor nec justo consequat laoreet. Aenean volutpat lacinia turpis at
facilisis. Proin in malesuada ligula, at cursus erat. Nullam vehicula justo in erat posuere
congue. Morbi bibendum purus sit amet libero sagittis, eu tincidunt augue congue.
</p></body></html>
CSS shape-outside - ellipse()
The following example demonstrates the property shape-outside: ellipse() property creates a ellipse shape, and the content wraps around the element's bounding box −
Lorem ipsum dolor sit amet, consectetur adipiscing elit. Sed ac mauris sit amet augue consectetur
vestibulum. Integer id tortor nec justo consequat laoreet. Aenean volutpat lacinia turpis at
facilisis. Proin in malesuada ligula, at cursus erat. Nullam vehicula justo in erat posuere
congue. Morbi bibendum purus sit amet libero sagittis, eu tincidunt augue congue.
Lorem ipsum dolor sit amet, consectetur adipiscing elit. Sed ac mauris sit amet augue consectetur
vestibulum.
</p></div></body></html></pre>
CSS shape-outside - url()
The following example demonstrates the property shape-outside: url() property allowing text to flow around the defined shape of the image −
Lorem ipsum dolor sit amet, consectetur adipiscing elit. Sed ac mauris sit amet augue consectetur
vestibulum. Integer id tortor nec justo consequat laoreet. Aenean volutpat lacinia turpis at
facilisis. Proin in malesuada ligula, at cursus erat. Nullam vehicula justo in erat posuere
congue. Morbi bibendum purus sit amet libero sagittis, eu tincidunt augue congue.
Lorem ipsum dolor sit amet, consectetur adipiscing elit. Sed ac mauris sit amet augue consectetur
vestibulum. Integer id tortor nec justo consequat laoreet. Aenean volutpat lacinia turpis at
facilisis. Proin in malesuada ligula, at cursus erat. Nullam vehicula justo in erat posuere
congue. Morbi bibendum purus sit amet libero sagittis, eu tincidunt augue congue.
</p></div></body></html>
CSS shape-outside - polygon()
The following example demonstrates that the shape-outside: polygon() creates a polygonal shape, and the content wraps around the element's bounding box −
Lorem ipsum dolor sit amet, consectetur adipiscing elit. Sed ac mauris sit amet augue consectetur
vestibulum. Integer id tortor nec justo consequat laoreet. Aenean volutpat lacinia turpis at
facilisis. Proin in malesuada ligula, at cursus erat. Nullam vehicula justo in erat posuere
congue. Morbi bibendum purus sit amet libero sagittis, eu tincidunt augue congue.
</p></div></body></html></pre>
CSS shape-outside - inset()
The following example demonstrates that the shape-outside: inset() property create rectangular shape, and the content wraps around the edge of the rectangle −
Lorem ipsum dolor sit amet, consectetur adipiscing elit. Sed ac mauris sit amet augue consectetur
vestibulum. Integer id tortor nec justo consequat laoreet. Aenean volutpat lacinia turpis at
facilisis. Proin in malesuada ligula, at cursus erat. Nullam vehicula justo in erat posuere
congue. Morbi bibendum purus sit amet libero sagittis, eu tincidunt augue congue.
</p></div></body></html>
CSS shape-outside - path()
The following example demonstrates that the shape-outside: path() property creates triangular shape and allowing text to flow around it −
Lorem ipsum dolor sit amet, consectetur adipiscing elit. Sed ac mauris sit amet augue consectetur
vestibulum. Integer id tortor nec justo consequat laoreet. Aenean volutpat lacinia turpis at
facilisis. Proin in malesuada ligula, at cursus erat. Nullam vehicula justo in erat posuere
congue. Morbi bibendum purus sit amet libero sagittis, eu tincidunt augue congue.
</p></div></body></html>
CSS shape-outside - linear-gradient()
The following example demonstrates that the shape-outside: linear-gradient() property allowing text to flow around the shape defined by linear-gradient −
<html><head><style>
.gradient-shape {
float: left;
width: 150px;
height: 150px;
background: linear-gradient(45deg, #fff 150px, red 150px);
shape-outside: linear-gradient(45deg, #fff 150px, red 150px);
margin-right: 20px;
Lorem ipsum dolor sit amet, consectetur adipiscing elit. Sed ac mauris sit amet augue consectetur
vestibulum. Integer id tortor nec justo consequat laoreet. Aenean volutpat lacinia turpis at
facilisis. Proin in malesuada ligula, at cursus erat. Nullam vehicula justo in erat posuere
congue. Morbi bibendum purus sit amet libero sagittis, eu tincidunt augue congue.
</p></div></body></html></pre>
CSS shape-outside - Related Properties
Following is the list of CSS properties related to shape-outside:
property
value
shape-margin
Adds margin to CSS shapes that are created with the shape-outside property.
shape-image-threshold
Sets the alpha channel threshold for shape extraction when using an image with the shape-outside property.
CSS mask property masks and displays an image at a particular position to partially or completely hide an element. The property is a shorthand for the CSS properties: mask-clip, mask-composite, mask-image, mask-mode, mask-origin, mask-position, mask-repeat and mask-size
It specifies an image for the mask layer for an element. Default value is none.
mask-mode
It specifies whether the mask layer image should be luminance mask or alpha mask. Default value is match-source.
mask-composite
It specifies a compositing operation used on the current mask layer with the below mask layers. Default value is add.
mask-clip
It specifies the area affected by a mask image. Default value is border-box.
mask-origin
It specifies the origin position of a mask layer image. Default value is border- box.
mask-position
It sets the starting position of a mask image relative to the mask position area. Default value is 0% 0%.
mask-repeat
It specifies how a mask image will be repeated. Default value is repeat.
mask-size
It specifies the size of the mask layer image. Default value is auto.
initial
It sets the property to its default value.
inherit
It inherits the property from the parent element.
Examples of CSS Mask Property
The following examples explain the mask property with different values.
Defining Multiple Values using Mask Property
The mask property is a shorthand property for eight properties. Some of the properties are optional and may not be needed. In the following example five properties’ values have been defined namely: mask-image, mask-mode, mask-repeat, mask-position and mask-size.
The mask property is a shorthand property for eight properties. These eight properties can be used individually to produce the same effect produced by the mask proeprty. Some properties have been used individually in the following example to show the same effect as in the above example.
CSS math functions allow you to perform mathematical calculations directly in your CSS stylesheets. These functions can be used to manipulate values such as lengths, angles, colors, and more.
div{width:calc(100% - 40px);/* 100% width minus 40px for padding */width:max(200px, 50%);/* Set width to the maximum value between
200px and 50% of the viewport width */}</pre>


Table of Contents
Types of Mathematical Functions in CSS
Math Functions
Basic Arithmetic Functions
Comparison Functions
Stepped Value Functions
Trigonometric Functions
Types of Mathematical Functions in CSS
There are several types of math functions that can be used in CSS. They include:
Basic Arithmetic Functions This includes the calc() function for performing calculations on numerical values.
Comparison Functions This includes functions like min(), max(), and clamp() for comparing variables.
Stepped Value Functions This includes the round() function for calculating a rounded number based on a rounding strategy.
Trigonometric Functions These functions, such as sin(), cos(), and tan(), introduce mathematical functions like sine, cosine, and tangent into stylesheets.
The calc Function
The calc() function is a basic arithmetic function in CSS that allows you to perform calculations on numerical values. It can be used to dynamically modify property values by carrying out mathematical operations like addition, subtraction, multiplication, and division.
Example
Here's an example that demonstrates the usage of the calc() function:
.box {
/* 100% width minus 40px for padding */
width: calc(100% - 40px);
/* 100% of viewport height minus 20px for padding */
height: calc(100% - 20px);
background-color: lightblue;
padding: 20px;
box-sizing: border-box;
}
</style></head><body><div class="container"><div class="box">
This box uses the CSS calc() function to dynamically
calculate its width and height.
</div></div></body></html></pre>
The max Function
The max() function is a comparison function in CSS that allows you to determine the maximum value from a given list of values. It can be used to compare variables and apply conditional styling based on the maximum value.
Example
Here's an example that demonstrates the usage of the max() function:
.box {
/* Set the width to the maximum value between
200px and 50% of the viewport width */
width: max(200px, 50%);
background-color: lightblue;
padding: 20px;
box-sizing: border-box;
}
</style></head><body><div class="container"><div class="box">
This box uses the CSS max() function to set its width
to the maximum value between 200px and 50% of the
viewport width.
</div></div></body></html></pre>
The min Function
The min() function is a comparison function in CSS that allows you to determine the minimum value from a given list of values. It can be used to compare variables and apply conditional styling based on the minimum value.
Example
Here's an example that demonstrates the usage of the min() function:
.box {
/* Set the width to the minimum value between
200px and 50% of the viewport width */
width: min(200px, 50%);
background-color: lightblue;
padding: 20px;
box-sizing: border-box;
}
</style></head><body><div class="container"><div class="box">
This box uses the CSS min() function to set its width
to the minimum value between 200px and 50% of the
viewport width.
</div></div></body></html></pre>
Comparison Functions
The assessment of values is made easier by CSS comparison functions, which allows conditional styling based on comparisons within stylesheets.
Following table lists comparison functions:
Function
Description
Example
min()
Determines the minimum value from a given set of values.
Try It
max()
Determines the maximum value from a given list of values.
Try It
clamp()
Calculates the central of a minimum, central, and maximum values.
Try It
Stepped Value Functions
Stepped value functions provide granular control in stylesheets by enabling exact changes and discrete jumps in property values in CSS.
Following table lists stepped value functions:
Function
Description
Example
round()
Calculates a rounded number based on a rounding strategy.
Try It
Trigonometric Functions
CSS trigonometric functions allow for more complex design alterations by introducing mathematical functions like sine, cosine, and tangent into stylesheets.
Following table lists trigonometric functions:
Function
Description
Example
sin()
Calculates the trigonometric sine of a number.
Try It
cos()
Calculates the trigonometric cosine of a number
Try It
tan()
Calculates the trigonometric tangent of a number.
Try It
asin()
Calculates the trigonometric inverse sine of a number.
Try It
acos()
Calculates the trigonometric inverse cosine of a number.
Try It
atan()
Calculates the trigonometric inverse tangent of a number.
Try It
atan2()
Calculates the trigonometric inverse tangent of two-numbers in a plane.
CSS value functions allow you to generate values for CSS properties dynamically. These functions take parameters and return a value that can be used in place of a static value.
The function name appears first in the value syntax, followed by a opening parenthesis (. The argument(s) come next, and a closing parenthesis ) completes the function.
Multiple parameters are accepted by functions, and their formatting is the same as that of CSS property values.
Though optional, whitespace is permitted inside parenthesis. Multiple arguments are separated by commas in certain functional notations and by spaces in others.
Transform Functions
The CSS data type called <transform-function> represents visual transformations and is employed as a value within the transform property.
Translate Functions
Following table lists translate functions:
Functions
Description
translateX()
Translates an element horizontally.
translateY()
Translates an element veritcally.
translateZ()
Translates an element along the z-axis.
translate()
Translates an element on the 2D plane.
translate3d()
Translates an element in 3D space.
Rotation Functions
Following table lists rotation functions:
Functions
Description
rotateX()
Rotates an element around the horizontal axis.
rotateY()
Rotates an element around the vertical axis.
rotateZ()
Rotates an element around the z-axis.
rotate()
Rotates an element around a fixed point on the 2D plane.
rotate3d()
Rotates an element around a fixed axis in 3D space.
Scaling Functions
Following table lists scaling functions:
Functions
Description
scaleX()
Scales an element up or down horizontally.
scaleY()
Scales an element up or down vertically.
scaleZ()
Scales an element up or down along the z-axis.
scale()
Scales an element up or down on the 2D plane.
scale3d()
Scales an element up or down in 3D space.
Skew Functions
Following table lists skew functions:
Functions
Description
skewX()
Skews an element in the horizontal direction.
skewY()
Skews an element in the vertical direction.
skew()
Skews an element on the 2D plane.
Matrix Functions
Following table lists matrix functions:
Functions
Description
matrix()
Describes a homogeneous 2D transformation matrix.
matrix3d()
Describes a 3D transformation as a 44 homogeneous matrix.
Perspective Functions
Following table lists perspective functions:
Functions
Description
perspective()
Sets the distance between the user and the z=0 plane.
Math Functions
Mathematical expressions can be used in CSS to represent numeric values using math functions.
Basic Arithmetic Functions
Following table lists basic arithmetic functions:
Function
Description
calc()
Performs basic arithmetic calculations on numerical values.
Comparision Functions
Following table lists comparision functions:
Function
Description
min()
Determines the minimum value from a given set of values.
max()
Determines the maximum value from a given list of values.
clamp()
Calculates the central of a minimum, central, and maximum values.
Stepped Value Functions
Following table lists stepped value functions:
Function
Description
round()
Calculates a rounded number based on a rounding strategy.
Trignometric Functions
Following table lists trignometric functions:
Function
Description
sin()
Calculates the trigonometric sine of a number.
cos()
Calculates the trigonometric cosine of a number
tan()
Calculates the trigonometric tangent of a number.
asin()
Calculates the trigonometric inverse sine of a number.
acos()
Calculates the trigonometric inverse cosine of a number.
atan()
Calculates the trigonometric inverse tangent of a number.
atan2()
Calculates the trigonometric inverse tangent of two-numbers in a plane.
Filter Functions
The CSS data type <filter-function> denotes a graphical effect capable of changing the look of an input image. It’s used within the filter and backdrop-filter properties.
Function
Description
blur()
Increases the image gaussian blur.
brightness()
Brightens or darkens an image..
contrast()
Increases or decreases the image contrast.
drop-shadow()
Applies a drop shadow behind an image.
grayscale()
Converts an image to grayscale.
hue-rotate()
Changes the overall hue of an image.
invert()
Inverts the colors of an image.
opacity()
Adds transparency to an image.
saturate()
Changes the overall saturation of an image.
sepia()
Increases the sepia of an image.
Color Functions
The CSS data type <color> defines various ways to represent colors.
Function
Description
rgb()
Specifies a given color according to its red, green, blue and alpha (transparency) components.
hsl()
Specifies a given color according to its hue, saturation, lightness and alpha (transparency) components.
hwb()
Specifies a given color according to its hue, whiteness and blackness components.
lch()
Specifies a given color according to its lightness, chroma and hue components.
oklch()
Specifies a given color according to its lightness, chroma, hue and alpha (transparency) components.
Specifies a given color according to its lightness, a-axis distance, b-axis distance in the lab colorspace and alpha (transparency).
color()
Specifies a particular, specified colorspace rather than the implicit sRGB colorspace
color-mix()
Mixes two color values in a given colorspace by a given amount.
Image Functions
The CSS data type <image> offers graphical representations of images or gradients.
Gradient Functions
Following table lists gradient functions:
Function
Description
linear-gradient()
Linear gradients transition colors progressively along an imaginary line.
radial-gradient()
Radial gradients transition colors progressively from a center point (origin).
conic-gradient()
Conic gradients transition colors progressively around a circle.
repeating-linear-gradient()
Is similar to linear-gradient() and takes the same arguments, but it repeats the color stops infinitely in all directions so as to cover its entire container.
repeating-radial-gradient()
Is similar to radial-gradient() and takes the same arguments, but it repeats the color stops infinitely in all directions so as to cover its entire container.
repeating-conic-gradient()
Is similar to conic-gradient() and takes the same arguments, but it repeats the color stops infinitely in all directions so as to cover its entire container.
Image Functions
Following table lists image functions:
Function
Description
image-set()
Picks the most appropriate CSS image from a given set, primarily for high pixel density screens.
cross-fade()
Blends two or more images at a defined transparency.
paint()
Defines an <image> value generated with a PaintWorklet.
Counter Functions
CSS counter functions can theoretically be used anywhere a <string> is available, however they are typically used in conjunction with the content property.
Function
Description
counter()
Returns a string representing the current value of the named counter if there is one.
counters()
Enables nested counters, returning a concatenated string representing the current values of the named counters, if there are any.
Shape Functions
The CSS data type <basic-shape> signifies a visual shape and is employed in properties such as clip-path, offset-path, and shape-outside.
Function
Description
circle()
Defines a circle shape.
ellipse()
Defines an ellipse shape.
inset()
Defines an inset rectangle shape.
polygon()
Defines a polygon shape.
path()
Accepts an SVG path string to enable a shape to be drawn.
Reference Functions
In order to reference a value defined elsewhere, the following functions are used as a value of properties.
Uses the user-agent defined as environment variable.
url()
Uses a file from the specified URL.
var()
Uses the custom property value instead of any part of a value of another property.
Grid Functions
The following functions are used to define a CSS Grid.
Function
Description
fit-content()
Clamps a given size to an available size according to the formula min(maximum size, max(minimum size, argument)).
minmax()
Defines a size range greater-than or equal-to min and less-than or equal-to max.
repeat()
Represents a repeated fragment of the track list, allowing a large number of columns or rows that exhibit a recurring pattern.
Font Functions
Alternate glyph usage is managed through the use of CSS font functions in combination with the font-variant-alternates property.
Function
Description
stylistic()
This function activates stylistic alternates for certain characters using a font-specific name associated with a number.
styleset()
This function activates stylistic alternatives for groups of characters. The parameter is a font-specific name associated with a number, such as ss02.
character-variant()
This function allows distinct stylistic variations for individual characters, unlike styleset(), which creates coherent glyphs for a character set.
swash()
This function activates swash glyphs with a font-specific name associated with a number, e.g. swsh 2 and cswh 2.
ornaments()
This function activates ornaments such as fleurons and dingbat glyphs using a font-specific name associated with a number, such as ornm 2.
annotation()
This function allows annotations such as circled digits or inverted characters using a font-specific name associated with a number, for example, nalt 2
Easing Functions
The values for transition and animation properties come from the following functions.
Function
Description
linear()
Easing function that interpolates linearly between its points..
cubic-bezier()
Easing function that defines a cubic Bzier curve.
steps()
Iteration along a specified number of stops along the transition, displaying each stop for equal lengths of time.
Media queries in CSS are used to apply different CSS styles based on the screen size, resolution, and other characteristics of the user device. Media queries uses @media rule to include a extra block of CSS properties when a certain conditions are met. Media queries can also be used to style printable version of page separately.
Syntax
@media not|only mediatype and (media feature) and (media feature){
CSS-Code;}</pre>


Here, media-type can be things like screen, print, speech, etc., and media-feature can be characteristics such as width, height, aspect ratio, orientation, and more.


You might have noticed that the same website looks different on mobile and desktop devices. This type of screen depended styling is achieved using CSS media queries. In this tutorial, we will learn about media queries and the properties associated with them.


Table of Contents
Media Types
CSS Media Type Print
CSS Media Type Screen
CSS Media Type All
Width Ranges for Media Queries
Combining CSS Media Queries
CSS Media Type With Only
CSS Media Queries AND Operator
Media Queries NOT Operator
Creating Complex Media Query
Media Queries Screen Orientation
List of Media Queries Features
Media Types
Media types are used in CSS media queries to apply different styles based on device. The most common media types are all, print, and screen. If you don't specify a media type, it matches all devices.
all: Default Value. This value applies to all media types.
print: This value is only valid when printing the document.
screen: This value is only valid for screens, such as computers, tablets, and smartphones.
JavaScript provides a CSS object model interface called CSSMediaRule, which can be used to access the rules created using the @media CSS at-rule.
CSS Media Type Print
Sometimes the print version generated for user doesn't require all the styling shown in screen. The print version generally generated in grayscale style or with simple light colors. This type of designing is recommended, as dark backgrounds will consume more ink from printer.
Example
Following example demonstrates use of a CSS media query with the media type print.
<!DOCTYPE html><html><head><style>
body{
background-color: black;
color: white;
padding: 10px;
}
@media print {
body {
background-color: white;
color: black;
padding: 10px;
}
}
button {
background-color: aqua;
padding: 5px;
}
</style></head><body><h3> Tutorialspoint </h3><p>CSS Media Type - Print</p><p>
Background is white for printable version of this page.
Check out...
</p><button onclick="printPage()">Print Page</button><script>
function printPage() {
window.print();
}
</script></body></html></pre>
CSS Media Type All
This is used to specify common styling that used in all screen sizes, printable version and other versions.
Example
The following example demonstrates the use of a CSS media query with the media type all
<!DOCTYPE html><html><head><style>
@media all {
body{
background-color: black;
color: white;
padding: 10px;
}
}
</style></head><body><h3>Tutorialspoint </h3><p> CSS Media Type - All </p><p>
In printable version or any screen size, the
styles of this page is same.
</p><button onclick="printPage()">
Print Page
</button><script>
function printPage() {
window.print();
}
</script></body></html></pre>
CSS Media Type Screen
This value is only valid for screens, such as computers, tablets, and smartphones.
Example
The following example demonstrates that if the screen size is greater than 500px, the background color changes to pink and text color changes to blue
<!DOCTYPE html><html><head><style>
.container {
display: flex;
flex-direction: row;
padding: 10px;
gap: 10px;
}
.child{
padding: 10px;
background-color: #f0f0f0;
border: 2px solid;
}
@media screen and (max-width: 500px) {
.container {
flex-direction: column;
}
}
</style></head><body><p>
Orientation of child elements depend on screen size,
for screen size less than 500px, children align in
two different columns.
</p><div class="container"><div class="child" > HTML </div><div class="child"> CSS </div></div></body></html></pre>
Width Ranges for Media Queries
In media Queries, you can also specify screen width range like this.
@media (width > 700px){/* Styles for screens that are at least 700px wide */}
Example
The following example demonstrates that when the screen width is between 600px and 800px, the background color changes to yellow and text color changes to red.
<!DOCTYPE html><html><head><style>
p {
color: blue;
}
@media (600px < width < 800px) {
p {
background-color: yellow;
color: red;
}
}
</style></head><body><h1>Tutorialspoint</h1><p>CSS Media Type - Screen</p><p>Resize the browser size to see the effect.</p></body></html></pre>
Comma Separated Media Types
A comma in media query is similar to logical 'OR' operator.
The following declaration will applying to screen width less than 500px or for printable versions. You can also use OR operator instead of comma.
@media (min-width: 500px), print{/* Styles */}
Example
The following example demonstrates using media types with comma separation. The background color changes when in print mode and also for screen size is > 500px
<!DOCTYPE html><html><head><style>
body {
background-color: white;
color: black;
}
@media (min-width: 500px), print {
body {
background-color: black;
color: white;
}
}
button {
background-color: violet;
padding: 5px;
}
</style></head><body><h1>CSS Media Type - Screen and Print</h1><p>
Resize the window to less than 500px to see the
background and font color changes to default.
</p><p>
Click on below button to see the effect when you
print the page. ( Enable background graphics options
if any at print section )
</p><button onclick="printPage()">Print Page</button><script>
function printPage() {
window.print();
}
</script></body></html></pre>
CSS Media Type With Only
Media Type With Only applies the style only if the entire media query matches. This can be helpful to prevent older browsers from applying styles.
Example
The following example demonstrates that when the screen width is between 500px and 700px, the background color changes to pink and text color changes to blue
<!DOCTYPE html><html><head><style>
body {
color: red;
}
@media only screen and (min-width: 500px) and (max-width: 700px) {
body {
color: blue;
background-color: pink;
}
}
</style></head><body><h1>Tutorialspoint</h1><p>CSS Media Type - Screen</p><p>
Resize the browser window to see the effect.
</p></body></html>
CSS Media Queries AND Operator
The AND operator is used to combine multiple conditions in a media query. Both conditions must be true for the styles to apply.
Example
This example demonstrates when screen width is between 500px and 700px, style will be added.
body {
background-color: lightgray;
color: black;
}
@media (min-width: 500px) and (max-width: 700px) {
body {
background-color: lightgreen;
color: blue;
}
}
</style></head><body><h1> Media Query with AND Operator</h1><p>
Resize the browser window between 500px and 700px
to see the effect.
</p></body></html></pre>
Media Queries NOT Operator
The NOT operator negates a media query, applying the styles only if the media query does not match.
The NOT operator is evaluated last in a media query, so the above media query would be evaluated as follows:
@media not (all and (monochrome)){/* */}/* It's not evaluated like this:*/@media (not all) and (monochrome){/* */}
Example
In this example NOT operator negate the condition width < 700.
body {
background-color: lightgray;
color: black;
}
@media not screen and (width < 700px) {
body {
background-color: orange;
color: white;
}
}
</style></head><body><h1> Media Query with NOT Operator </h1><p>
Resize the browser window to less than 700px
to see the effect.
</p></body></html></pre>
Creating Complex Media Query
You can create complex media queries by combining multiple conditions using the and, not, and only operators. You can also combine multiple media queries into a comma-separated list.
Example
In this example we combined multiple media queries, try changing browser width to see multiple effects.
<!DOCTYPE html><html><head><style>
body {
background-color: lightgray;
color: black;
}
@media only screen and (min-width: 500px) and (max-width: 700px) {
body {
background-color: pink;
color: blue;
}
}
@media not screen and (max-width: 700px) {
body {
background-color: orange;
color: white;
}
}
</style></head><body><h1>
Media Query with AND, NOT, and ONLY Operators
</h1><p>
Resize the browser window to see the effects.
</p></body></html></pre>
CSS Media Queries For Screen Orientation
We can define style for specific orientation (landscape or portrait) of user device. The default value for this is portrait.
@media (orientation: portrait){/* Styles */}
Example
The following example demonstrates that when the screen width is greater than 500px and the device is in landscape orientation, the text color changes to blue
<!DOCTYPE html><html><head><style>
body {
color: red;
}
@media (min-width: 500px) and (orientation: landscape) {
body {
color: blue;
}
}
</style></head><body><h3>Resize the browser window to see the effect.</h3><p>
The text color changed to blue when the viewport width is
at least 500px and the device is in landscape orientation.
</p></body></html></pre>
List of Media Queries Features
CSS media queries feature is used to apply different styles to the webpage based on the a specific characteristic, output device, or environment.
Following is the list of CSS properties related to media features:
Media Features
Description
Example
any-hover
To check if any of the user's input devices can hover over elements on the page.
Try It
any-pointer
To determine if the user has a pointing device such as mouse and whether that device is accurate or not.
Try It
aspect-ratio
To check the aspect ratio of the viewport or the rendering surface.
Try It
color
To specify the desired number of bits per color component of the output device.
Try It
color-gamut
To apply different styles to your web page depending on the range of colors that the user's device can display.
Try It
color-index
To check how many colors a device can display.
Try It
device-aspect-ratio
To check the aspect ratio between the width and height of an output device. This media feature is obsolete and rarely used. Instead, use the aspect-ratio media feature.
Try It
device-height
To check height of the output device's display area. This media feature is obsolete and rarely used. Instead, use the height media feature.
Try It
device-width
To check width of the output device's display area. This media feature is obsolete and rarely used. Instead, use the width media feature.
Try It
display-mode
To detect and style web content based on the current display mode of a web application. ( fullscreen | standalone | minimal-ui | browser | window-controls-overlay )
Try It
dynamic-range
To check whether the user agent and output device supports the high brightness, contrast ratio, and color depth.
Try It
forced-colors
To check the user has enabled a forced colors mode on their device.
Try It
grid
To check if the user device or screen supports a grid layout.
Try It
height
To determine the height of the viewport.
Try It
hover
To determine if the user's device is able to hover over elements.
Try It
monochrome
To determine the number of bits are used to represent each pixel in the monochrome frame buffer of the output device.
Try It
orientation
To check whether the device's screen or page is in a portrait or landscape orientation.
CSS Variables are custom properties that allows you to store and reuse values throughout your CSS program. CSS variables are similar to variables in other programming languages.
Table of Contents
How to declare a Variable in CSS?
The Traditional Way
Using CSS Variables
The Root Pseudo-Class
Inheritance of Custom Properties
CSS Variables Fallback Value
CSS Variables Invalid Value
CSS Variables in Javascript
How to declare a Variable in CSS?
CSS variables are typically defined using :root selector. Following is syntax to declare a CSS variable:
We can use the var function to replace values for CSS properties on any elements.
CSS does not allow variables to be used in media queries or container queries, Also you cannot use them to set the name of a CSS property or selector.
The Traditional Way
In this example we will see how the colors and styling done without using variable. Here you can notice that we are repetitively specifying property values.
.container {
background-color: #fff;
padding: 10px;
}
</style></head><body><header><h1>Welcome to My Website</h1></header><div class="container"><p>
This is a container with a background color
defined traditionally. Here we need to specify
repeating color values multiple times.
</p></div></body></html></pre>
Using CSS Variables
The following code shows how to use variables to avoid redundancy in CSS. This become more relevant when working on large code bases in real world application.
Here you can also see that we defined the color '#0044cc' as blue, So developer can repetitively use this color by using variable blue.
Example
<html lang="en"><head><style>
:root {
--main-bg-color: #f0f0f0;
--main-text-color: #333;
--primary-font: 'Arial', sans-serif;
--padding: 10px;
--blue: #0044cc;
--header-text: #fff;
--container-bg: #fff;
}
body {
background-color: var(--main-bg-color);
color: var(--main-text-color);
font-family: var(--primary-font);
padding: var(--padding);
}
header {
background-color: var(--blue);
color: var(--header-text);
padding: var(--padding);
}
.container {
background-color: var(--container-bg);
padding: var(--padding);
}
</style></head><body><header><h1>Welcome to My Website</h1></header><div class="container"><p>
This is a container with a background color
defined using variables.
</p></div></body></html></pre>
The Root Pseudo-Class
CSS variables are declared at the top of the stylesheet using the :root pseudo-class, which matches the root element of the document. This means that CSS variables declared using the :root selector can be used by any element in the document.
CSS variable names are case-sensitive, which means that --pink-color and --Pink-color are two different variables.
Step-1: Define the custom properties
To declare variables using the :root pseudo-class, you simply add the '--' prefix to the variable name and then set its value.
:root{--pink-color: pink;--blue-color: blue;}
Step-2: Use the custom properties in the CSS
These variables can then be used throughout your CSS code using the var() function.
The following example demonstrates that the use of CSS custom properties with inheritance.
<html><head><style>
:root {
--white-color: #f0f0f0;
--black-color: rgb(0, 0, 21);
}
.box {
--box-background: var(--white-color);
background-color: var(--box-background);
text-align: center;
padding: 20px;
}
.box1, .box2 {
display: inline-block;
background-color: var(--black-color);
/* Box Background is defined at parent box */
color: var(--box-background);
width: 100px;
height: 50px;
}
</style></head><body><div class="box"><h2>Tutorialspoint</h2><p> How to code a website using HTML and CSS </p><div class="box1"> HTML </div><div class="box2"> CSS </div></div></body></html></pre>
CSS Variables Fallback Value
You can use CSS variables with fallback values to ensure that your CSS code is still valid and works even if the variable is not defined.
CSS fallback values are not used to make CSS custom properties work in older browsers. They are only used as a backup in browsers that support CSS custom properties, in case the variable is not defined or has an invalid value.
Example
In below example, we have only defined color shade for white, But are also using black variable. Since we are defining fallback-value for black color variable, there will not be any error.
<html><head><style>
:root {
--white-color: #f0f0f0;/* Shade for white */
/* variable for black not defined */
}
.box {
text-align: center;
padding: 20px;
background-color: var(--white-color, white);
color: var(--black-color, black);
}
.box1, .box2 {
display: inline-block;
background-color: var(--black-color, black);
color: var(--white-color, white);
width: 100px;
height: 50px;
}
</style></head><body><div class="box"><h2>Tutorialspoint</h2><p> How to code a website using HTML and CSS </p><div class="box1"> HTML </div><div class="box2"> CSS </div></div></body></html></pre>
CSS Variables Invalid Value
In below example, the --red-color custom property is defined with a value of 15px. This is an invalid value because the red color property only accepts color values.
However, the browser will not be able to resolve the value of the custom property because it is invalid. As a result, it will simply ignore the CSS rule and the text in the second h2 element will remain the same color.
Example
In this example even though we are making color of h2 as red using color property, due to error caused by invalid color the default color black is used.
<html><head><style>
:root {
/* define a invalid value for c0lor */
--red-color: 15px;
}
h2 {
/* Make color of h2 as red */
color: red;
}
h2 {
/* Use invalid color for h2, this will cause error
and default color value (black) is used */
color: var(--red-color);
}
</style></head><body><h2>
Tutorialspoint CSS Variables.
</h2></body></html></pre>
CSS Variables in Javascript
The following example demonstrates that how to use JavaScript to set CSS variables globally and locally.
Example
<html><head><style>
.box {
text-align: center;
padding: var(--padding);
background-color: var(--white-color);
color: var(--black-color);
}
.box1, .box2 {
display: inline-block;
background-color: var(--black-color);
color: var(--white-color);
width: 100px;
height: 50px;
}
</style></head><body><div class="box"><h2>Tutorialspoint</h2><p>How to code a website using HTML and CSS</p><div class="box1">HTML</div><div class="box2">CSS</div></div><script>
const root = document.documentElement;
const boxElement = document.querySelector('.box');
// Define a global variable
root.style.setProperty('--padding', '20px');
// Define variables specific to the box element
boxElement.style.setProperty('--white-color', '#f0f0f0');
boxElement.style.setProperty('--black-color', 'rgb(0, 0, 21)');
</script></body></html></pre>
CSS pagination is a technique of creating page numbers for a website. This help users to easily navigate between large amounts of content. In this chapter, we will learn how to setup and style pagination using CSS.
CSS Pagination Example
Here is a example of pagination styled using CSS.
12345
First Page
Table of Contents
Setup Pagination For a Website
Simple Pagination Example
Styling Pagination Using CSS
Rounded Pagination Buttons
Hoverable Transition Effect
Bordered Pagination
Space Between Links
Pagination Size
Centered Pagination
Next and Previous Buttons
Breadcrumb Pagination
Pagination With List
How to Setup Pagination For a Website?
To set up pagination for a website, you need to break your content into small pages and provide navigation to move between them in every page. Let’s see step by step procedure for setting up pagination.
Setup HTML Structure
First we need to set HTML structure for pagination setup. We can use anchor tags enclosed in div elements for this. Following is code for HTML structure of a pagination setup.
Initially all the pages should be invisible, expect the first page. For this, we can use display property as none for all pages. As class “active” is added to first page, it will be visible initially.
Now, we need to add some JavaScript to handle pagination logic. We can capture click event on pagination links using JavaScript addEventListener() method and change visibility of pages based on that.
Simple Pagination Example
The example belows shows simple pagination setup developed using the above steps.
// Remove 'active' class from all content pages
contentPages.forEach(p => p.classList.remove('active'));
// Find the target page and display it
const targetPage = document.querySelector(this.getAttribute('href'));
if (targetPage) {
targetPage.classList.add('active');
}
// Add 'active' class to the clicked link
this.classList.add('active');
});
});
});
</script></body></html></pre>
Styling Pagination Using CSS
To style pagination links, we can use pseudo-class :active and :hover.
Pseudo-class :active Can be used to highlight current page in pagination links.
Pseudo-class :hover Can be used to style mouse hover states of pagination link.
The following example shows how these properties can enhance appearance of pagination links.
Breadcrumb pagination is a navigation method that shows users the path theyve taken to reach their current page. Let's see an example to design breadcrumb pagination.
Example
<!DOCTYPE html><html><head><style>
ul.breadcrumb-pagination {
padding: 10px;
list-style: none;
background-color: pink;
}
ul.breadcrumb-pagination li {
display: inline-block;
}
ul.breadcrumb-pagination li a {
color: blue;
}
ul.breadcrumb-pagination li+li:before {
padding: 10px;
content: "/\00a0";
}
</style></head><body><ul class="breadcrumb-pagination"><li><a href="#">Tutorialspoint</a></li><li><a href="#">CSS Pagination</a></li><li class="active-link">CSS Pagnation With Breadcrumb</li></ul></body></html></pre>
Pagination With List
We can also use unordered list (<ul>) and list items (<li>) for creating the pagination. Let see an example.