Python’s standard library has a rich collection of modules for data compression and archiving. One can select whichever is suitable for his job.
There are following modules related to data compression −
Python’s standard library has a rich collection of modules for data compression and archiving. One can select whichever is suitable for his job.
There are following modules related to data compression −
A given problem may be solved by more than one alternative algorithms. Hence, we need to optimize the performance of the solution. Python’s timeit module is a useful tool to measure the performance of a Python application.
The timit() function in this module measures execution time of your Python code.
timeit.timeit(stmt, setup, timer, number)
The following statement uses list comprehension to return a list of multiple of 2 for each number in the range upto 100.
>>>[n*2for n inrange(100)][0,2,4,6,8,10,12,14,16,18,20,22,24,26,28,30,32,34,36,38,40,42,44,46,48,50,52,54,56,58,60,62,64,66,68,70,72,74,76,78,80,82,84,86,88,90,92,94,96,98,100,102,104,106,108,110,112,114,116,118,120,122,124,126,128,130,132,134,136,138,140,142,144,146,148,150,152,154,156,158,160,162,164,166,168,170,172,174,176,178,180,182,184,186,188,190,192,194,196,198]
To measure the execution time of the above statement, we use the timeit() function as follows −
>>>from timeit import timeit
>>> timeit('[n*2 for n in range(100)]', number=10000)0.0862189000035869
Compare the execution time with the process of appending the numbers using a for loop.
>>> string ='''
... numbers=[]
... for n in range(100):
... numbers.append(n*2)
... '''>>> timeit(string, number=10000)0.1010853999905521
The result shows that list comprehension is more efficient.
The statement string can contain a Python function to which one or more arguments My be passed as setup code.
We shall find and compare the execution time of a factorial function using a loop with that of its recursive version.
The normal function using for loop is −
deffact(x): fact =1for i inrange(1, x+1):return factfact*=i
Definition of recursive factorial.
defrfact(x):if x==1:return1else:return x*fact(x-1)
Test these functions to calculate factorial of 10.
print("Using loop:",fact(10))print("Using Recursion",rfact(10))
Result
Using loop:3628800
Using Recursion 3628800
Now we shall find their respective execution time with timeit() function.
import timeit

setup1="""
from __main__ import fact
x = 10
"""

setup2="""
from __main__ import rfact
x = 10
"""print("Performance of factorial function with loop")print(timeit.timeit(stmt ="fact(x)", setup=setup1, number=10000))print("Performance of factorial function with Recursion")print(timeit.timeit(stmt ="rfact(x)", setup=setup2, number=10000))
Performance of factorial function with loop
0.00330029999895487
Performance of factorial function with Recursion
0.006506800003990065
The recursive function is slower than the function with loop.
In this way, we can perform performance measurement of Python code.
Output formatting in Python is used to make your code more readable and your output more user-friendly. Whether you are displaying simple text strings, complex data structures, or creating reports, Python offers several ways for formatting output.
These ways include using −
Additionally, Python’s “textwrap” and “pprint” modules offer advanced functionalities for wrapping text and pretty-printing data structures.
We can format output using the string modulo operator %. This operator is unique to strings and makes up for the pack of having functions from C’s printf() family. Format specification symbols like %d, %c, %f, and %s are used as placeholders in a string, similar to those in C.
Following is a simple example −
print("My name is %s and weight is %d kg!"%('Zara',21))
It will produce the following output −
My name is Zara and weight is 21 kg!
We can format output using the format() method, which was introduced in Python 3.0 and has been backported to Python 2.6 and 2.7.
The format() method is part of the built-in string class and allows for complex variable substitutions and value formatting. It is considered a more elegant and flexible way to format strings compared to the string modulo operator.
The general syntax of format() method is as follows −
str.format(var1, var2,...)
The method returns a formatted string.
The string itself contains placeholders {} in which values of variables are successively inserted.
name="Rajesh"
age=23print("my name is {} and my age is {} years".format(name, age))
It will produce the following output −
my name is Rajesh and my age is 23 years
You can use variables as keyword arguments to format() method and use the variable name as the placeholder in the string.
print("my name is{name}and my age is{age}
years".format(name="Rajesh", age=23))
F-strings, or formatted string literals, are a way to format strings in Python that is simple, fast, and easy to read. You create an f-string by adding an f before the opening quotation mark of a string.
Inside the string, you can include placeholders for variables, which are enclosed in curly braces {}. The values of these variables will be inserted into the string at those places.
In this example, the variables “name” and “age” are inserted into the string where their placeholders “{name}” and “{age}” are located. F-strings make it easy to include variable values in strings without having to use the format() method or string concatenation −
name ='Rajesh'
age =23

fstring =f'My name is {name} and I am {age} years old'print(fstring)
It will produce the following output −
My name is Rajesh and I am 23 years old
You can also specify C-style formatting symbols. The only change is using :instead of %. For example, instead of %s use {:s} and instead of %d use {:d}as shown below −
name ="Rajesh"
age =23print("my name is {:s} and my age is {:d} years".format(name, age))
You will get the output as shown below −
my name is Rajesh and my age is 23 years
The Template class in string module provides an alternative method to format the strings dynamically. One of the benefits of Template class is to be able to customize the formatting rules.
A valid template string, or placeholder, consists of two parts: The $ symbol followed by a valid Python identifier.
You need to create an object of Template class and use the template string as an argument to the constructor. Next, call the substitute() method of Template class. It puts the values provided as the parameters in place of template strings.
from string import Template

temp_str ="My name is $name and I am $age years old"
tempobj = Template(temp_str)
ret = tempobj.substitute(name='Rajesh', age=23)print(ret)
It will produce the following output −
My name is Rajesh and I am 23 years old
The wrap class in Python’s textwrap module contains functionality to format and wrap plain texts by adjusting the line breaks in the input paragraph. It helps in making the text wellformatted and beautiful.
The textwrap module has the following convenience functions −
The textwrap.wrap() function wraps the single paragraph in text (a string) so every line is at most width characters long. Returns a list of output lines, without final newlines. Optional keyword arguments correspond to the instance attributes of TextWrapper. width defaults to 70.
The textwrap.fill() function wraps the single paragraph in text, and returns a single string containing the wrapped paragraph.
Both methods internally create an object of TextWrapper class and calling a single method on it. Since the instance is not reused, it will be more efficient for you to create your own TextWrapper object.
import textwrap

text ='''
Python is a high-level, general-purpose programming language. Its design philosophy emphasizes code readability with the use of significant indentation via the off-side rule.

Python is dynamically typed and garbage-collected. It supports multiple programming paradigms, including structured (particularly procedural), object-oriented and functional programming. It is often described as a "batteries included" language due to its comprehensive standard library.
'''

wrapper = textwrap.TextWrapper(width=40)
wrapped = wrapper.wrap(text = text)# Print outputfor element in wrapped:print(element)
It will produce the following output −
Python is a high-level, general-purpose
programming language. Its design
philosophy emphasizes code readability
with the use of significant indentation
via the off-side rule. Python is
dynamically typed and garbage-collected.
It supports multiple programming
paradigms, including structured
(particularly procedural), objectoriented and functional programming. It
is often described as a "batteries
included" language due to its
comprehensive standard library.
Following attributes are defined for a TextWrapper object −
The shorten() function collapse and truncate the given text to fit in the given width. The text first has its whitespace collapsed. If it then fits in the *width*, it is returned as is. Otherwise, as many words as possible are joined and then the placeholder is appended −
import textwrap

python_desc ="""Python is a general-purpose interpreted, interactive, object-oriented, and high-level programming language. It was created by Guido van Rossum during 1985- 1990. Like Perl, Python source code is also available under the GNU General Public License (GPL). This tutorial gives enough understanding on Python programming language."""

my_wrap = textwrap.TextWrapper(width =40)

short_text = textwrap.shorten(text = python_desc, width=150)print('\n\n'+ my_wrap.fill(text = short_text))
It will produce the following output −
Python is a general-purpose interpreted,
interactive, object-oriented,and high
level programming language. It was
created by Guido van Rossum [...]
The pprint module in Python’s standard library enables aesthetically good looking appearance of Python data structures. The name pprint stands for pretty printer. Any data structure that can be correctly parsed by Python interpreter is elegantly formatted.
The formatted expression is kept in one line as far as possible, but breaks into multiple lines if the length exceeds the width parameter of formatting. One unique feature of pprint output is that the dictionaries are automatically sorted before the display representation is formatted.
The pprint module contains definition of PrettyPrinter class. Its constructor takes following format −
pprint.PrettyPrinter(indent, width, depth, stream, compact)
The PrettyPrinter class defines following methods −
The pprint() method prints the formatted representation of PrettyPrinter object.
The pformat() method returns the formatted representation of object, based on parameters to the constructor.
The following example demonstrates a simple use of PrettyPrinter class −
import pprint
students={"Dilip":["English","Maths","Science"],"Raju":{"English":50,"Maths":60,"Science":70},"Kalpana":(50,60,70)}
pp=pprint.PrettyPrinter()print("normal print output")print(students)print("----")print("pprint output")
pp.pprint(students)
The output shows normal as well as pretty print display −
normal print output
{'Dilip': ['English', 'Maths', 'Science'], 'Raju': {'English': 50, 'Maths': 60, 'Science': 70}, 'Kalpana': (50, 60, 70)}
----
pprint output
{'Dilip': ['English', 'Maths', 'Science'],
 'Kalpana': (50, 60, 70),
 'Raju': {'English': 50, 'Maths': 60, 'Science': 70}}
The pprint module also defines convenience functions pprint() and pformat() corresponding to PrettyPrinter methods. The example below uses pprint() function.
from pprint import pprint
students={"Dilip":["English","Maths","Science"],"Raju":{"English":50,"Maths":60,"Science":70},"Kalpana":(50,60,70)}print("normal print output")print(students)print("----")print("pprint output")
pprint (students)
The next example uses pformat() method as well as pformat() function. To use pformat() method, PrettyPrinter object is first set up. In both cases, the formatted representation is displayed using normal print() function.
import pprint
students={"Dilip":["English","Maths","Science"],"Raju":{"English":50,"Maths":60,"Science":70},"Kalpana":(50,60,70)}print("using pformat method")
pp=pprint.PrettyPrinter()
string=pp.pformat(students)print(string)print('------')print("using pformat function")
string=pprint.pformat(students)print(string)
Here is the output of the above code −
using pformat method
{'Dilip': ['English', 'Maths', 'Science'],
 'Kalpana': (50, 60, 70),
 'Raju': {'English': 50, 'Maths': 60, 'Science': 70}}
------
using pformat function
{'Dilip': ['English', 'Maths', 'Science'],
 'Kalpana': (50, 60, 70),
 'Raju': {'English': 50, 'Maths': 60, 'Science': 70}}
Pretty printer can also be used with custom classes. Inside the class __repr__() method is overridden. The __repr__() method is called when repr() function is used. It is the official string representation of Python object. When we use object as parameter to print() function it prints return value of repr() function.
In this example, the __repr__() method returns the string representation of player object −
import pprint classplayer:def__init__(self, name, formats=[], runs=[]):def__repr__(self):self.name=name self.formats=formats self.runs=runsl1=['Tests','ODI','T20'] l2=[[140,45,39],[15,122,36,67,100,49],[78,44,12,0,23,75]] p1=player("virat",l1,l2) pp=pprint.PrettyPrinter() pp.pprint(p1)dct={} dct[self.name]=dict(zip(self.formats,self.runs))return(repr(dct))
The output of above code is −
{'virat': {'Tests': [140, 45, 39], 'ODI': [15, 122, 36, 67, 100, 49],
'T20': [78, 44, 12, 0, 23, 75]}}
Templating in Python is a technique used in web development to dynamically generate static HTML pages using templates and data.
In this tutorial, we will explore the basics of templating in Python, including installation, creating templates, and rendering templates with data, with a focus on the Jinja2 templating engine.
String templates in Python is a simple way to perform string substitutions. Python’s string module includes the Template class, which provides an easy way to replace placeholders in a string with actual values.
The Template class in the string module is useful for dynamically forming a string object through a substitution technique described in PEP 292. Its simpler syntax and functionality make it easier to translate for internationalization purposes compared to other built-in string formatting facilities in Python.
Template strings use the $ symbol for substitution, immediately followed by an identifier that follows the rules of forming a valid Python identifier.
To create a template, you instantiate the Template class with a string that contains placeholders prefixed with $ as shown below −
from string import Template

template = Template("Hello, $name!")
You can substitute values into the template using the substitute() method, which takes a dictionary of key-value pairs.
The substitute() method replaces the placeholders (identifiers) in the template with actual values. You can provide these values using keyword arguments or a dictionary. The method then returns a new string with the placeholders filled in.
Example: Using Keyword Arguments
Following code substitute identifiers in a template string using keyword arguments −
from string import Template

tempStr = Template('Hello. My name is $name and my age is $age')
newStr = tempStr.substitute(name ='Pushpa', age =26)print(newStr)
It will produce the following output −
Hello. My name is Pushpa and my age is 26
Example: Using a Dictionary
In the following example, we use a dictionary object to map the substitution identifiers in the template string −
from string import Template

tempStr = Template('Hello. My name is $name and my age is $age')
dct ={'name':'Pushpalata','age':25}
newStr = tempStr.substitute(dct)print(newStr)
Following is the output of the above code −
Hello. My name is Pushpalata and my age is 25
Example: Missing Parameters Raises KeyError
If the substitute() method is not provided with sufficient parameters to be matched against the identifiers in the template string, Python raises KeyError −
from string import Template

tempStr = Template('Hello. My name is $name and my age is $age')
dct ={'name':'Pushpalata'}
newStr = tempStr.substitute(dct)print(newStr)
Following is the error produced −
Traceback (most recent call last): File "/home/cg/root/667e441d9ebd5/main.py", line 5, in <module> newStr = tempStr.substitute(dct) File "/usr/lib/python3.10/string.py", line 121, in substituteFile "/usr/lib/python3.10/string.py", line 114, in convert return str(mapping[named]) KeyError: 'age'return self.pattern.sub(convert, self.template)
The safe_substitute() method behaves similarly to substitute() method, except for the fact that it doesn’t throw error if the keys are not sufficient or are not matching. Instead, the original placeholder will appear in the resulting string intact.
Example
In the following example, we are using the safe_substitue() method for substituting values −
from string import Template
tempStr = Template('Hello. My name is $name and my age is $age')
dct ={'name':'Pushpalata'}
newStr = tempStr.safe_substitute(dct)print(newStr)
It will produce the following output −
Hello. My name is Pushpalata and my age is $age
To use Jinja2 for templating in Python, you first need to install the library. Jinja2 is a powerful templating engine that is widely used in web development for rendering HTML. It can be installed easily using pip, Python’s package installer −
pip install jinja2
Jinja2 is a powerful templating engine for Python that allows you to create dynamic content by blending static template files with data. This section explores how to create Jinja2 templates and render them with data.
To create a Jinja2 template, you define a template string or load it from a file. Templates use double curly braces {{ … }} for placeholders and support control structures like “loops” and “conditionals” with {% … %}.
Example
Following is an example of a simple Jinja2 template stored in a file “template.html” −
<!DOCTYPE html><html><head><title>Hello,{{ name }}!</title></head><body><h1>Hello,{{ name }}!</h1><p>Welcome to our site.</p></body></html>
To render a Jinja2 template, follow these steps −
Example
In here, we are rendering Jinja2 template −
from jinja2 import Template, FileSystemLoader, Environment

# Loading a template from a file (template.html)
file_loader = FileSystemLoader('.')
env = Environment(loader=file_loader)
template = env.get_template('template.html')# Rendering the template with data
output = template.render(name='Alice')# Output the rendered templateprint(output)
The output of the rendered Jinja2 template would be an HTML document with the placeholders replaced by the actual data passed during rendering −
<!DOCTYPE html> <html> <head></head> <body><title>Hello, Alice!</title></body> </html><h1>Hello, Alice!</h1> <p>Welcome to our site.</p>
Jinja2 supports various advanced features such as loops, conditionals, and custom filters, making it a powerful tool for creating complex templates.
Jinja2 supports template inheritance, allowing you to create a base template with common elements (like headers, footers, navigation bars) and extend or override specific blocks in child templates. This promotes code reuse and maintainability in large projects.
Example
This HTML template file named “base.html” defines a basic structure for a web page using Jinja2 templating syntax.
It includes blocks “{% block title %}” and “{% block content %}” that can be overridden in derived templates to customize the title and main content of the page, respectively −
<!-- base.html --><!DOCTYPE html><html lang="en"><head><meta charset="UTF-8"><title>{% block title %}Default Title{% endblock %}</title></head><body>{% block content %}{% endblock %}</body></html>
The following Jinja2 template file “child.html” extends the “base.html” template, overriding the title block to set it to “Child Page” and the content block to include an <h1> header with the text “Child Page Content”.
<!-- child.html -->{% extends "base.html"%}{% block title %}Child Page{% endblock %}{% block content %}<h1>Child Page Content</h1>{% endblock %}
Jinja2 allows you to iterate over lists or other iterable objects using {% for %}loops. Following is an example of how you can use a loop to generate an unordered list (<ul>) in HTML −
<ul>{%for item in items %}<li>{{ item }}</li>{% endfor %}</ul>
Conditional statements in Jinja2 ({% if %} and {% else %}) is used to control the flow of your templates based on conditions. Here is an example where “Jinja2” checks if user exists and displays a personalized greeting if true; otherwise, it prompts to log in −
{%if user %}<p>Welcome,{{ user }}!</p>{%else%}<p>Please log in.</p>{% endif %}
Custom filters in Jinja2 is used to define your own filters to manipulate data before displaying it in the template.
In the following example, a custom filter reverse is defined in Jinja2 to reverse the string “hello”, resulting in “olleh” when applied in the template −
# Define a custom filter functiondefreverse_string(s):return s[::-1]# Register the filter with the Jinja2 environment
env.filters['reverse']= reverse_string
In your template, you can then apply the “reverse” filter to any string −
{{"hello"| reverse }}
Following is the output obtained −
olleh
Serialization refers to the process of converting an object into a format that can be easily stored, transmitted, or reconstructed later. In Python, this involves converting complex data structures, such as objects or dictionaries, into a byte stream.
Serialization allows data to be easily saved to disk or transmitted over a network, and later reconstructed back into its original form. It is important for tasks like saving game states, storing user preferences, or exchanging data between different systems.
Python offers several libraries for serialization, each with its own advantages. Here is a detailed overview of some commonly used serialization libraries in Python −
The pickle module in Python is used for serializing and deserializing objects. Serialization, also known as pickling, involves converting a Python object into a byte stream, which can then be stored in a file or transmitted over a network.
Deserialization, or unpickling, is the reverse process, converting the byte stream back into a Python object.
We can serialize an object using the dump() function and write it to a file. The file must be opened in binary write mode (‘wb’).
Example
In the following example, a dictionary is serialized and written to a file named “data.pkl” −
import pickle

data ={'name':'Alice','age':30,'city':'New York'}# Open a file in binary write modewithopen('data.pkl','wb')asfile:# Serialize the data and write it to the file
   pickle.dump(data,file)print("File created!!")
When above code is executed, the dictionary object’s byte representation will be stored in data.pkl file.
To deserialize or unpickle the object, you can use the load() function. The file must be opened in binary read mode (‘rb’) as shown below −
import pickle

# Open the file in binary read modewithopen('data.pkl','rb')asfile:# Deserialize the data
   data = pickle.load(file)print(data)
This will read the byte stream from “data.pkl” and convert it back into the original dictionary as shown below −
{'name': 'Alice', 'age': 30, 'city': 'New York'}
Protocols are the conventions used in constructing and deconstructing Python objects to/from binary data.
The pickle module supports different serialization protocols, with higher protocols generally offering more features and better performance. Currently pickle module defines 6 different protocols as listed below −
| Sr.No. | Protocol & Description |
|---|---|
| 1 | Protocol version 0Original “human-readable” protocol backwards compatible with earlier versions. |
| 2 | Protocol version 1Old binary format also compatible with earlier versions of Python. |
| 3 | Protocol version 2Introduced in Python 2.3 provides efficient pickling of new-style classes. |
| 4 | Protocol version 3Added in Python 3.0. recommended when compatibility with other Python 3 versions is required. |
| 5 | Protocol version 4Introduced in Python 3.4. It adds support for very large objects. |
| 6 | Protocol version 5Introduced in Python 3.8. It adds support for out-of-band data. |
You can specify the protocol by passing it as an argument to pickle.dump() function.
To know the highest and default protocol version of your Python installation, use the following constants defined in the pickle module −
>>>import pickle
>>> pickle.HIGHEST_PROTOCOL
5>>> pickle.DEFAULT_PROTOCOL
4
The pickle module in Python also defines Pickler and Unpickler classes for more detailed control over the serialization and deserialization processes. The “Pickler” class writes pickle data to a file, while the “Unpickler” class reads binary data from a file and reconstructs the original Python object.
To serialize a Python object using the Pickler class, you can follow these steps −
from pickle import Pickler

# Open a file in binary write modewithopen("data.txt","wb")as f:# Create a dictionary
   dct ={'name':'Ravi','age':23,'Gender':'M','marks':75}# Create a Pickler object and write the dictionary to the file
   Pickler(f).dump(dct)print("Success!!")
After executing the above code, the dictionary object’s byte representation will be stored in “data.txt” file.
To deserialize the data from a binary file using the Unpickler class, you can do the following −
from pickle import Unpickler

# Open the file in binary read modewithopen("data.txt","rb")as f:# Create an Unpickler object and load the dictionary from the file
   dct = Unpickler(f).load()# Print the dictionaryprint(dct)
We get the output as follows −
{'name': 'Ravi', 'age': 23, 'Gender': 'M', 'marks': 75}
The pickle module can also serialize and deserialize custom classes. The class definition must be available at both the time of pickling and unpickling.
In this example, an instance of the “Person” class is serialized and then deserialized, maintaining the state of the object −
import pickle classPerson:def__init__(self, name, age, city):# Create an instance of the Person class person = Person('Alice',30,'New York')# Serialize the person objectwithopen('person.pkl','wb')asfile: pickle.dump(person,file)# Deserialize the person objectwithopen('person.pkl','rb')asfile: person = pickle.load(file)print(person.name, person.age, person.city)self.name = name self.age = age self.city = city
After executing the above code, we get the following output −
Alice 30 New York
The Python standard library also includes the marshal module, which is used for internal serialization of Python objects. Unlike pickle, which is designed for general-purpose use, marshal is primarily intended for use by Python itself (e.g., for writing .pyc files).
It is generally not recommended for general-purpose serialization due to potential compatibility issues between Python versions.
JSON (JavaScript Object Notation) is a popular format for data interchange. It is human-readable, easy to write, and language-independent, making it ideal for serialization.
Python provides built-in support for JSON through the json module, which allows you to serialize and deserialize data to and from JSON format.
Serialization is the process of converting a Python object into a JSON string or writing it to a file.
Example: Serialize Data to a JSON String
In the example below, we use the json.dumps() function to convert a Python dictionary to a JSON string −
import json

# Create a dictionary
data ={"name":"Alice","age":25,"city":"San Francisco"}# Serialize the dictionary to a JSON string
json_string = json.dumps(data)print(json_string)
Following is the output of the above code −
{"name": "Alice", "age": 25, "city": "San Francisco"}
Example: Serialize Data and Write to a File
In here, we use the json.dump() function to write the serialized JSON data directly to a file −
import json

# Create a dictionary
data ={"name":"Alice","age":25,"city":"San Francisco"}# Serialize the dictionary and write it to a filewithopen("data.json","w")as f:
   json.dump(data, f)print("Success!!")
Deserialization is the process of converting a JSON string back into a Python object or reading it from a file.
Example: Deserialize a JSON String
In the following example, we use the json.loads() function to convert a JSON string back into a Python dictionary −
import json

# JSON string
json_string ='{"name": "Alice", "age": 25, "city": "San Francisco"}'# Deserialize the JSON string into a Python dictionary
loaded_data = json.loads(json_string)print(loaded_data)
It will produce the following output −
{'name': 'Alice', 'age': 25, 'city': 'San Francisco'}
Example: Deserialize Data from a File
Here, we use the json.load() function to read JSON data from a file and convert it to a Python dictionary−
import json

# Open the file and load the JSON data into a Python dictionarywithopen("data.json","r")as f:
   loaded_data = json.load(f)print(loaded_data)
The output obtained is as follows −
{'name': 'Alice', 'age': 25, 'city': 'San Francisco'}
YAML (YAML Ain’t Markup Language) is a human-readable data serialization standard that is commonly used for configuration files and data interchange.
Python supports YAML serialization and deserialization through the pyyamlpackage, which needs to be installed first as shown below −
pip install pyyaml
In the below example, yaml.dump() function converts the Python dictionary data into a YAML string and writes it to the file “data.yaml”.
The “default_flow_style” parameter ensures that the YAML output is more human-readable with expanded formatting −
import yaml

# Create a Python dictionary
data ={"name":"Emily","age":35,"city":"Seattle"}# Serialize the dictionary and write it to a YAML filewithopen("data.yaml","w")as f:
   yaml.dump(data, f, default_flow_style=False)print("Success!!")
Here, yaml.safe_load() function is used to safely load the YAML data from “data.yaml” and convert it into a Python dictionary (loaded_data) −
Using safe_load() is preferred for security reasons as it only allows basic Python data types and avoids executing arbitrary code from YAML files.
import yaml

# Deserialize data from a YAML filewithopen("data.yaml","r")as f:
   loaded_data = yaml.safe_load(f)print(loaded_data)
The output produced is as shown below −
{'age': 35, 'city': 'Seattle', 'name': 'Emily'}
Python uses reference counting mechanism while implementing garbage collection policy. Whenever an object in the memory is referred, the count is incremented by one. On the other hand, when the reference is removed, the count is decremented by 1. If the garbage collector running in the background finds any object with count as 0, it is removed and the memory occupied is reclaimed.
Weak reference is a reference that does not protect the object from getting garbage collected. It proves important when you need to implement caches for large objects, as well as in a situation where reduction of Pain from circular references is desired.
To create weak references, Python has provided us with a module named weakref.
The ref class in this module manages the weak reference to an object. When called, it retrieves the original object.
To create a weak reference −
weakref.ref(class())
import weakref
classMyclass:def__del__(self):print('(Deleting {})'.format(self))
obj = Myclass()
r = weakref.ref(obj)print('object:', obj)print('reference:', r)print('call r():', r())print('deleting obj')del obj
print('r():', r())
Calling the reference object after deleting the referent returns None.
It will produce the following output −
object: <__main__.Myclass object at 0x00000209D7173290>
reference: <weakref at 0x00000209D7175940; to 'Myclass' at
0x00000209D7173290>
call r(): <__main__.Myclass object at 0x00000209D7173290>
deleting obj
(Deleting <__main__.Myclass object at 0x00000209D7173290>)
r(): None
The constructor of ref class has an optional parameter called callback function, which gets called when the referred object is deleted.
import weakref
classMyclass:def__del__(self):print('(Deleting {})'.format(self))defmycallback(rfr):"""called when referenced object is deleted"""print('calling ({})'.format(rfr))
obj = Myclass()
r = weakref.ref(obj, mycallback)print('object:', obj)print('reference:', r)print('call r():', r())print('deleting obj')del obj
print('r():', r())
It will produce the following output −
object: <__main__.Myclass object at 0x000002A0499D3590> reference: <weakref at 0x000002A0499D59E0; to 'Myclass' at 0x000002A0499D3590> call r(): <__main__.Myclass object at 0x000002A0499D3590> deleting obj (Deleting <__main__.Myclass object at 0x000002A0499D3590>) calling (<weakref at 0x000002A0499D59E0; dead>) r(): None Finalizing Objects The weakref module provides finalize class. Its object is called when the garbage collector collects the object. The object survives until the reference object is called. import weakref class Myclass: def __del__(self):def finalizer(*args): print('Finalizer{!r})'.format(args)) obj = Myclass() r = weakref.finalize(obj, finalizer, "Call to finalizer") print('object:', obj) print('reference:', r) print('call r():', r()) print('deleting obj') del obj print('r():', r()) It will produce the following output − object: <__main__.Myclass object at 0x0000021015103590> reference: <finalize object at 0x21014eabe80; for 'Myclass' at 0x21015103590> Finalizer('Call to finalizer',)) call r(): None deleting obj (Deleting <__main__.Myclass object at 0x0000021015103590>) r(): None The weakref module provides WeakKeyDictionary and WeakValueDictionary classes. They don't keep the objects alive as they appear in the mapping objects. They are more appropriate for creating a cache of several objects. WeakKeyDictionary Mapping class that references keys weakly. Entries in the dictionary will be discarded when there is no longer a strong reference to the key. An instance of WeakKeyDictionary class is created with an existing dictionary or without any argumentThe functionality is the same as a normal dictionary to add and remove mapping entries to it. In the code given below three Person instances are created. It then creates an instance of WeakKeyDictionary with a dictionary where the key is the Person instance and the value is the Person's name. We call the keyrefs() method to retrieve weak references. When the reference to Peron1 is deleted, dictionary keys are printed again. A new Person instance is added to a dictionary with weakly referenced keys. At last, we are printing keys of dictionary again. Example import weakref class Person: def __init__(self, person_id, name, age):print('(Deleting {})'.format(self))def __repr__(self):self.emp_id = person_id self.name = name self.age = agePerson1 = Person(101, "Jeevan", 30) Person2 = Person(102, "Ramanna", 35) Person3 = Person(103, "Simran", 28) weak_dict = weakref.WeakKeyDictionary({Person1: Person1.name, Person2: Person2.name, Person3: Person3.name}) print("Weak Key Dictionary : {}\n".format(weak_dict.data)) print("Dictionary Keys : {}\n".format([key().name for key in weak_dict.keyrefs()])) del Person1 print("Dictionary Keys : {}\n".format([key().name for key in weak_dict.keyrefs()])) Person4 = Person(104, "Partho", 32) weak_dict.update({Person4: Person4.name}) print("Dictionary Keys : {}\n".format([key().name for key in weak_dict.keyrefs()])) It will produce the following output − Weak Key Dictionary : {<weakref at 0x7f542b6d4180; to 'Person' at 0x7f542b8bbfd0>: 'Jeevan', <weakref at 0x7f542b6d5530; to 'Person' at 0x7f542b8bbeb0>: 'Ramanna', <weakref at 0x7f542b6d55d0; to 'Person' at 0x7f542b8bb7c0>: 'Simran'} Dictionary Keys : ['Jeevan', 'Ramanna', 'Simran'] Dictionary Keys : ['Ramanna', 'Simran'] Dictionary Keys : ['Ramanna', 'Simran', 'Partho'] WeakValueDictionary Mapping class that references values weakly. Entries in the dictionary will be discarded when no strong reference to the value exists any more. We shall demonstrate how to create a dictionary with weakly referenced values using WeakValueDictionary. The code is similar to previous example but this time we are using Person name as key and Person instance as values. We are using valuerefs() method to retrieve weakly referenced values of the dictionary. Example import weakref class Person: def __init__(self, person_id, name, age):return "{} : {} : {}".format(self.person_id, self.name, self.age)def __repr__(self):self.emp_id = person_id self.name = name self.age = agePerson1 = Person(101, "Jeevan", 30) Person2 = Person(102, "Ramanna", 35) Person3 = Person(103, "Simran", 28) weak_dict = weakref.WeakValueDictionary({Person1.name:Person1, Person2.name:Person2, Person3.name:Person3}) print("Weak Value Dictionary : {}\n".format(weak_dict.data)) print("Dictionary Values : {}\n".format([value().name for value in weak_dict.valuerefs()])) del Person1 print("Dictionary Values : {}\n".format([value().name for value in weak_dict.valuerefs()])) Person4 = Person(104, "Partho", 32) weak_dict.update({Person4.name: Person4}) print("Dictionary Values : {}\n".format([value().name for value in weak_dict.valuerefs()])) It will produce the following output − Weak Value Dictionary : {'Jeevan': <weakref at 0x7f3af9fe4180; to 'Person' at 0x7f3afa1c7fd0>, 'Ramanna': <weakref at 0x7f3af9fe5530; to 'Person' at 0x7f3afa1c7eb0>, 'Simran': <weakref at 0x7f3af9fe55d0; to 'Person' at 0x7f3afa1c77c0>} Dictionary Values : ['Jeevan', 'Ramanna', 'Simran'] Dictionary Values : ['Ramanna', 'Simran'] Dictionary Values : ['Ramanna', 'Simran', 'Partho']return "{} : {} : {}".format(self.person_id, self.name, self.age)
Database access in Python is used to interact with databases, allowing applications to store, retrieve, update, and manage data consistently. Various relational database management systems (RDBMS) are supported for these tasks, each requiring specific Python packages for connectivity −
Data input and generated during execution of a program is stored in RAM. If it is to be stored persistently, it needs to be stored in database tables.
Relational databases use SQL (Structured Query Language) for performing INSERT/DELETE/UPDATE operations on the database tables. However, implementation of SQL varies from one type of database to other. This raises incompatibility issues. SQL instructions for one database do not match with other.
To address this issue of compatibility, Python Enhancement Proposal (PEP) 249 introduced a standardized interface known as DB-API. This interface provides a consistent framework for database drivers, ensuring uniform behavior across different database systems. It simplifies the process of transitioning between various databases by establishing a common set of rules and methods.
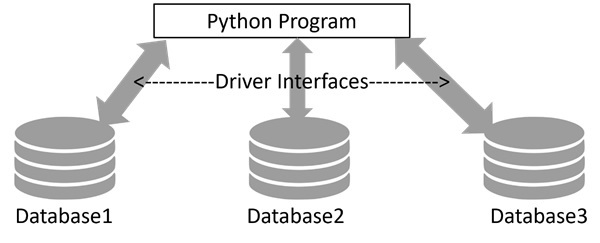
Python’s standard library includes sqlite3 module, a DB_API compatible driver for SQLite3 database. It serves as a reference implementation for DB-API. For other types of databases, you will have to install the relevant Python package −
| Database | Python Package |
|---|---|
| Oracle | cx_oracle, pyodbc |
| SQL Server | pymssql, pyodbc |
| PostgreSQL | psycopg2 |
| MySQL | MySQL Connector/Python, pymysql |
Using SQLite with Python is very easy due to the built-in sqlite3 module. The process involves −
In this tutorial, we shall learn how to access database using Python, how to store data of Python objects in a SQLite database, and how to retrieve data from SQLite database and process it using Python program.
SQLite is a server-less, file-based lightweight transactional relational database. It doesn’t require any installation and no credentials such as username and password are needed to access the database.
Python’s sqlite3 module contains DB-API implementation for SQLite database. It is written by Gerhard Hring. Let us learn how to use sqlite3 module for database access with Python.
Let us start by importing sqlite3 and check its version.
>>>import sqlite3
>>> sqlite3.sqlite_version
'3.39.4'
A connection object is set up by connect() function in sqlite3 module. First positional argument to this function is a string representing path (relative or absolute) to a SQLite database file. The function returns a connection object referring to the database.
>>> conn=sqlite3.connect('testdb.sqlite3')>>>type(conn)<class'sqlite3.Connection'>
Various methods are defined in connection class. One of them is cursor() method that returns a cursor object, about which we shall know in next section. Transaction control is achieved by commit() and rollback() methods of connection object. Connection class has important methods to define custom functions and aggregates to be used in SQL queries.
Next, we need to get the cursor object from the connection object. It is your handle to the database when performing any CRUD operation on the database. The cursor() method on connection object returns the cursor object.
>>> cur=conn.cursor()>>>type(cur)<class'sqlite3.Cursor'>
We can now perform all SQL query operations, with the help of its execute() method available to cursor object. This method needs a string argument which must be a valid SQL statement.
We shall now add Employee table in our newly created ‘testdb.sqlite3’ database. In following script, we call execute() method of cursor object, giving it a string with CREATE TABLE statement inside.
import sqlite3
conn=sqlite3.connect('testdb.sqlite3')
cur=conn.cursor()
qry='''
CREATE TABLE Employee (
EmpID INTEGER PRIMARY KEY AUTOINCREMENT,
FIRST_NAME TEXT (20),
LAST_NAME TEXT(20),
AGE INTEGER,
SEX TEXT(1),
INCOME FLOAT
);
'''try:
   cur.execute(qry)print('Table created successfully')except:print('error in creating table')
conn.close()
When the above program is run, the database with Employee table is created in the current working directory.
We can verify by listing out tables in this database in SQLite console.
sqlite>.open mydb.sqlite
sqlite>.tables
Employee
The INSERT Operation is required when you want to create your records into a database table.
The following example, executes SQL INSERT statement to create a record in the EMPLOYEE table −
import sqlite3
conn=sqlite3.connect('testdb.sqlite3')
cur=conn.cursor()
qry="""INSERT INTO EMPLOYEE(FIRST_NAME,
   LAST_NAME, AGE, SEX, INCOME)
   VALUES ('Mac', 'Mohan', 20, 'M', 2000)"""try:
   cur.execute(qry)
   conn.commit()print('Record inserted successfully')except:
   conn.rollback()print('error in INSERT operation')
conn.close()
You can also use the parameter substitution technique to execute the INSERT query as follows −
import sqlite3
conn=sqlite3.connect('testdb.sqlite3')
cur=conn.cursor()
qry="""INSERT INTO EMPLOYEE(FIRST_NAME,
   LAST_NAME, AGE, SEX, INCOME)
   VALUES (?, ?, ?, ?, ?)"""try:
   cur.execute(qry,('Makrand','Mohan',21,'M',5000))
   conn.commit()print('Record inserted successfully')except Exception as e:
   conn.rollback()print('error in INSERT operation')
conn.close()
READ Operation on any database means to fetch some useful information from the database.
Once the database connection is established, you are ready to make a query into this database. You can use either fetchone() method to fetch a single record or fetchall() method to fetch multiple values from a database table.
In the following code, the cursor object executes SELECT * FROM EMPLOYEE query. The resultset is obtained with fetchall() method. We print all the records in the resultset with a for loop.
import sqlite3
conn=sqlite3.connect('testdb.sqlite3')
cur=conn.cursor()
qry="SELECT * FROM EMPLOYEE"try:# Execute the SQL command
   cur.execute(qry)# Fetch all the rows in a list of lists.
   results = cur.fetchall()for row in results:
  fname = row[1]
  lname = row[2]
  age = row[3]
  sex = row[4]
  income = row[5]# Now print fetched resultprint("fname={},lname={},age={},sex={},income={}".format(fname, lname, age, sex, income ))except Exception as e:print(e)print("Error: unable to fecth data")
conn.close()
It will produce the following output −
fname=Mac,lname=Mohan,age=20,sex=M,income=2000.0
fname=Makrand,lname=Mohan,age=21,sex=M,income=5000.0
UPDATE Operation on any database means to update one or more records, which are already available in the database.
The following procedure updates all the records having income=2000. Here, we increase the income by 1000.
import sqlite3
conn=sqlite3.connect('testdb.sqlite3')
cur=conn.cursor()
qry="UPDATE EMPLOYEE SET INCOME = INCOME+1000 WHERE INCOME=?"try:# Execute the SQL command
   cur.execute(qry,(1000,))# Fetch all the rows in a list of lists.
   conn.commit()print("Records updated")except Exception as e:print("Error: unable to update data")
conn.close()
DELETE operation is required when you want to delete some records from your database. Following is the procedure to delete all the records from EMPLOYEE where INCOME is less than 2000.
import sqlite3
conn=sqlite3.connect('testdb.sqlite3')
cur=conn.cursor()
qry="DELETE FROM EMPLOYEE WHERE INCOME<?"try:# Execute the SQL command
   cur.execute(qry,(2000,))# Fetch all the rows in a list of lists.
   conn.commit()print("Records deleted")except Exception as e:print("Error: unable to delete data")

conn.close()
Transactions are a mechanism that ensure data consistency. Transactions have the following four properties −

The Python DB API 2.0 provides two methods to either commit or rollback a transaction.
You already know how to implement transactions. Here is a similar example −
# Prepare SQL query to DELETE required records
sql ="DELETE FROM EMPLOYEE WHERE AGE > ?"try:# Execute the SQL command
   cursor.execute(sql,(20,))# Commit your changes in the database
   db.commit()except:# Rollback in case there is any error
   db.rollback()
Commit is an operation, which gives a green signal to the database to finalize the changes, and after this operation, no change can be reverted back.
Here is a simple example to call the commit method.
db.commit()
If you are not satisfied with one or more of the changes and you want to revert back those changes completely, then use the rollback() method.
Here is a simple example to call the rollback() method.
db.rollback()
PyMySQL is an interface for connecting to a MySQL database server from Python. It implements the Python Database API v2.0 and contains a pure-Python MySQL client library. The goal of PyMySQL is to be a drop-in replacement for MySQLdb.
Before proceeding further, you make sure you have PyMySQL installed on your machine. Just type the following in your Python script and execute it −
import PyMySQL
If it produces the following result, then it means MySQLdb module is not installed −
Traceback (most recent call last): File "test.py", line 3, in <module>ImportError: No module named PyMySQLImport PyMySQL
The last stable release is available on PyPI and can be installed with pip −
pip install PyMySQL
Note − Make sure you have root privilege to install the above module.
Before connecting to a MySQL database, make sure of the following points −
To use MySQL database instead of SQLite database in earlier examples, we need to change the connect() function as follows −
import PyMySQL
# Open database connection
db = PyMySQL.connect("localhost","testuser","test123","TESTDB")
Apart from this change, every database operation can be performed without difficulty.
There are many sources of errors. A few examples are a syntax error in an executed SQL statement, a connection failure, or calling the fetch method for an already cancelled or finished statement handle.
The DB API defines a number of errors that must exist in each database module. The following table lists these exceptions.
| Sr.No. | Exception & Description |
|---|---|
| 1 | WarningUsed for non-fatal issues. Must subclass StandardError. |
| 2 | ErrorBase class for errors. Must subclass StandardError. |
| 3 | InterfaceErrorUsed for errors in the database module, not the database itself. Must subclass Error. |
| 4 | DatabaseErrorUsed for errors in the database. Must subclass Error. |
| 5 | DataErrorSubclass of DatabaseError that refers to errors in the data. |
| 6 | OperationalErrorSubclass of DatabaseError that refers to errors such as the loss of a connection to the database. These errors are generally outside of the control of the Python scripter. |
| 7 | IntegrityErrorSubclass of DatabaseError for situations that would damage the relational integrity, such as uniqueness constraints or foreign keys. |
| 8 | InternalErrorSubclass of DatabaseError that refers to errors internal to the database module, such as a cursor no longer being active. |
| 9 | ProgrammingErrorSubclass of DatabaseError that refers to errors such as a bad table name and other things that can safely be blamed on you. |
| 10 | NotSupportedErrorSubclass of DatabaseError that refers to trying to call unsupported functionality. |
A regular expression is a special sequence of characters that helps you match or find other strings or sets of strings, using a specialized syntax held in a pattern. Regular expression are popularly known as regex or regexp.
Usually, such patterns are used by string-searching algorithms for “find” or “find and replace” operations on strings, or for input validation.
Large scale text processing in data science projects requires manipulation of textual data. The regular expressions processing is supported by many programming languages including Python. Python’s standard library has remodule for this purpose.
Since most of the functions defined in re module work with raw strings, let us first understand what the raw strings are.
Regular expressions use the backslash character (‘\’) to indicate special forms or to allow special characters to be used without invoking their special meaning. Python on the other hand uses the same character as escape character. Hence Python uses the raw string notation.
A string become a raw string if it is prefixed with r or R before the quotation symbols. Hence ‘Hello’ is a normal string were are r’Hello’ is a raw string.
>>> normal="Hello"
>>> print (normal)
Hello
>>> raw=r"Hello"
>>> print (raw)
Hello
In normal circumstances, there is no difference between the two. However, when the escape character is embedded in the string, the normal string actually interprets the escape sequence, where as the raw string doesn’t process the escape character.
>>> normal="Hello\nWorld"
>>> print (normal)
Hello
World
>>> raw=r"Hello\nWorld"
>>> print (raw)
Hello\nWorld
In the above example, when a normal string is printed the escape character ‘\n’ is processed to introduce a newline. However because of the raw string operator ‘r’ the effect of escape character is not translated as per its meaning.
Most letters and characters will simply match themselves. However, some characters are special metacharacters, and don’t match themselves. Meta characters are characters having a special meaning, similar to * in wild card.
Here’s a complete list of the metacharacters −
.^ $ *+ ? {}[] \ |()
The square bracket symbols[ and ] indicate a set of characters that you wish to match. Characters can be listed individually, or as a range of characters separating them by a ‘-‘.
| Sr.No. | Metacharacters & Description |
|---|---|
| 1 | [abc]match any of the characters a, b, or c |
| 2 | [a-c]which uses a range to express the same set of characters. |
| 3 | [a-z]match only lowercase letters. |
| 4 | [0-9]match only digits. |
| 5 | ‘^’complements the character set in [].[^5] will match any character except’5’. |
‘\’is an escaping metacharacter. When followed by various characters it forms various special sequences. If you need to match a [ or \, you can precede them with a backslash to remove their special meaning: \[ or \\.
Predefined sets of characters represented by such special sequences beginning with ‘\’ are listed below −
| Sr.No. | Metacharacters & Description |
|---|---|
| 1 | \dMatches any decimal digit; this is equivalent to the class [0-9]. |
| 2 | \DMatches any non-digit character; this is equivalent to the class [^0-9]. |
| 3 | \sMatches any whitespace character; this is equivalent to the class [\t\n\r\f\v]. |
| 4 | \SMatches any non-whitespace character; this is equivalent to the class [^\t\n\r\f\v]. |
| 5 | \wMatches any alphanumeric character; this is equivalent to the class [a-zAZ0-9_]. |
| 6 | \WMatches any non-alphanumeric character. equivalent to the class [^a-zAZ0-9_]. |
| 7 | .Matches with any single character except newline ‘\n’. |
| 8 | ?match 0 or 1 occurrence of the pattern to its left |
| 9 | +1 or more occurrences of the pattern to its left |
| 10 | *0 or more occurrences of the pattern to its left |
| 11 | \bboundary between word and non-word and /B is opposite of /b |
| 12 | [..]Matches any single character in a square bracket and [^..] matches any single character not in square bracket. |
| 13 | \It is used for special meaning characters like \. to match a period or \+ for plus sign. |
| 14 | {n,m}Matches at least n and at most m occurrences of preceding |
| 15 | a| bMatches either a or b |
Python’s re module provides useful functions for finding a match, searching for a pattern, and substitute a matched string with other string etc.
This function attempts to match RE pattern at the start of string with optional flags. Following is the syntax for this function −
re.match(pattern, string, flags=0)
Here is the description of the parameters −
| Sr.No. | Parameter & Description |
|---|---|
| 1 | patternThis is the regular expression to be matched. |
| 2 | StringThis is the string, which would be searched to match the pattern at the beginning of string. |
| 3 | FlagsYou can specify different flags using bitwise OR (|). These are modifiers, which are listed in the table below. |
The re.match() function returns a match object on success, None on failure. A match object instance contains information about the match: where it starts and ends, the substring it matched, etc.
The match object’s start() method returns the starting position of pattern in the string, and end() returns the endpoint.
If the pattern is not found, the match object is None.
We use group(num) or groups() function of match object to get matched expression.
| Sr.No. | Match Object Methods & Description |
|---|---|
| 1 | group(num=0)This method returns entire match (or specific subgroup num) |
| 2 | groups()This method returns all matching subgroups in a tuple (empty if there weren’t any) |
import re
line ="Cats are smarter than dogs"
matchObj = re.match(r'Cats', line)print(matchObj.start(), matchObj.end())print("matchObj.group() : ", matchObj.group())
It will produce the following output −
0 4
matchObj.group() : Cats
This function searches for first occurrence of RE pattern within the string, with optional flags. Following is the syntax for this function −
re.search(pattern, string, flags=0)
Here is the description of the parameters −
| Sr.No. | Parameter & Description |
|---|---|
| 1 | PatternThis is the regular expression to be matched. |
| 2 | StringThis is the string, which would be searched to match the pattern anywhere in the string. |
| 3 | FlagsYou can specify different flags using bitwise OR (|). These are modifiers, which are listed in the table below. |
The re.search function returns a match object on success, none on failure. We use group(num) or groups() function of match object to get the matched expression.
| Sr.No. | Match Object Methods & Description |
|---|---|
| 1 | group(num=0)This method returns entire match (or specific subgroup num) |
| 2 | groups()This method returns all matching subgroups in a tuple (empty if there weren’t any) |
import re
line ="Cats are smarter than dogs"
matchObj = re.search(r'than', line)print(matchObj.start(), matchObj.end())print("matchObj.group() : ", matchObj.group())
It will produce the following output −
17 21
matchObj.group() : than
Python offers two different primitive operations based on regular expressions, match checks for a match only at the beginning of the string, while searchchecks for a match anywhere in the string (this is what Perl does by default).
import re
line ="Cats are smarter than dogs";
matchObj = re.match(r'dogs', line, re.M|re.I)if matchObj:print("match --> matchObj.group() : ", matchObj.group())else:print("No match!!")
searchObj = re.search(r'dogs', line, re.M|re.I)if searchObj:print("search --> searchObj.group() : ", searchObj.group())else:print("Nothing found!!")
When the above code is executed, it produces the following output −
No match!!
search --> matchObj.group() : dogs
The findall() function returns all non-overlapping matches of pattern in string, as a list of strings or tuples. The string is scanned left-to-right, and matches are returned in the order found. Empty matches are included in the result.
re.findall(pattern, string, flags=0)
| Sr.No. | Parameter & Description |
|---|---|
| 1 | PatternThis is the regular expression to be matched. |
| 2 | StringThis is the string, which would be searched to match the pattern anywhere in the string. |
| 3 | FlagsYou can specify different flags using bitwise OR (|). These are modifiers, which are listed in the table below. |
import re
string="Simple is better than complex."
obj=re.findall(r"ple", string)print(obj)
It will produce the following output −
['ple', 'ple']
Following code obtains the list of words in a sentence with the help of findall() function.
import re
string="Simple is better than complex."
obj=re.findall(r"\w*", string)print(obj)
It will produce the following output −
['Simple', '', 'is', '', 'better', '', 'than', '', 'complex', '', '']
One of the most important re methods that use regular expressions is sub.
re.sub(pattern, repl, string,max=0)
This method replaces all occurrences of the RE pattern in string with repl, substituting all occurrences unless max is provided. This method returns modified string.
import re
phone ="2004-959-559 # This is Phone Number"# Delete Python-style comments
num = re.sub(r'#.*$',"", phone)print("Phone Num : ", num)# Remove anything other than digits
num = re.sub(r'\D',"", phone)print("Phone Num : ", num)
It will produce the following output −
Phone Num : 2004-959-559
Phone Num : 2004959559
The following example uses sub() function to substitute all occurrences of is with was word −
import re
string="Simple is better than complex. Complex is better than complicated."
obj=re.sub(r'is',r'was',string)print(obj)
It will produce the following output −
Simple was better than complex. Complex was better than complicated.
The compile() function compiles a regular expression pattern into a regular expression object, which can be used for matching using its match(), search() and other methods.
re.compile(pattern, flags=0)
| Sr.No. | Modifier & Description |
|---|---|
| 1 | re.IPerforms case-insensitive matching. |
| 2 | re.LInterprets words according to the current locale. This interpretation affects the alphabetic group (\w and \W), as well as word boundary behavior (\b and \B). |
| 3 | re.M Makes $ match the end of a line (not just the end of the string) and makes ^ match the start of any line (not just the start of the string). |
| 4 | re.SMakes a period (dot) match any character, including a newline. |
| 5 | re.UInterprets letters according to the Unicode character set. This flag affects the behavior of \w, \W, \b, \B. |
| 6 | re.XPermits “cuter” regular expression syntax. It ignores whitespace (except inside a set [] or when escaped by a backslash) and treats unescaped # as a comment marker. |
The sequence −
prog = re.compile(pattern)
result = prog.match(string)
is equivalent to −
result = re.match(pattern, string)
But using re.compile() and saving the resulting regular expression object for reuse is more efficient when the expression will be used several times in a single program.
import re
string="Simple is better than complex. Complex is better than complicated."
pattern=re.compile(r'is')
obj=pattern.match(string)
obj=pattern.search(string)print(obj.start(), obj.end())

obj=pattern.findall(string)print(obj)

obj=pattern.sub(r'was', string)print(obj)
It will produce the following output −
7 9
['is', 'is']
Simple was better than complex. Complex was better than complicated.
This function returns an iterator yielding match objects over all non-overlapping matches for the RE pattern in string.
re.finditer(pattern, string, flags=0)
import re
string="Simple is better than complex. Complex is better than complicated."
pattern=re.compile(r'is')
iterator = pattern.finditer(string)print(iterator )for match in iterator:print(match.span())
It will produce the following output −
(7, 9)
(39, 41)
findall() matches all occurrences of a pattern, not just the first one as search() does. For example, if a writer wanted to find all of the adverbs in some text, they might use findall() in the following manner −
import re
text ="He was carefully disguised but captured quickly by police."
obj = re.findall(r"\w+ly\b", text)print(obj)
It will produce the following output −
['carefully', 'quickly']
import re
text ='Errors should never pass silently. Unless explicitly silenced.'
obj=re.findall(r'\b[aeiouAEIOU]\w+', text)print(obj)
It will produce the following output −
['Errors', 'Unless', 'explicitly']
Regular expression literals may include an optional modifier to control various aspects of matching. The modifiers are specified as an optional flag. You can provide multiple modifiers using exclusive OR (|), as shown previously and may be represented by one of these −
| Sr.No. | Modifier & Description |
|---|---|
| 1 | re.IPerforms case-insensitive matching. |
| 2 | re.LInterprets words according to the current locale. This interpretation affects the alphabetic group (\w and \W), as well as word boundary behavior(\b and \B). |
| 3 | re.MMakes $ match the end of a line (not just the end of the string) and makes ^ match the start of any line (not just the start of the string). |
| 4 | re.SMakes a period (dot) match any character, including a newline. |
| 5 | re.UInterprets letters according to the Unicode character set. This flag affects the behavior of \w, \W, \b, \B. |
| 6 | re.XPermits “cuter” regular expression syntax. It ignores whitespace (except inside a set [] or when escaped by a backslash) and treats unescaped # as a comment marker. |
Except for control characters, (+ ? . * ^ $ ( ) [ ] { } | \), all characters match themselves. You can escape a control character by preceding it with a backslash.
Following table lists the regular expression syntax that is available in Python −
| Sr.No. | Pattern & Description |
|---|---|
| 1 | ^Matches beginning of line. |
| 2 | $Matches end of line. |
| 3 | .Matches any single character except newline. Using m option allows it to match newline as well. |
| 4 | […]Matches any single character in brackets. |
| 5 | [^…]Matches any single character not in brackets |
| 6 | re*Matches 0 or more occurrences of preceding expression. |
| 7 | re+Matches 1 or more occurrence of preceding expression. |
| 8 | re?Matches 0 or 1 occurrence of preceding expression. |
| 9 | re{ n}Matches exactly n number of occurrences of preceding expression. |
| 10 | re{ n,}Matches n or more occurrences of preceding expression. |
| 11 | re{ n, m}Matches at least n and at most m occurrences of preceding expression. |
| 12 | a| bMatches either a or b. |
| 13 | (re)Groups regular expressions and remembers matched text. |
| 14 | (?imx)Temporarily toggles on i, m, or x options within a regular expression. If in parentheses, only that area is affected. |
| 15 | (?-imx)Temporarily toggles off i, m, or x options within a regular expression. If in parentheses, only that area is affected. |
| 16 | (?: re)Groups regular expressions without remembering matched text. |
| 17 | (?imx: re)Temporarily toggles on i, m, or x options within parentheses. |
| 18 | (?-imx: re)Temporarily toggles off i, m, or x options within parentheses. |
| 19 | (?#…)Comment. |
| 20 | (?= re)Specifies position using a pattern. Doesn’t have a range. |
| 21 | (?! re)Specifies position using pattern negation. Doesn’t have a range. |
| 22 | (?> re)Matches independent pattern without backtracking. |
| 23 | \wMatches word characters. |
| 24 | \WMatches nonword characters. |
| 25 | \sMatches whitespace. Equivalent to [\t\n\r\f]. |
| 26 | \SMatches nonwhitespace. |
| 27 | \dMatches digits. Equivalent to [0-9]. |
| 28 | \DMatches nondigits. |
| 29 | \AMatches beginning of string. |
| 30 | \ZMatches end of string. If a newline exists, it matches just before newline. |
| 31 | \zMatches end of string. |
| 32 | \GMatches point where last match finished. |
| 33 | \bMatches word boundaries when outside brackets. Matches backspace (0x08) when inside brackets. |
| 34 | \BMatches nonword boundaries. |
| 35 | \n, \t, etc.Matches newlines, carriage returns, tabs, etc. |
| 36 | \1…\9Matches nth grouped subexpression. |
| 37 | \10Matches nth grouped subexpression if it matched already. Otherwise refers to the octal representation of a character code. |
| Sr.No. | Example & Description |
|---|---|
| 1 | pythonMatch “python”. |
| Sr.No. | Example & Description |
|---|---|
| 1 | [Pp]ythonMatch “Python” or “python” |
| 2 | rub[ye]Match “ruby” or “rube” |
| 3 | [aeiou]Match any one lowercase vowel |
| 4 | [0-9]Match any digit; same as [0123456789] |
| 5 | [a-z]Match any lowercase ASCII letter |
| 6 | [A-Z]Match any uppercase ASCII letter |
| 7 | [a-zA-Z0-9]Match any of the above |
| 8 | [^aeiou]Match anything other than a lowercase vowel |
| 9 | [^0-9]Match anything other than a digit |
| Sr.No. | Example & Description |
|---|---|
| 1 | .Match any character except newline |
| 2 | \dMatch a digit: [0-9] |
| 3 | \DMatch a nondigit: [^0-9] |
| 4 | \sMatch a whitespace character: [ \t\r\n\f] |
| 5 | \SMatch nonwhitespace: [^ \t\r\n\f] |
| 6 | \wMatch a single word character: [A-Za-z0-9_] |
| 7 | \WMatch a nonword character: [^A-Za-z0-9_] |
| Sr.No. | Example & Description |
|---|---|
| 1 | ruby?Match “rub” or “ruby”: the y is optional |
| 2 | ruby*Match “rub” plus 0 or more ys |
| 3 | ruby+Match “rub” plus 1 or more ys |
| 4 | \d{3}Match exactly 3 digits |
| 5 | \d{3,}Match 3 or more digits |
| 6 | \d{3,5}Match 3, 4, or 5 digits |
This matches the smallest number of repetitions −
| Sr.No. | Example & Description |
|---|---|
| 1 | <.*>Greedy repetition: matches “<python>perl>” |
| 2 | <.*?>Nongreedy: matches “<python>” in “<python>perl>” |
| Sr.No. | Example & Description |
|---|---|
| 1 | \D\d+No group: + repeats \d |
| 2 | (\D\d)+Grouped: + repeats \D\d pair |
| 3 | ([Pp]ython(, )?)+Match “Python”, “Python, python, python”, etc. |
This matches a previously matched group again −
| Sr.No. | Example & Description |
|---|---|
| 1 | ([Pp])ython&\1ailsMatch python&pails or Python&Pails |
| 2 | ([‘”])[^\1]*\1Single or double-quoted string. \1 matches whatever the 1st group matched. \2 matches whatever the 2nd group matched, etc. |
| Sr.No. | Example & Description |
|---|---|
| 1 | python|perlMatch “python” or “perl” |
| 2 | rub(y|le))Match “ruby” or “ruble” |
| 3 | Python(!+|\?)“Python” followed by one or more ! or one ? |
This needs to specify match position.
| Sr.No. | Example & Description |
|---|---|
| 1 | ^PythonMatch “Python” at the start of a string or internal line |
| 2 | Python$Match “Python” at the end of a string or line |
| 3 | \APythonMatch “Python” at the start of a string |
| 4 | Python\ZMatch “Python” at the end of a string |
| 5 | \bPython\bMatch “Python” at a word boundary |
| 6 | \brub\B\B is nonword boundary: match “rub” in “rube” and “ruby” but not alone |
| 7 | Python(?=!)Match “Python”, if followed by an exclamation point. |
| 8 | Python(?!!)Match “Python”, if not followed by an exclamation point. |
| Sr.No. | Example & Description |
|---|---|
| 1 | R(?#comment)Matches “R”. All the rest is a comment |
| 2 | R(?i)ubyCase-insensitive while matching “uby” |
| 3 | R(?i:uby)Same as above |
| 4 | rub(?:y|le))Group only without creating \1 backreference |
Recursion is a fundamental programming concept where a function calls itself in order to solve a problem. This technique breaks down a complex problem into smaller and more manageable sub-problems of the same type. In Python, recursion is implemented by defining a function that makes one or more calls to itself within its own body.
As we discussed before Recursion is a technique where a function calls itself. Here for understanding recursion, it’s required to know its key components. Following are the primary components of the recursion −
The Base case is a fundamental concept in recursion, if serving as the condition under which a recursive function stops calling itself. It is essential for preventing infinite recursion and subsequent stack overflow errors.
The base case provides a direct solution to the simplest instance of the problem ensuring that each recursive call gets closer to this terminating condition.
The most popular example of recursion is calculation of factorial. Mathematically factorial is defined as −
n! = n × (n-1)!
It can be seen that we use factorial itself to define factorial. Hence this is a fit case to write a recursive function. Let us expand above definition for calculation of factorial value of 5.
5! =5 × 4!
   5 × 4 × 3!
   5 × 4 × 3 × 2!
   5 × 4 × 3 × 2 × 1!
   5 × 4 × 3 × 2 × 1=120
While we can perform this calculation using a loop, its recursive function involves successively calling it by decrementing the number till it reaches 1.
The following example shows hows you can use a recursive function to calculate factorial −
deffactorial(n):if n ==1:print(n)return1#base caseelse:print(n,'*', end=' ')return n * factorial(n-1)#Recursive caseprint('factorial of 5=', factorial(5))
The above programs generates the following output −
5 * 4 * 3 * 2 * 1
factorial of 5= 120
The recursive case is the part of a recursive function where the function calls itself to solve a smaller or simpler instance of the same problem. This mechanism allows a complex problem to be broken down into more manageable sub-problems where each them is a smaller version of the original problem.
The recursive case is essential for progressing towards the base case, ensuring that the recursion will eventually terminate.
Following is the example of the Recursive case. In this example we are generating the Fibonacci sequence in which the recursive case sums the results of the two preceding Fibonacci numbers −
deffibonacci(n):if n <=0:return0# Base case for n = 0elif n ==1:return1# Base case for n = 1else:return fibonacci(n -1)+ fibonacci(n -2)# Recursive casefib_series =[fibonacci(i)for i inrange(6)]print(fib_series)
The above programs generates the following output −
[0, 1, 1, 2, 3, 5]
Binary Search using Recursion

Binary search is a powerful algorithm for quickly finding elements in sorted lists, with logarithmic time complexity making it highly efficient.

Let us have a look at another example to understand how recursion works. The problem at hand is to check whether a given number is present in a list.

While we can perform a sequential search for a certain number in the list using a for loop and comparing each number, the sequential search is not efficient especially if the list is too large. The binary search algorithm that checks if the index 'high' is greater than index 'low. Based on value present at 'mid' variable, the function is called again to search for the element.

We have a list of numbers, arranged in ascending order. The we find the midpoint of the list and restrict the checking to either left or right of midpoint depending on whether the desired number is less than or greater than the number at midpoint.

The following diagram shows how binary search works −

Python Recursion
Example

The following code implements the recursive binary searching technique −

Open Compiler
def bsearch(my_list, low, high, elem):
   if high >= low:
      mid = (high + low) // 2
      if my_list[mid] == elem:
         return mid
      elif my_list[mid] > elem:
         return bsearch(my_list, low, mid - 1, elem)
      else:
         return bsearch(my_list, mid + 1, high, elem)
   else:
      return -1

my_list = [5,12,23, 45, 49, 67, 71, 77, 82]
num = 67
print("The list is")
print(my_list)
print ("Check for number:", num)
my_result = bsearch(my_list,0,len(my_list)-1,num)

if my_result != -1:
   print("Element found at index ", str(my_result))
else:
   print("Element not found!")
Output

The list is
[5, 12, 23, 45, 49, 67, 71, 77, 82]
Check for number: 67
Element found at index 5
A Decorator in Python is a function that receives another function as argument. The argument function is the one to be decorated by decorator. The behaviour of argument function is extended by the decorator without actually modifying it.
In this chapter, we whall learn how to use Python decorator.
Function in Python is a first order object. It means that it can be passed as argument to another function just as other data types such as number, string or list etc. It is also possible to define a function inside another function. Such a function is called nested function. Moreover, a function can return other function as well.
The typical definition of a decorator function is as under −
defdecorator(arg_function):#arg_function to be decorateddefnested_function():#this wraps the arg_function and extends its behaviour#call arg_functionarg_function()return nested_function
Here a normal Python function −
deffunction():print("hello")
You can now decorate this function to extend its behaviour by passing it to decorator −
function=decorator(function)
If this function is now executed, it will show output extended by decorator.
Practice the following examples to understand the concept of Python decorators −
Following code is a simple example of decorator −
defmy_function(x):print("The number is=",x)defmy_decorator(some_function,num):defwrapper(num):print("Inside wrapper to check odd/even")if num%2==0:
     ret="Even"else:
     ret="Odd!"
  some_function(num)return ret   print("wrapper function is called")return wrapper

no=10
my_function = my_decorator(my_function, no)print("It is ",my_function(no))
The my_function() just prints out the received number. However, its behaviour is modified by passing it to a my_decorator. The inner function receives the number and returns whether it is odd/even. Output of above code is −
wrapper function is called
Inside wrapper to check odd/even
The number is= 10
It is Even
An elegant way to decorate a function is to mention just before its definition, the name of decorator prepended by @ symbol. The above example is re-written using this notation −
defmy_decorator(some_function):defwrapper(num):print("Inside wrapper to check odd/even")if num%2==0:
     ret="Even"else:
     ret="Odd!"
  some_function(num)return ret   print("wrapper function is called")return wrapper

@my_decoratordefmy_function(x):print("The number is=",x)
no=10print("It is ",my_function(no))
Python’s standard library defines following built-in decorators −
The classmethod is a built-in function. It transforms a method into a class method. A class method is different from an instance method. Instance method defined in a class is called by its object. The method received an implicit object referred to by self. A class method on the other hand implicitly receives the class itself as first argument.
In order to declare a class method, the following notation of decorator is used −
classMyclass:@classmethoddefmymethod(cls):#....
The @classmethod form is that of function decorator as described earlier. The mymethod receives reference to the class. It can be called by the class as well as its object. That means Myclass.mymethod as well as Myclass().mymethod both are valid calls.
Let us understand the behaviour of class method with the help of following example −
classcounter:
   count=0def__init__(self):print("init called by ", self)
  counter.count=counter.count+1print("count=",counter.count)@classmethoddefshowcount(cls):print("called by ",cls)print("count=",cls.count)
c1=counter()
c2=counter()print("class method called by object")
c1.showcount()print("class method called by class")
counter.showcount()
In the class definition count is a class attribute. The __init__() method is the constructor and is obviously an instance method as it received self as object reference. Every object declared calls this method and increments count by 1.
The @classmethod decorator transforms showcount() method into a class method which receives reference to the class as argument even if it is called by its object. It can be seen even when c1 object calls showcount, it displays reference of counter class.
It will display the following output −
init called by <__main__.counter object at 0x000001D32DB4F0F0>
count= 1
init called by <__main__.counter object at 0x000001D32DAC8710>
count= 2
class method called by object
called by <class '__main__.counter'>
count= 2
class method called by class
called by <class '__main__.counter'>
The staticmethod is also a built-in function in Python standard library. It transforms a method into a static method. Static method doesn’t receive any reference argument whether it is called by instance of class or class itself. Following notation used to declare a static method in a class −
classMyclass:@staticmethoddefmymethod():#....
Even though Myclass.mymethod as well as Myclass().mymethod both are valid calls, the static method receives reference of neither.
The counter class is modified as under −
classcounter:
   count=0def__init__(self):print("init called by ", self)
  counter.count=counter.count+1print("count=",counter.count)@staticmethoddefshowcount():print("count=",counter.count)
c1=counter()
c2=counter()print("class method called by object")
c1.showcount()print("class method called by class")
counter.showcount()
As before, the class attribute count is increment on declaration of each object inside the __init__() method. However, since mymethod(), being a static method doesn’t receive either self or cls parameter. Hence value of class attribute count is displayed with explicit reference to counter.
The output of the above code is as below −
init called by <__main__.counter object at 0x000002512EDCF0B8>
count= 1
init called by <__main__.counter object at 0x000002512ED48668>
count= 2
class method called by object
count= 2
class method called by class
count= 2
Python’s property() built-in function is an interface for accessing instance variables of a class. The @property decorator turns an instance method into a “getter” for a read-only attribute with the same name, and it sets the docstring for the property to “Get the current value of the instance variable.”
You can use the following three decorators to define a property −
A property object returned by property() function has getter, setter, and delete methods.
property(fget=None, fset=None, fdel=None, doc=None)
The fget argument is the getter method, fset is setter method. It optionally can have fdel as method to delete the object and doc is the documentation string.
The property() object’s setter and getter may also be assigned with the following syntax also.
speed =property()
speed=speed.getter(speed, get_speed)
speed=speed.setter(speed, set_speed)
Where get_speed() and set_speeds() are the instance methods that retrieve and set the value to an instance variable speed in Car class.
The above statements can be implemented by @property decorator. Using the decorator car class is re-written as −
classcar:def__init__(self, speed=40):@speed.setterdefspeed(self, speed):if speed<0or speed>100:print("speed limit 0 to 100")returnself._speed=speed return@propertydefspeed(self):return self._speedc1=car()print(c1.speed)#calls getter c1.speed=60#calls setterself._speed=speed return
Property decorator is very convenient and recommended method of handling instance attributes.