PHP (recursive acronym for PHP: Hypertext Preprocessor) is a widely-used open source general-purpose scripting language that is especially suited for web development and can be embedded into HTML.
The best way we learn anything is by practice and exercise questions. We have started this section for those (beginner to intermediate) who are familiar with PHP.
Hope, these exercises help you to improve your PHP coding skills. Currently, following sections are available, we are working hard to add more exercises. Happy Coding!
Note: It’s fine if you are playing around with PHP codes with the help of an online PHP editor, to enjoy a full-fledged PHP environment (since online editors have several caveats, e.g. embedding PHP within HTML) up and running on your own machine is much better of an option to learn PHP. Please read our installing PHP on Windows and Linux if you are unfamiliar to PHP installation.
List of PHP Exercises :
PHP Basic : 102 Exercises with Solution
PHP Basic Algorithm: 136 Exercises with Solution
PHP Error and Exception Handling [ 10 exercises with solution ]
PHP File Handling [ 18 exercises with solution ]
PHP Cookies and Sessions Exercises Practice Solution [ 16 exercises with solution ]
PHP OOP Exercises Practice Solution [ 19 exercises with solution ]
PHP arrays : 59 Exercises with Solution
PHP for loop : 38 Exercises with Solution
PHP functions : 6 Exercises with Solution
PHP classes : 7 Exercises with Solution
PHP Regular Expression : 7 Exercises with Solution
PHP Date : 28 Exercises with Solution
PHP String : 26 Exercises with Solution
PHP Math : 12 Exercises with Solution
PHP JSON : 4 Exercises with Solution
PHP Searching and Sorting Algorithm : 17 Exercises with Solution
More to Come !
PHP Challenges :
PHP Challenges: Part -1 [ 1- 25]
More to come
Note : You may accomplish the same task (solution of the exercises) in various ways, therefore the ways described here are not the only ways to do stuff. Rather, it would be great, if this helps you anyway to choose your own methods.
[ Want to contribute to PHP exercises? Send your code (attached with a .zip file) to us at w3resource[at]yahoo[dot]com. Please avoid copyrighted materials.]
PHP has a number of functions for handling as well as reporting errors. Besides, you can define your own way of handling and reporting errors. In this and subsequent pages we are going to discuss installation, runtime configuration, predefined constants and functions relating to PHP error handling and reporting.
Installation and configuration
In PHP 5, you don’t need any external library, and you don’t need any installation in addition to error handling and reporting.
Configuration settings for PHP Error handling and reporting are available in php.ini file, which is located in the php installation folder of your system.
Following is a list of error handling settings, there descriptions, default value and where they can be changed (Changeable).
For reference, settings of any PHP configuration can be changed in various ways – using ini_set(), in WINDOWS registry, in php.ini, in .htaccess or in httpd.conf. PHP_INI_ALL refers that the related configuration can be changed in any the aforementioned ways. PHP_INI_SYSTEM refers the entry can be set in php.ini or httpd.conf.
Name
Type
Description
Default
Changeable
error_reporting
integer
Set the error reporting level.
NULL
PHP_INI_ALL
display_errors
string
Determines if errors are displayed or hidden.
“1”
PHP_INI_ALL
display_startup_errors
boolean
Even if display_errors is on, hides errors that occur during PHP’s startup sequence. Keep it off when online.
“0”
PHP_INI_ALL
log_errors
boolean
Specifies if script error messages should be logged to the server’s error log.
“0”
PHP_INI_ALL
log_errors_max_len
integer
Specifies the maximum length of log_errors in bytes.
“1024”
PHP_INI_ALL
ignore_repeated_errors
boolean
Do not log repeated messages.
“0”
PHP_INI_ALL
ignore_repeated_source
boolean
Ignore source of message when ignoring repeated messages.
“0”
PHP_INI_ALL
report_memleaks
boolean
If set to Off, memory leaks (the program is unable to release memory it has occupied) will not be displayed.
“1”
PHP_INI_ALL
track_errors
boolean
If enabled, variable $php_errormsg will always hold the last error message.
“0”
PHP_INI_ALL
html_errors
boolean
Turns HTML tags off in error messages.
“1”
PHP_INI_ALL
xmlrpc_errors
boolean
Formats errors as XML-RPC error message, turning normal error reporting off.
“0”
PHP_INI_SYSTEM
xmlrpc_error_number
integer
Used as the value of the XML-RPC fault Code element.
“0”
PHP_INI_ALL
docref_root
string
Format of a new error which contains a reference to a page describing the error or function causing the error.
“”
PHP_INI_ALL
docref_ext
string
Specifies the file extension of the reference page (as mentioned in docref_root).
“”
PHP_INI_ALL
error_prepend_string
string
String to output before an error message.
NULL
PHP_INI_ALL
error_append_string
string
String to output after an error message.
NULL
PHP_INI_ALL
error_log
string
Name of the file where script errors should be logged.
NULL
PHP_INI_ALL
PHP error handling – predefined constants
DescriptionList of predefined constants used in PHP 5 for error handling.
Predefined constants
Here is a list of the predefined constants used in PHP 5 for error handling :
Name
Type
Description
value
E_ERROR
integer
Execution of the script comes to a halt. An example is memory allocation problem.
1
E_WARNING
integer
Execution of the script is not halted, warnings generated.
2
E_PARSE
integer
Parse errors generated by parsers during compilation.
4
E_NOTICE
integer
Run-time notices which indicated that may be an error took place but may also be a normal course of action.
8
E_CORE_ERROR
integer
Fatal errors that occur during the initial startup of PHP.
16
E_CORE_WARNING
integer
Warnings (execution of the script is not halted) that occur during PHP’s initial startup.
32
E_COMPILE_ERROR
integer
Fatal compile-time errors.
64
E_COMPILE_WARNING
integer
Compile-time warnings, execution of the script is not halted.
128
E_USER_ERROR
integer
User-generated error message.
256
E_USER_WARNING
integer
User-generated warning message.
512
E_USER_NOTICE
integer
Same as E_NOTICE. The only difference is, trigger_error() function is used here to generate the error message.
1024
E_STRICT
integer
User-generated notice message.
2048
E_RECOVERABLE_ERROR
integer
Catchable fatal error.
4096
E_DEPRECATED
integer
Run-time notices.
8192
E_USER_DEPRECATED
integer
User-generated warning message.
16384
E_ALL
integer
All errors and warnings, as supported. Exception level E_STRICT.
30719
All these constants are available in php.ini of your PHP installation folder.
Cookies are used to store the information of a web page in a remote browser, so that when the same user comes back to that page, that information can be retrieved from the browser itself.
In this tutorial, we will discuss how to use Cookies in PHP. We have several examples in this tutorial which will help you to understand the concept and use of a cookie.
Uses of cookie
Cookies are often used to perform following tasks:
Session management: Cookies are widely used to manage user sessions. For example, when you use an online shopping cart, you keep adding items in the cart and finally when you checkout, all of those items are added to the list of items you have purchased. This can be achieved using cookies.
User identification: Once a user visits a webpage, using cookies, that user can be remembered. And later on, depending upon the search/visit pattern of the user, content which the user likely to be visited are served. A good example of this is ‘Retargetting’. A concept used in online marketing, where depending upon the user’s choice of content, advertisements of the relevant product, which the user may buy, are served.
Tracking / Analytics: Cookies are used to track the user. Which, in turn, is used to analyze and serve various kind of data of great value, like location, technologies (e.g. browser, OS) form where the user visited, how long (s)he stayed on various pages etc.
How to create a cookie in PHP
PHP has a setcookie() function to send a cookie. We will discuss this function in detail now.
So, what does the code above does? The first parameter sets the name of the cookie as ‘w3resource’, the second parameter sets the value as ‘w3resource tutorials’, the third parameter states that the cookie will be expired after 3600 seconds (note the way it has been declared, we use time() and then add the number of seconds we wish the cookie must be expired after), the fourth parameter sets path on the server ‘/home/your_name’ where your_name may be an username, so it directs the home directory of a user, the fifth and sixth parameter is set to 1, i.e. true, so the cookie is available over secure connections only and it is available on HTTP protocol only.
echo $_COOKIE["w3resource"]; simply prints the cookie value. This way you can retrieve a cookie value.
Output:
w3resource tutorials
How to create a cookie without urlencoding the cookie value
The setcookie() sends a cookie by urlencoding the cookie value. If you want to send a cookie without urlencoding the cookie value, you have to use setrawcookie().
This function has all the parameters which setcookie() has, and the return value is also boolean.
PHP $_COOKIE autoglobal
If a cookie is successfully sent to you from the client, it is available in $_COOKIE, which is automatically global in PHP, if the variables_order directive in php.ini is set to C.
If you wish to retreive all the cookies, you may use the following command
<?php
print_r($_COOKIE);
?>
Copy
headers already sent problem because of cookies
PHP Cookies are part of the HTTP header. Therefore, in a PHP script, if it is not set before any another output is sent to the browser, you will get a warning like “…headers already sent….”.
To get rid of the problem, you may use “Output buffering functions”. Following code shows how to add an output buffering function.
<?php
ob_start(); //at the begining of the php script
//your code goes here
//add these two lines at the end of the script
$stuff = ob_get_clean();
echo $stuff;
?>
Copy
How to delete a cookie
To delete a cookie value, you may set the expiry time of the cookie in the past. In the following code snippet, cookie expiry time is set one hour before.
This may confuse you if you are just starting out with web programming. But in practice, Cookies are defined by RFC 2965. It is a standard which can be used any programming language. It has nothing to do with PHP vs JavaScript. In PHP, as we have seen in the first example of this tutorial, that cookies can be set such a way that it can’t be accessed by client side JavaScript, but that is a programming feature only.
Cookies vs Sessions
Both cookies and sessions are used for storing persistent data. But there are differences for sure.
Sessions are stored on server side. Cookies are on the client side.
Sessions are closed when the user closes his browser. For cookies, you can set time that when it will be expired.
Sessions are safe that cookies. Because, since stored on client’s computer, there are ways to modify or manipulate cookies.
Hopefully, this tutorial about PHP cookies is useful for you. Let us know if you have questions or suggestions.
In this page, we will discuss how file uploading is performed using PHP. For uploading files using PHP, we need to perform following tasks –
1. Set up an html page with a form using which we will upload the file. 2. Setup a PHP script to upload the file to the server as well as move the file to it’s destination. 3. Inform the user whether the upload was successful or not.
Code Explanation: $_FILES[“uploaded_file”][“name”] The original name of the file uploaded from the user’s machine. $_FILES[“uploaded_file”][“type”] The MIME type of the uploaded file. You can use different types for test files, images and video. $_FILES[“uploaded_file”][“size”] The size of the uploaded file in bytes. $_FILES[“uploaded_file”][“tmp_name”] The location in which the file is temporarily stored on the server. $_FILES[“uploaded_file”][“error”] An error code if the file upload fails.
This way you can upload files to a web server. We encourage you to copy the codes above and try it on your computer or a web server.
Syntax:mail(to, subject, message, extra headers, additional parameters)
Parameter:
Name
Description
Required / Optional
Type
to
Mail address to which you want to send mail
Required
String
subject
Subject of the mail
Required
String
message
Message to be sent with the mail. Each line of the message should be separated with a LF (\n). Lines should not be larger than 70 characters.
Required
String
extra headers
Additional headers like from, CC, BCC. If more than one additional headers are used, they must be separated with CRLF (Carriage return line feed), i.e. new line.
Optional
string
additional parameters
Additional parameters like – the envelope sender address when using sendmail with the -f sendmail option, can be used using this parameter.
Optional
string
Return value:
Returns true if the mail is successfully sent, otherwise, it returns false.
Value Type: boolean
Example:
<?php
$to  = '[email protected]';
$subject = 'Demo mail ';
$message = 'This is a demo mail. Please reply to make sure the mail communication is okay.';
mail($to, $subject, $message);
?>
Copy
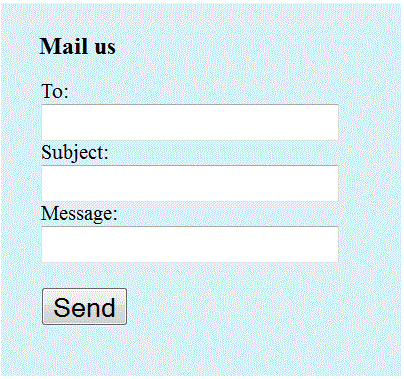
Send a simple mail using mail() function
Browse view of the form for sending simple mail in php
We encourage you to replace the value of the parameters used in the above example and test it.
Send mail in PHP with additional parameters
You can pass additional parameters as command line options to the program configured to be used while sending mail. Those said configurations are defined by the sendmail_path configuration. One example of using additional parameter is setting the envelope sender address with -f option.
This tutorial discusses PHP form handling/processing. You will learn how to collect user-supplied form data using POST and GET method from various from controls like text, select, radio, checkbox and textarea.
When user submits data by clicking on “complete reservation”, data supplied to various fields of the form goes to the file mentioned as a value of the action attribute specified within the opening tag of the form. For this example, like often developers do, we have used this file itself for processing form data. So, <?php echo $_SERVER['PHP_SELF']; ?> points to the file itself. If you wish to use a PHP file other that this to process form data, you may replace that with filename of your choice.
Form data is submitted to the PHP file for processing using POST here. Other methods you may use instead of POST is GET and REQUEST.
In a moment we will see differences between those three methods.
GET vs POST vs REQUEST
All of these methods create an associative array(e.g. array( key => value, key2 => value2, key3 => value3, …)). This array holds key-value pairs, where keys are names of the form controls and data supplied to those controls are values.
Both GET, POST and REQUEST are treated as $_GET, $_POST and $_REQUEST. All of these are superglobals,i.e. automatically global variables. So, they can be accessed throughout a script, including within functions or methods, without declaring them explicitly as global $variable;.
$_GET is an associative array of variables passed to the current script via the URL parameters.
$_POST is an associative array of variables passed to the current script via the HTTP POST method.
$_REQUEST is also an associative array. Since it contains the contents of $_GET, $_POST and $_COOKIE automatically, it can be modified remotely and thus can’t be trusted. So, it may be not a good idea to use REQUEST when processing form data. so, you may use GET or POST.
Which one shall I use? GET or POST
Sometimes, this may bother a beginner. Let’s see both of this methods a bit more in detail, which, hopefully, help you to pick one.
GET appends name/value pairs to the URL and this way passes the values collected from form to the destination PHP file. POST method embeds the name-value pairs inside the body of the HTTP request and the information is sent to the server.
Browsers have limitations when it comes to appending name value pairs to the url, as it happens in case of GET. The effective limitation is about 2000 characters. Some Firewalls or IDS also produce unreliable results because of this. Moreover, name value pairs are also cached in browser. If somebody bookmarks the url containing name value pairs, (s)he can directly get the values passed previously.
Passing the values appended to the url, particularly when sending sensitive information is not a good idea for security reasons.
Limitations of characters does not come to POST since it embeds name-value pairs within the body of the HTTP request. Moreover POST supports advanced functionality such as support for multi-part binary input while uploading files to server.
POST is preferred by developers, in general, to send form data to the server. GET may be used for sending nonsensitive data.
Using POST
Now, we will see how we can send data using POST and how to access data send using POST. We will take the HTML form shown above in this tutorial for demonstration.
When you use POST, the value of the method attribute is POST. And you can collect values send bu POST to the file specified as the value of action attribute. In this example, we are using the file itself, where the code for the HTML form resides.
POST creates an associative array. So, after form is submit, you may access that data using $_POST array. Let’s add the following PHP code in that file (say form-handling-example-form.php)to view what we receive after filling our example HTML form with some arbitrary data.
<?php
print_r($_POST);
?>
Copy
And following will be output of after form data is submit (with data we supplied to the form for demonstration. You may use your own data).
In practice, though, you will need to collect data for individual fields/controls of the form. In a moment, we will discuss that.
How to collect text input using POST
To collect text input data, we use $_POST['fieldname'], where field name is value of the associated field’s name attribute. So, for the example form, to collect data supplied by user in Full Name field, we use $_POST['full_name']. You may collect data in this fashion for fields if value of the type attribute is text or email or date.
For collecting data form selection list, radio, and checkbox, we need to be a little tricky, though.
How to collect selection list data/value using POST
Here is a piece of code which you may use to collect data from a selection list.
The code above will collect data/value form a checkbox.
How to collect radio button data/value using POST
Using a simple PHP Switch statement, you may collect data from a radio button.
<label>Terms and conditions<span class="note">*</span></label>
  <input type="radio" name="tnc" value="agree" <?php echo $tncv; ?>>I agree<br>
  <input type="radio" name="tnc" value="disagree" <?php echo $tnc1v; ?>>I disagree<br>
$tnc = $_POST['tnc'];
switch($tnc)
{
case "agree":
$tncv="checked";
$tnc1v="";
break;

case "disagree":
$tncv="";
$tnc1v="checked";
break;

default: // By default 1st option is selected
$tncv="checked";
$tnc1v="";
break;
};
Copy
Detecting if the form is submit
To detect whether a form is submitted, you may use following code pattern.
if (isset($_POST['submit'])){
//do something
}
Copy
Where submit is the name of the submit button used to submit data.
Using GET
If you wish to collect data using GET instead of POST, you have to change the value of the method attribute of the form in question as GET. User supplied form data can be collected using $_GET associative array in the similar fashion we shown POST to be used to collect data.
For the form in the example in this tutorial, if we use GET instead of POST, and supply some arbitrary data to the form and submit, data will be passed to the url as name-value pairs. Following picture shows you what happens.
You may download the form used in this example and try all the options shown in this tutorial.
Form handling/processing is a very important part of learning PHP and hopefully this tutorial is useful for you to do that. If you feel some more relevant stuff can be useful, let us know.
Due to its simplicity and ease of use, PHP is a widely-used open source general-purpose scripting language. PHP is used for creating interactive and dynamic web pages quickly and can access a wide range of relational database management systems such as MySQL, PostgreSQL, and SQLite. Many of us already access MySQL databases by using either the MySQL or MySQLi extensions. As of version 5.1 PHP provides new database connection abstraction library, PHP Data Objects (PDO).
Contents:
What is PDO?
Installing PDO
Predefined Constants
Supported Databases
Sample database, table, table structure, table records for various examples
The PDO class
Details of the PDO class methods
Details of PDOStatement class
What is PDO?
PDO – PHP Data Object.
A set of PHP extensions that provide a core PDO class and database specific drivers.
Provides a vendor-neutral lightweight data-access abstraction layer.
Focus on data access abstraction rather than database abstraction.
PDO requires the new object oriented features in the core of PHP 5, therefore it will not run with earlier versions of PHP.
Installing PDO
PDO is dividing into two components: – Core which provides the interface. – Drivers to access particular driver.
Installing PDO on Unix systems: — PDO (Core) and the PDO_SQLITE driver (SQLITE driver) is enabled by default as of PHP 5.1.0. To access other databases you must enable the PDO driver. — To install PDO as a shared module the php.ini needs to be updated so that the PDO extension will be loaded automatically when PHP runs. You also need to enable other database specific drivers and they must be listed after the pdo.so line, as PDO must be initialized before the database-specific extensions can be loaded. If you built PDO and the database-specific extensions statically, you can skip this step: extension=pdo.so
Installing PDO on Windows systems: — PDO and all the major drivers ship with PHP as shared extensions, and simply need to be activated by editing the php.ini file : extension=php_pdo.dll. This step is not necessary for PHP 5.3 and above, as a DLL is no longer required for PDO. — Next, choose the other database-specific DLL files and either use dl() to load them at runtime, or enable them in php.ini below php_pdo.dll.
To get the effect of a new configuration in php.ini file you will need to restart PHP.
Predefined Constants
Supported Database
PDO interface is available in the following drivers:
Database name
Driver name
Cubrid
PDO_CUBRID
FreeTDS / Microsoft SQL Server / Sybase
PDO_DBLIB
Firebird/Interbase 6
PDO_FIREBIRD
IBM DB2
PDO_IBM
IBM Informix Dynamic Server
PDO_INFORMIX
MySQL 3.x/4.x/5.x
PDO_MYSQL
Oracle Call Interface
PDO_OCI
ODBC v3 (IBM DB2, unixODBC and win32 ODBC)
PDO_ODBC
PostgreSQL
PDO_PGSQL
SQLite 3 and SQLite 2
PDO_SQLITE
Microsoft SQL Server / SQL Azure
PDO_SQLSRV
4D
PDO_4D
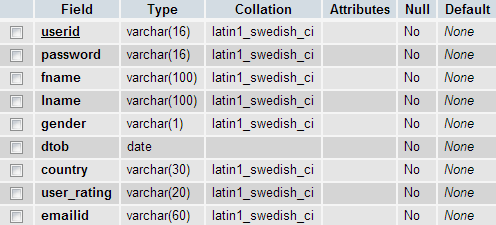
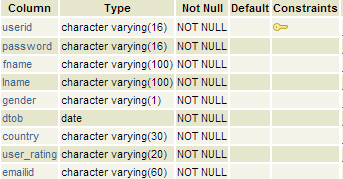
Sample database, table, table structure, table records for various examples
dsn – The Data Source Name, or DSN, contains the information required to connect to the database. The string contains the prefix name (e.g. pgsql for PostgreSQL database), a colon, and the server keyword. username – A string that contains the user’s name. This parameter is optional for some PDO drivers. password – A string that contains the user’s password. This parameter is optional for some PDO drivers. driver_options – Optional. A key=>value array of driver-specific connection options.
Return Value: Returns a PDO object on success. If failure, returns a PDOException object.
Database Connections
Connections are established by creating instances of the PDO base class. It doesn’t matter which driver you want to use; you always use the PDO class name. The constructor accepts parameters for specifying the database source (known as the DSN) and optionally for the username and password (if any).
If there are any connection errors, a PDOException object will be thrown. You may catch the exception if you want to handle the error condition, or you can leave it to global exception handler which can be set up via set_exception_handler().
Error: SQLSTATE[08006] [7] could not connect to server: Connection refused (0x0000274D/10061) Is the server running on host “localhost” (::1) and accepting TCP/IP connections on port 5432? FATAL: password authentication failed for user “postgress”
Closing a connection
<?php>
$dbh = new PDO('mysql:host=localhost;dbname=test', $user, $pass);
// use the connection here
// Following command close the connection.
$dbh = null;
?>
Copy
Persistent connections
Many web applications will benefit from making persistent connections to database servers. Persistent connections are not closed at the end of the script but are cached and re-used when another script requests a connection using the same credentials. The persistent connection cache allows you to avoid the overhead of establishing a new connection every time a script needs to talk to a database, resulting in a faster web application.
Turns off auto-commit mode and begins a transaction. The transaction begins with PDO::beginTransaction and will end when PDO::commit or PDO::rollback is called.
Syntax:bool PDO::beginTransaction ( void )
Return Value: Returns TRUE on success or FALSE on failure.
Example: The following example a MySQL database called hr and table called user_details have used. It starts a transaction and then executes a command to add one row into the table user_details. The command is sent to the database and the transaction is explicitly ended with PDO::commit.
Commits a transaction, returning the database connection to auto-commit mode until the next call to PDO::beginTransaction() starts a new transaction.
Syntax:bool PDO::commit ( void )
Return Value: Returns TRUE on success or FALSE on failure.
Example: See previous (PDO::beginTransaction) example.
PDO::errorCode
PDO::errorCode retrieves the SQLSTATE (a two characters class value followed by a three characters subclass value) associated with the last operation on the database handle.
Syntax:mixed PDO::errorCode();
Return Value: Returns a five-char SQLSTATE as a string, or NULL if there was no operation on the statement handle.
Example:
In this example, the name of the column is misspelled (genderr instead of gender), causing an error. errorCode() displays the error.
Retrieves extended error information associated with the last operation on the database handle.
Syntax:array PDO::errorInfo();
Return Value: An array of error information about the last operation performed by this database handle. The array consists of the following fields:
0 : The SQLSTATE error code. 1 : The driver-specific error code. 2 : The driver-specific error message.
Example: In the following example (PostgreSQL database is used), the name of the column is misspelled (genderr instead of gender), causing an error, which is then reported.
Output:42703Array ( [0] => 42703 [1] => 7 [2] => ERROR: column “genderr” does not exist LINE 1: SELECT * FROM user_details where genderr=’M’ ^ )
PDO::exec
Execute an SQL statement and return the number of rows affected by the statement.
Syntax:int PDO::exec ($statement)
Parameters : statement – An SQL statement to prepare and execute.
Return Value: An integer reporting the number of rows affected. If no rows were affected, PDO::exec() returns 0.
Example:
In the following example (PostgreSQL database is used), the name of the column is misspelled (genderr instead of gender), causing an error, which is then reported.
<?php
try {
$dbhost = 'localhost';
$dbname='hr';
$dbuser = 'root';
$dbpass = '';
$connec = new PDO("mysql:host=$dbhost;dbname=$dbname", $dbuser, $dbpass);
}catch (PDOException $e) {
echo "Error : " . $e->getMessage() . "<br/>";
die();
}
/*  Delete some rows from the allcountry table  */
$count = $connec->exec("DELETE FROM allcountry WHERE country_id = 'AR'");
/* Return number of rows */
echo("Number of deleted rows in allcountry table : ". $count);
?>
Copy
Output:Number of deleted rows in allcountry table : 1
PDO::getAttribute
Retrieves the value of a predefined PDO or driver attribute.
Syntax:mixed PDO::getAttribute ( $attribute )
Parameters: One of the PDO::ATTR_* constants. The constants that apply to database connections are as follows: PDO::ATTR_AUTOCOMMIT PDO::ATTR_CASE PDO::ATTR_CLIENT_VERSION PDO::ATTR_CONNECTION_STATUS PDO::ATTR_DRIVER_NAME PDO::ATTR_ERRMODE PDO::ATTR_ORACLE_NULLS PDO::ATTR_PERSISTENT PDO::ATTR_PREFETCH PDO::ATTR_SERVER_INFO PDO::ATTR_SERVER_VERSION PDO::ATTR_TIMEOUT
Return Value: A successful call returns the value of the requested PDO attribute. On failure, returns null.
Example: The following example (PostgreSQL database is used) retrieving database connection attributes.
Return Value: If a sequence name was not specified for the name parameter, PDO::lastInsertId() returns a string representing the row ID of the last row that was inserted into the database. If a sequence name was specified for the name parameter, PDO::lastInsertId() returns a string representing the last value retrieved from the specified sequence object. If the PDO driver does not support this capability, PDO::lastInsertId() triggers an IM001 SQLSTATE.
Example:
The following example (PostgreSQL database is used) returns the ID of the last inserted row or sequence value.
Parameters: statement: A string contains a valid SQL statement. driver_options: An array containing an attribute name and value (key=>value pairs ).
Return Value: Returns a PDOStatement object on success. On failure, returns a PDOException object, or false depending on the value of PDO::ATTR_ERRMODE.
Example – 1:
The following example prepares an SQL statement with named parameters.
<?php
try {
$dbhost = 'localhost';
$dbname='hr';
$dbuser = 'root';
$dbpass = '';
$connec = new PDO("mysql:host=$dbhost;dbname=$dbname", $dbuser, $dbpass);
}catch (PDOException $e) {
echo "Error : " . $e->getMessage() . "<br/>";
die();
}
/* Execute a prepared statement by passing an array of values */
$sql = 'SELECT fname, lname, country FROM user_details
Rolls back the current transaction, as initiated by PDO::beginTransaction(). A PDOException will be thrown if no transaction is active.
Syntax:bool PDO::rollBack ( void )
Return Value: TRUE if the method call succeeded, FALSE otherwise.
Example:
Following example begins a transaction and issues a DROP statement before rolling back the changes. In MySQL the DROP TABLE statement automatically commits the transaction, therefore nothing will roll back.
Syntax:bool PDO::setAttribute ( int $attribute , mixed $value )
Here is a list of some of the available generic attributes:
PDO::ATTR_CASE: Force column names to a specific case.
PDO::CASE_LOWER: Force column names to lower case.
PDO::CASE_NATURAL: Leave column names as returned by the database driver.
PDO::CASE_UPPER: Force column names to upper case.
PDO::ATTR_ERRMODE: Error reporting.
PDO::ERRMODE_SILENT: Just set error codes.
PDO::ERRMODE_WARNING: Raise E_WARNING.
PDO::ERRMODE_EXCEPTION: Throw exceptions.
PDO::ATTR_ORACLE_NULLS (available with all drivers, not just Oracle): Conversion of NULL and empty strings.
PDO::NULL_NATURAL: No conversion.
PDO::NULL_EMPTY_STRING: Empty string is converted to NULL.
PDO::NULL_TO_STRING: NULL is converted to an empty string.
PDO::ATTR_STRINGIFY_FETCHES: Convert numeric values to strings when fetching. Requires bool.
PDO::ATTR_STATEMENT_CLASS: Set user-supplied statement class derived from PDOStatement. Cannot be used with persistent PDO instances. Requires array(string classname, array(mixed constructor_args)).
PDO::ATTR_TIMEOUT: Specifies the timeout duration in seconds. Not all drivers support this option, and it’s meaning may differ from driver to driver. For example, sqlite will wait for up to this time value before giving up on obtaining an writable lock, but other drivers may interpret this as a connect or a read timeout interval.
PDO::ATTR_AUTOCOMMIT (available in OCI, Firebird and MySQL): Whether to autocommit every single statement.
PDO::ATTR_EMULATE_PREPARES Enables or disables emulation of prepared statements. Some drivers do not support native prepared statements or have limited support for them. Use this setting to force PDO to either always emulate prepared statements (if TRUE), or to try to use native prepared statements (if FALSE).
PDO::MYSQL_ATTR_USE_BUFFERED_QUERY (available in MySQL): Use buffered queries.
PDO::ATTR_DEFAULT_FETCH_MODE: Set default fetch mode.
Return Value: Returns TRUE on success or FALSE on failure.
Example:
Following example shows how to set the PDO::ATTR_ERRMODE attribute.
Closes the cursor, enabling the statement to be executed again.
Syntax:bool PDOStatement::closeCursor ( void )
Return Value: Returns TRUE on success or FALSE on failure.
Example – 1:
<?php
try {
$dbhost = 'localhost';
$dbname='hr';
$dbuser = 'root';
$dbpass = '';
$connec = new PDO("mysql:host=$dbhost;dbname=$dbname", $dbuser, $dbpass);
}catch (PDOException $e) {
echo "Error : " . $e->getMessage() . "<br/>";
die();
}
/* Create a PDOStatement object */
$stmt = $connec->prepare('SELECT * from user_details');
/* Create a second PDOStatement object */
$otherStmt = $connec->prepare("SELECT * from usser_details where gender ='M'");
/* Execute the first statement */
$stmt->execute();
/* Fetch only the first row from the results */
$stmt->fetch();
/* The following call to closeCursor() may be required by some drivers */
$stmt->closeCursor();
/* Now we can execute the second statement */
$otherStmt->execute();
?>
Copy
PDOStatement::columnCount
Returns the number of columns in a result set.
Syntax:int PDOStatement::columnCount ( void )
Return Value: Returns TRUE on success or FALSE on failure.
Example – 1: The following example displays the number of columns of a particular table.
Fetch the SQLSTATE of the most recent operation on the database statement object.
Syntax: public string PDOStatement::errorCode ( void )
Return Value: Same to PDO::errorCode(), except that PDOStatement::errorCode() only retrieves error codes for operations performed with PDOStatement objects.
Example – 1: In the following example, SQL query has an error (wrong column name). errorCode() displays the error.
Retrieves error information associated with the last operation on the statement handle.
Syntax:array PDOStatement::errorInfo ( void )
Parameters:
Name
Description
Type
parameter
Parameter identifier. For a prepared statement using named placeholders, this will be a parameter name of the form :name.
mixed
value
The value to bind to the parameter.
mixed
data_type
Optional, PDO::PARAM_* constant.
int
Return Value: PDOStatement::errorInfo() returns an array of error information about the last operation performed by this statement handle. The array consists of the following fields:
0 – The SQLSTATE error code. 1 – The driver-specific error code. 2 – The driver-specific error message.
Example – 1 : In the following example, SQL statement has an error, which is displayed by errorinfo().
Syntax :public mixed PDOStatement::fetch ([ int $fetch_style [, int $cursor_orientation = PDO::FETCH_ORI_NEXT [, int $cursor_offset = 0 ]]] )
Parameters:
Name
Description
Type
parameter
Controls how the next row will be returned to the caller. This value must be one of the PDO::FETCH_* constants (see the constants details), defaulting to the value of PDO::ATTR_DEFAULT_FETCH_MODE (which defaults to PDO::FETCH_BOTH).
int
cursor_orientation
This value must be one of the PDO::FETCH_ORI_* constants, defaulting to PDO::FETCH_ORI_NEXT.
int
offset
For a PDOStatement object representing a scrollable cursor for which the cursor_orientation parameter is set to PDO::FETCH_ORI_ABS, this value specifies the absolute number of the row in the result set that shall be fetched.
int
Return Value: The return value of this function on success depends on the fetch type. In all cases, FALSE is returned on failure.
Example – 1: The following example shows how to fetch rows using different fetch styles.
<?php
try {
$dbhost = 'localhost';
$dbname='hr';
$dbuser = 'root';
$dbpass = '';
$conn = new PDO("mysql:host=$dbhost;dbname=$dbname", $dbuser, $dbpass);
}catch (PDOException $e) {
echo "Error : " . $e->getMessage() . "<br/>";
die();
}
$sth = $conn->prepare("SELECT fname, lname FROM user_details");
$sth->execute();
/* Exercise PDOStatement::fetch styles */
echo "PDO::FETCH_ASSOC: "."<br>";
echo "Return next row as an array indexed by column name"."<br>";
$result = $sth->fetch(PDO::FETCH_ASSOC);
print_r($result);
echo("<br>");
echo "PDO::FETCH_BOTH: "."<br>";
echo "Return next row as an array indexed by both column name and number"."<br>";
$result = $sth->fetch(PDO::FETCH_BOTH);
print_r($result);
echo("<br>");
echo "PDO::FETCH_LAZY: "."<br>";
echo "Return next row as an anonymous object with column names as properties"."<br>";
$result = $sth->fetch(PDO::FETCH_LAZY);
print_r($result);
echo("<br>");
echo "PDO::FETCH_OBJ: "."<br>";
echo "Return next row as an anonymous object with column names as properties"."<br>";
$result = $sth->fetch(PDO::FETCH_OBJ);
echo $result->fname;
?>
Copy
Output: PDO::FETCH_ASSOC: Return next row as an array indexed by column name Array ( [fname] => Scott [lname] => Rayy ) PDO::FETCH_BOTH: Return next row as an array indexed by both column name and number Array ( [fname] => Palash [0] => Palash [lname] => Ghosh [1] => Ghosh ) PDO::FETCH_LAZY: Return next row as an anonymous object with column names as properties PDORow Object ( [queryString] => SELECT fname, lname FROM user_details [fname] => Diana [lname] => Lorentz ) PDO::FETCH_OBJ: Return next row as an anonymous object with column names as properties John
PDOStatement::fetchAll
Returns an array containing the rows in a result set.
This argument have a different meaning depending on the value of the fetch_style parameter PDO::FETCH_COLUMN: Returns the indicated 0-indexed column. PDO::FETCH_CLASS: Returns instances of the specified class, mapping the columns of each row to named properties in the class. PDO::FETCH_FUNC: Returns the results of calling the specified function, using each row’s columns as parameters in the call.
mixed
ctor_args
Arguments of custom class constructor when the fetch_style parameter is PDO::FETCH_CLASS.
int
Return Value: An array of the remaining rows in the result set, or false if the method call fails.
Example – 1: The following example fetches all remaining rows in a result set
<?php
try {
$dbhost = 'localhost';
$dbname='hr';
$dbuser = 'root';
$dbpass = '';
$connec = new PDO("mysql:host=$dbhost;dbname=$dbname", $dbuser, $dbpass);
}catch (PDOException $e)
{
echo "Error : " . $e->getMessage() . "<br/>";
die();
}
$sth = $connec->prepare("SELECT fname, lname FROM user_details");
$sth->execute();
/* Fetch all of the remaining rows in the result set */
print("Fetch all of the remaining rows in the result set:\n");
$result = $sth->fetchAll();
print_r($result);
?>
Copy
Output:Fetch all of the remaining rows in the result set: Array ( [0] => Array ( [fname] => Scott [0] => Scott [lname] => Rayy [1] => Rayy ) [1] => Array ( [fname] => Palash [0] => Palash [lname] => Ghosh [1] => Ghosh ) [2] => Array ( [fname] => Diana [0] => Diana [lname] => Lorentz [1] => Lorentz ) [3] => Array ( [fname] => John [0] => John [lname] => ray [1] => ray ) )
PDOStatement::fetchColumn
Returns one column in a row from the next row of a result set.
Syntax:string PDOStatement::fetchColumn ([ int $column_number = 0 ] )
Parameters:
Name
Description
Type
column_number
An optional integer indicating the zero-based column number. The default is 0 (the first column in the row).
mixed
Return Value: Returns TRUE on success or FALSE on failure.
Example – 1: The following example returns one column in a row.
Returns the number of rows affected (added, deleted, or changed) by the last statement.
Syntax:public int PDOStatement::rowCount ( void )
Return Value: Return the number of rows.
Example – 1: The following example shows how to execute a prepared statement with named placeholders.
<?php
try {
$dbhost = 'localhost';
$dbname='hr';
$dbuser = 'root';
$dbpass = '';
$connec = new PDO("mysql:host=$dbhost;dbname=$dbname", $dbuser, $dbpass);
}catch (PDOException $e)
{
echo "Error : " . $e->getMessage() . "<br/>";
die();
}
/* Delete all rows from the alluser table *
$del = $connec->prepare('DELETE FROM alluser');
$del->execute();
/* Return number of rows that were deleted */
$count = $del->rowCount();
echo "Deleted ".$count." number of rows ";
?>
Copy
Output:Deleted 4 number of rows
PDOStatement::setAttribute
Set a statement attribute. Currently, no generic attributes are set but only driver specific:
Syntax:bool PDOStatement::setAttribute ( int $attribute , mixed $value )
Return Value:
Returns TRUE on success or FALSE on failure.
PDOStatement::setFetchMode
Set the default fetch mode for this statement.
Syntax: public bool PDOStatement::setFetchMode ( int $mode ) public bool PDOStatement::setFetchMode ( int $PDO::FETCH_COLUMN , int $colno ) public bool PDOStatement::setFetchMode ( int $PDO::FETCH_CLASS , string $classname , array $ctorargs ) public bool PDOStatement::setFetchMode ( int $PDO::FETCH_INTO , object $object )
Parameters:
Name
Description
Type
mode
The fetch mode must be one of the PDO::FETCH_* constants. See the constants list.
mixed
colno
Column number.
int
classname
Class name.
string
ctorargs
Constructor arguments.
array
object
Object.
object
Return Value: Returns TRUE on success or FALSE on failure.
Example – 1: The following example demonstrates the uses of PDO::FETCH_ASSOC, PDO::FETCH_NUM, PDO::FETCH_BOTH, PDO::FETCH_LAZY, PDO::FETCH_OBJ constants.
In this page, we are going to discuss how to take backups of MySQL databases and restoring them.
Take backup by copying table files
You can simple copy the table files of a MySQL database to a separate location and accomplish a backup. Later, when necessary, you simply copy them back to the original location to restore the database.
If you are using WAMP server for MySQL, then you can find table files within wamp > bin > mysql > mysql5.1.36 > data > databaseName. Where databaseName is a folder whose name is same as your database.
If you have installed MySQL manually, then you can find table files within Program Files > MySQL >MySQL Server 5.0 > data > databaseName. Where databaseName is a folder whose name is same as your database.
Remember in mysql5.1.36 and MySQL Server 5.0, 5.1.36 and 5.0 indicates the version of the MySQL, which differs if you are working on a different version of MySQL.
Take backup of delimited text files
SELECT * INTO OUTFILE C:\\publisher_backup.txt FROM publisher;
The above MySQL statement will take a backup of the publisher table into a file called publisher_backup.txt located in the C drive of your windows system.
Using LOAD DATA INFILE statement, you can restore data from the delimited text files.
Take backup using mysqldump
mysqldump command can be executed from mysql prompt. For all the code for mysqldump commands bellow, the database is the name of the database.
Take backup of a database
mysqldump database > backup-file.sql;
Copy
Restore a database
mysql database < backup-file.sql;
Copy
Copying data from one server to another
mysqldump --opt database | mysql --host=remote_host -C database
Copy
Where remote_host indicates a remote server where you want to take backup.
mysqlhotcopy command can be used to take backup of MyISAM and ARCHIVE tables. It runs on Unix.
For all the code for mysqlhotcopy commnd bellow, the database is the name of the database.
mysqlhotcopy database [/path_to_new_directory]
Copy
Where path_to_new_directory is the directory where backup will be taken.
Save MySQL query results into a text or CSV file
Here is an easy way to write MySQL query results into a .txt or .CSV files through the select statement.
Save query result into a .txt file :
mysql> SELECT code, name, continent FROM country INTO OUTFILE 'e:/country.txt';Query OK, 239 rows affected (0.03 sec)
Copy
Sample from .txt file:
ABW Aruba North America AFG Afghanistan Asia AGO Angola Africa AIA Anguilla North America ALB Albania Europe AND Andorra Europe ANT Netherlands Antilles North America ARE United Arab Emirates Asia ARG Argentina
Save query result into a country.csv file :
mysql> SELECT code, name, continent FROM country
INTO OUTFILE 'e:/country.csv'
FIELDS TERMINATED BY ','
ENCLOSED BY '"'
LINES TERMINATED BY '\n';Query OK, 239 rows affected (0.00 sec)
Import and export data between MySQL and Excel has become much easier in Excel 2007 than it’s previous versions. To explore the feature, you need to install MySQL For Excel.
You can install the MySQL For Excel component while installing MySQL Community Server 6. Or you may install it as an add-on upon your existing MySQL Server installation. Installation of this component has some prerequisites, though.
MySQL for Excel Requirements
You must have following installed on your machine for installing MySQL For Excel Installer :
.NET Framework 4.0 (Client or Full Profile).
Microsoft Office Excel 2007 or greater, for Microsoft Windows.
Visual Studio Tools for Office 4.0 and MySQL Installer may install this for you.
An available MySQL Server connection.
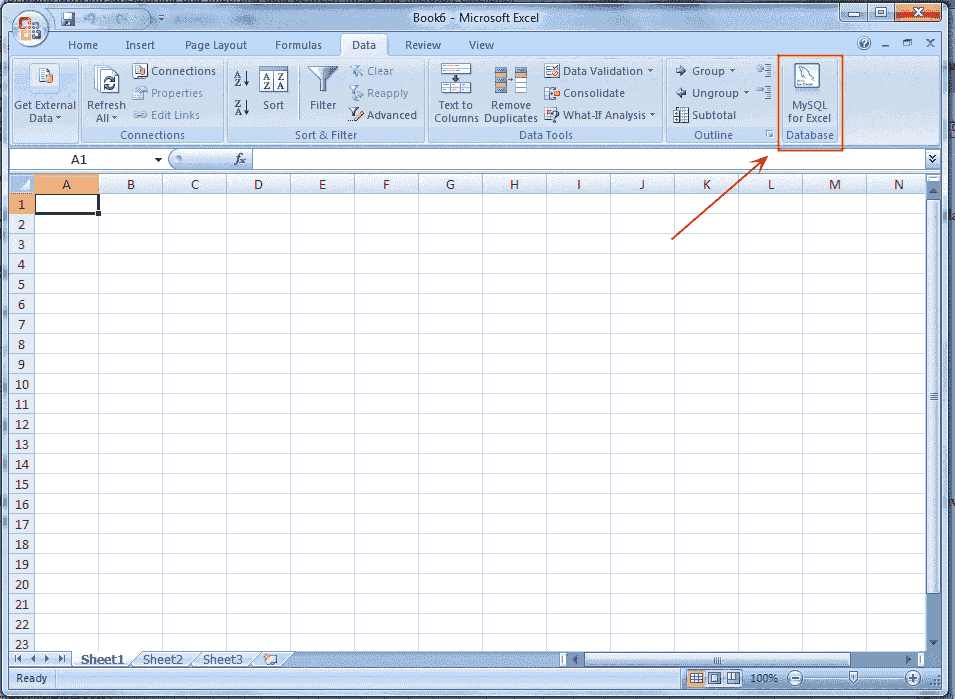
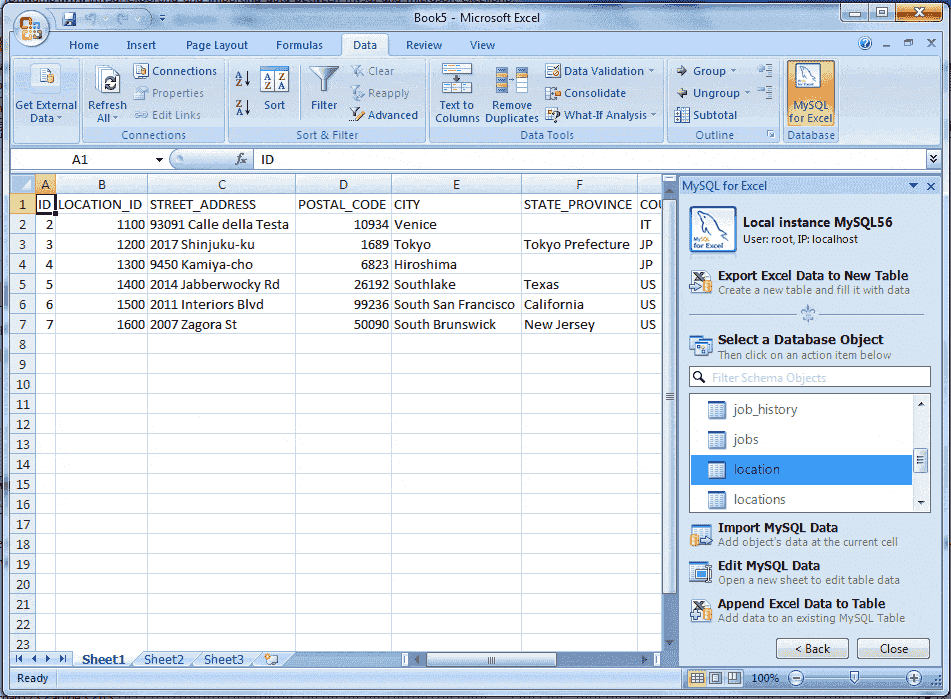
MySQL for Excel is loaded and executed by selecting the Data menu tab in Excel, and then choosing the “MySQL for Excel” Database icon. This opens a new Excel sidebar with the available MySQL for Excel options. The navigation bar with the MySQL for Excel icon is shown in the following screen shot:
Edit MySQL Data in Excel
MySQL for Excel enables you to load and edit MySQL data directly from Microsoft Excel, or yon can do it manually by pressing Commit Changes.
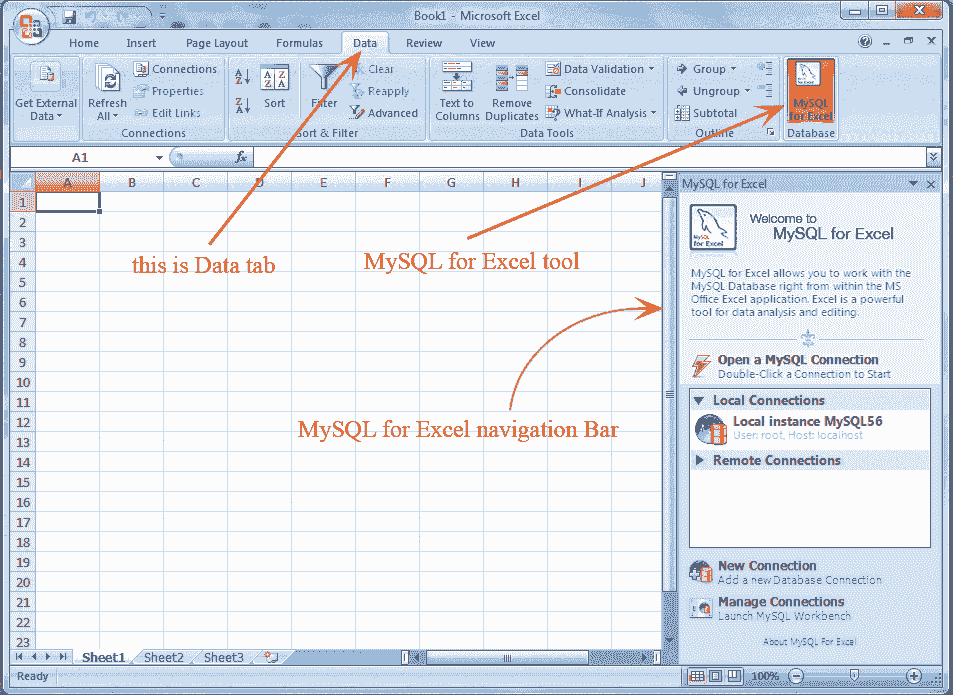
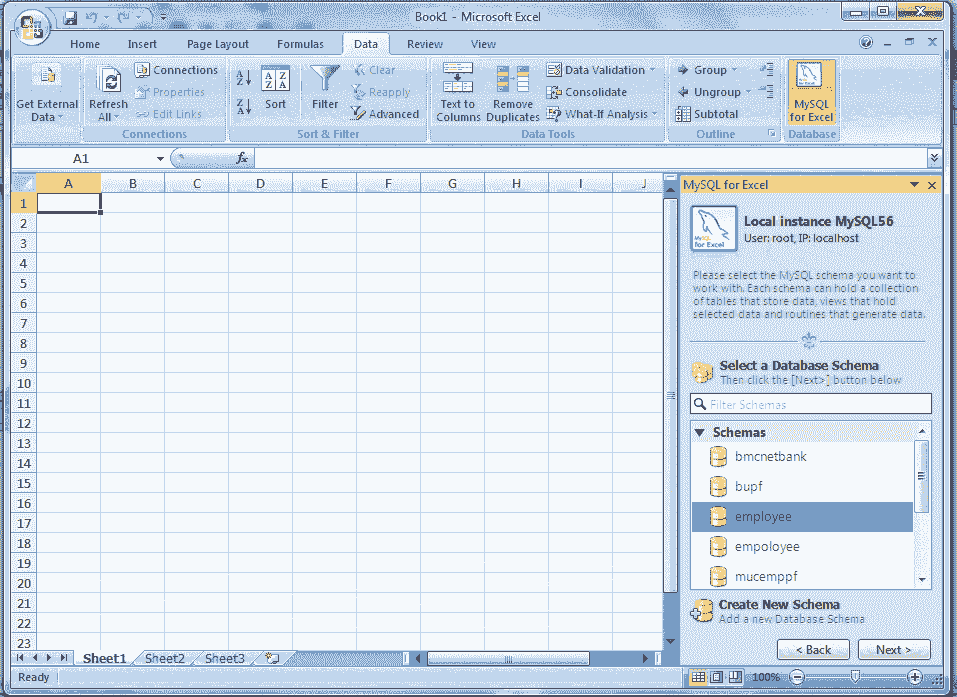
The example below uses the location table of the example employee database, but the screen will look the same for any table. Within MySQL for Excel, Open a MySQL Connection, click the employee schema, Next, select the location table, click Edit MySQL Data, then choose Import to import the data into a new Microsoft Excel worksheet for editing.
Here is the step by step guide to editing and commit the data:
Step 1:
Load Microsoft Office Excel 7
Step 2:
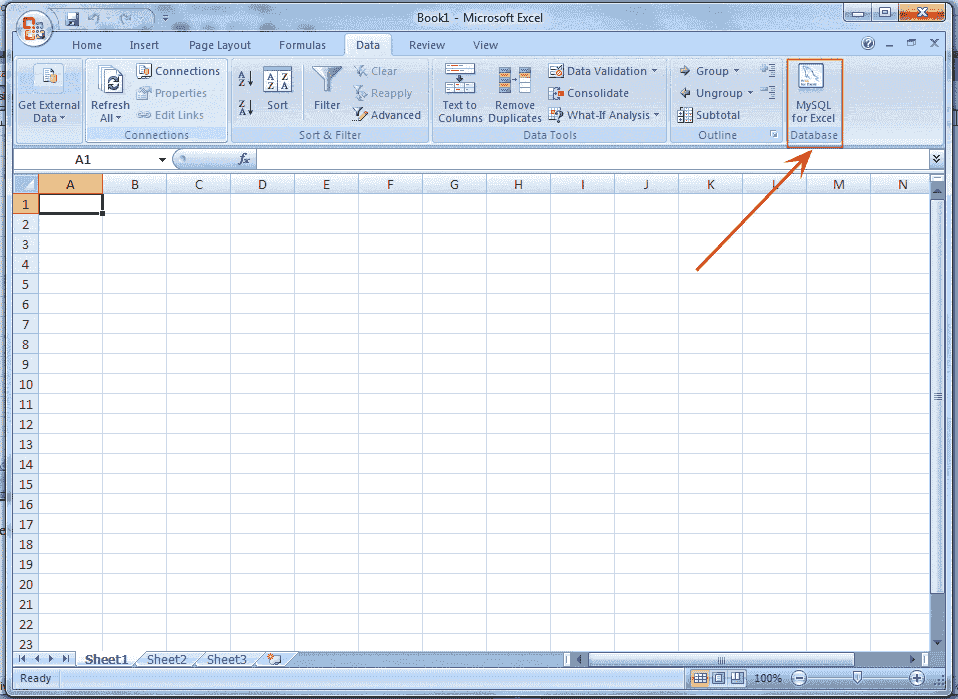
Click on Data Tab, see the above picture, the” MySQL for Excel” Database icon will appear shown below.
Step 3:
Click on “MySQL for Excel” Database icon. It opens a new Excel sidebar with the available MySQL for Excel options. The navigation bar with the MySQL for Excel icon is shown in the following picture.:
Here our Database is employee and we are working with location table, but the screen will look the same for any table.
Step 4:
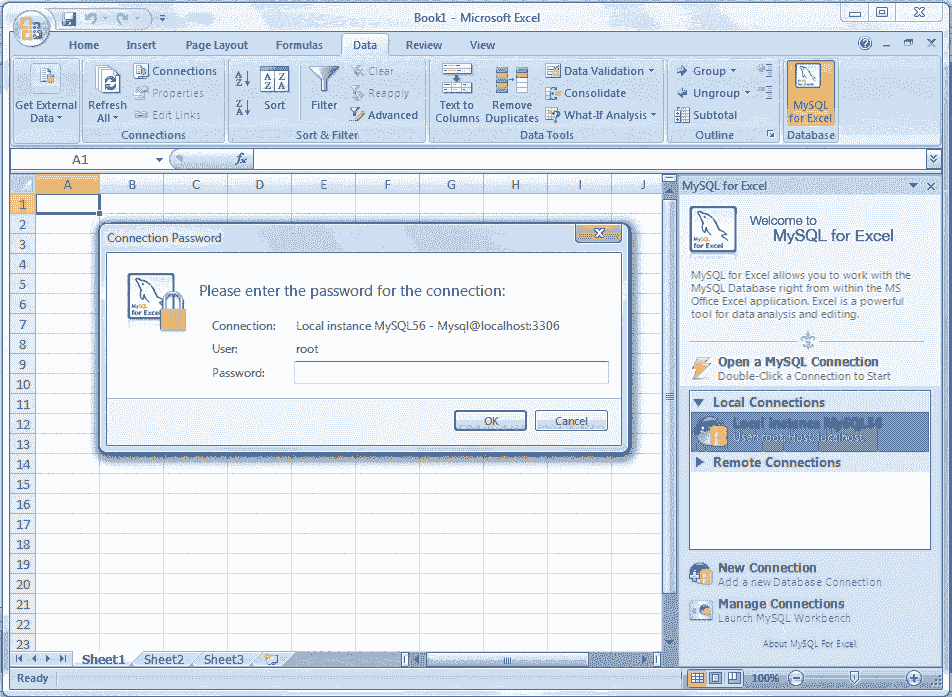
Within MySQL for Excel sidebar open a MySQL connection by double clicking. Here our connection is Local instance MySQL5.6 and with the following screen will appear for accepting the password.
Step 5:
Enter password for connection with MySQL server. The databases will show in MySQL for Excel sidebar. Our Database is employee. See the following picture.
Step 6:
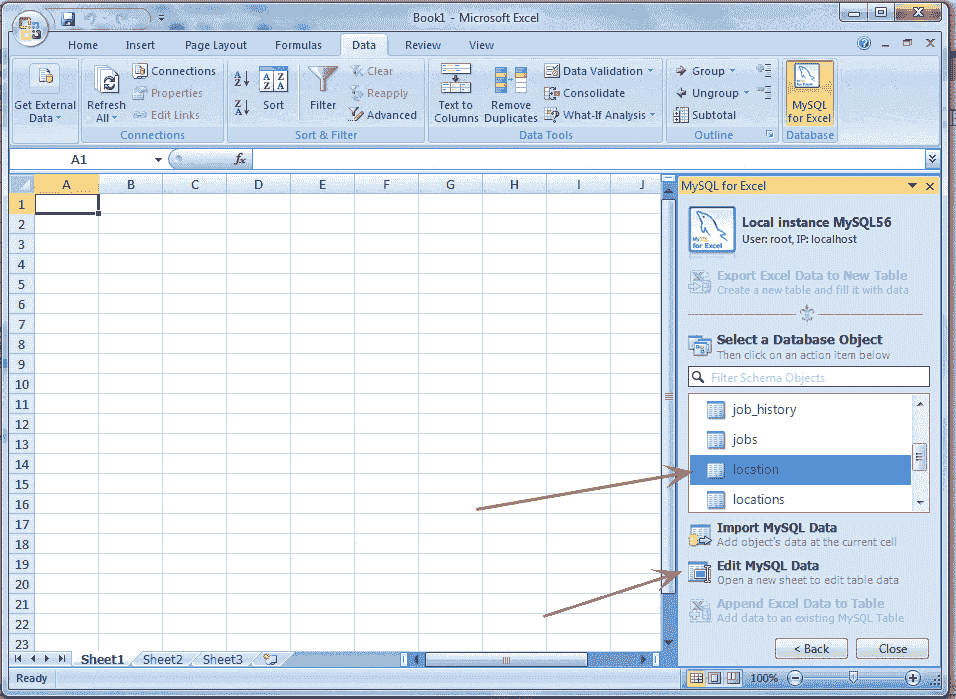
Double click on your desire database, and the tables within the database will display. Our table is location. See the following picture.
Step 7:
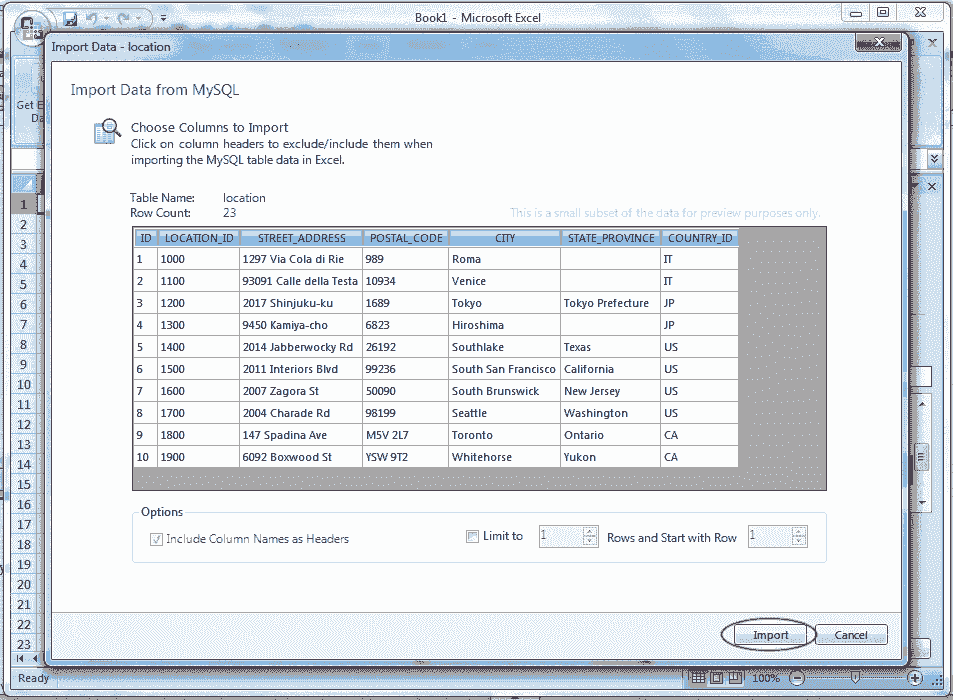
Select the table which you want to edit, click “Edit MySQL Data” inside the navigation bar as shown above, and see the following screen shot.
Step 8:
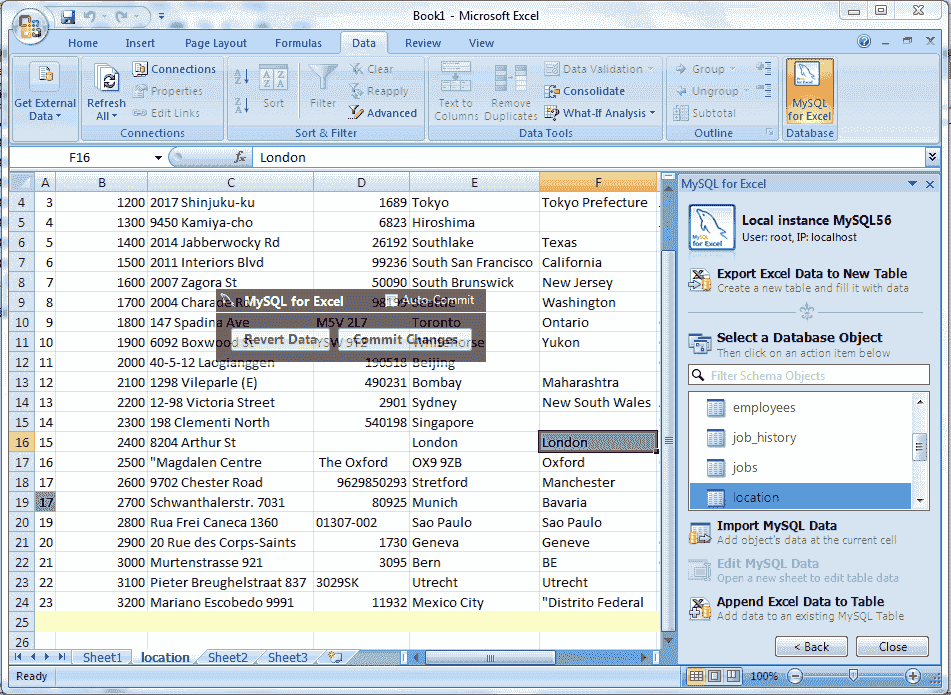
Click on Import button as mention in the above picture, and watch the following screen shot. The data of the selected table will appear and if you place the cursor on the data range the Revert Data and Commit Changes button ( specified by a red color rectangle ) will appear otherwise not.
Step 9:
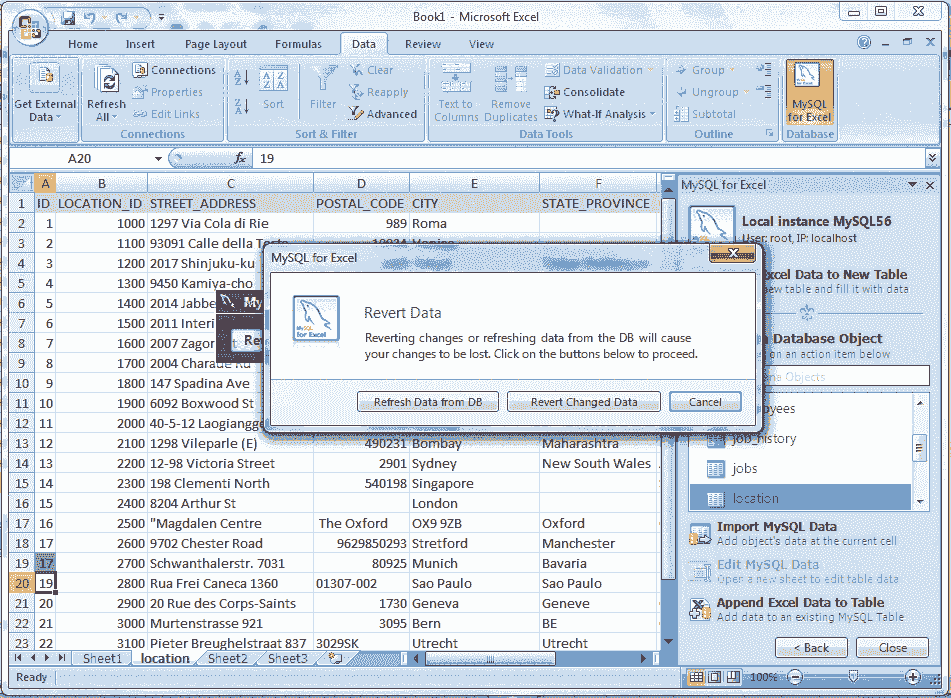
Here at our table, the first column ID is a primary key. If we change the value of ID in A19 cell 17 instead of 18 and press enter key the color of this cell will be green. Now we have changed the value of F16 cell is London and press enter key the cell color will change into green, and the color yellow at the last, indicate that the cells that accept new data. Data entered here is inserted into the MySQL table.
Step 10:
Now if we click the Revert Data button, watch the following screen shot.
Here in above picture if you click the Refresh Data from DB the data will be refresh and display the original data from DB, and if you click on Revert Changed Data, you will loose your changes just made. In this stage, if you click on Commit Changes button look the following screen shot.
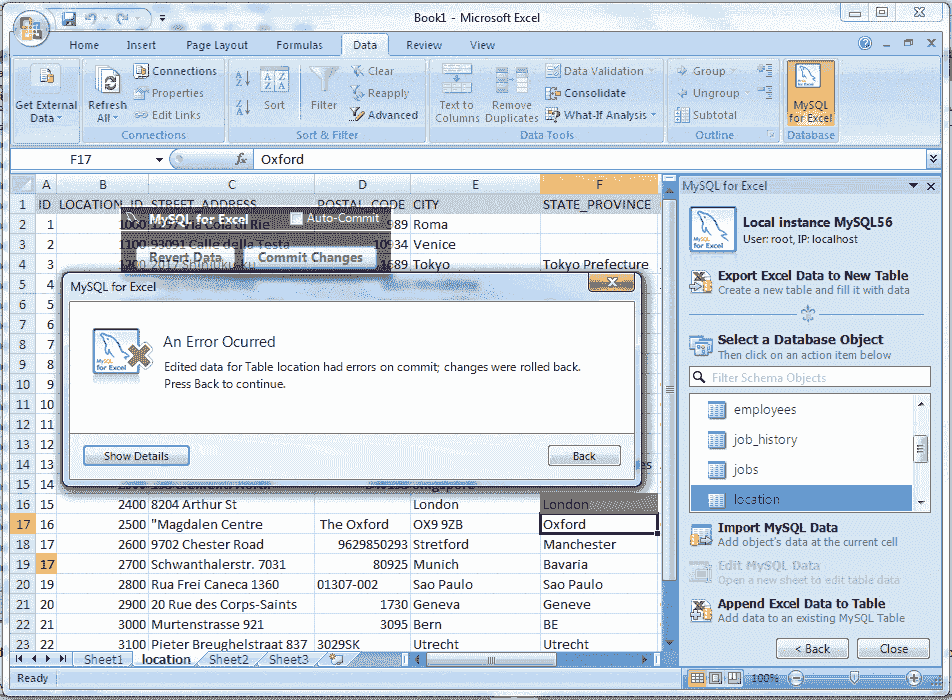
Here in the above picture, you are looking an error message, and the color of A19 cell changed from green to red, that is because the ID column is the primary key and the uniqueness have been violated here. Now we returned the value of A19 cell in its original value, i.e. 18, and click on Commit Changes button, and now look the below screen shot.
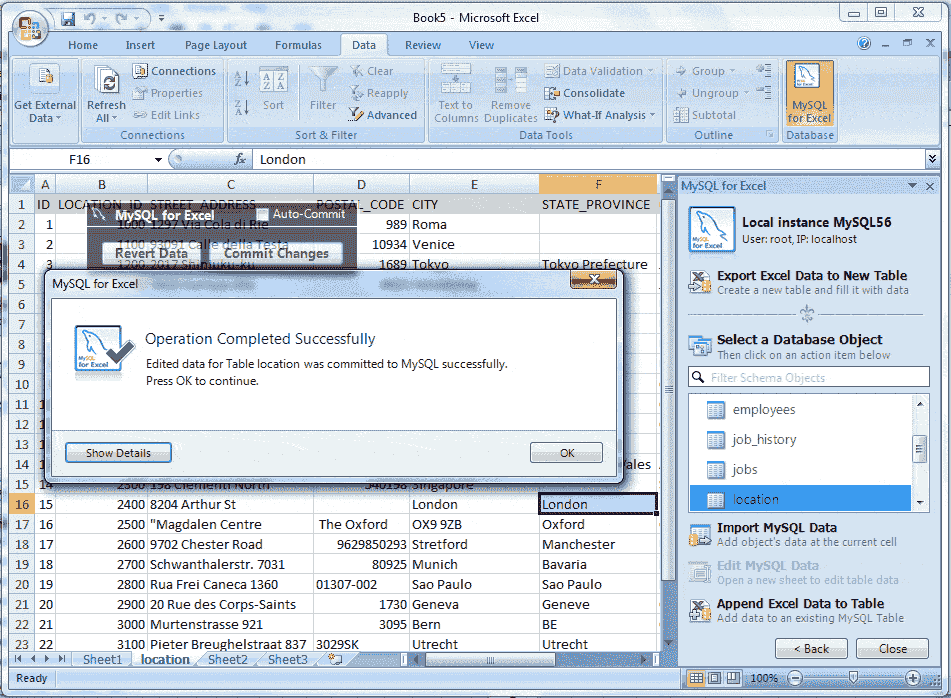
In the above picture shows the color of cell F16 have converted from green to blue, that means Commit Changes done successfully. Now you can close the Excel window saving or not but the database table has been updated. You can see it to do the step again. If you checked the Auto Commit check box, the effect immediately is seen in your sheet and data will be updated in MySQL database.
Import MySQL Data into Excel
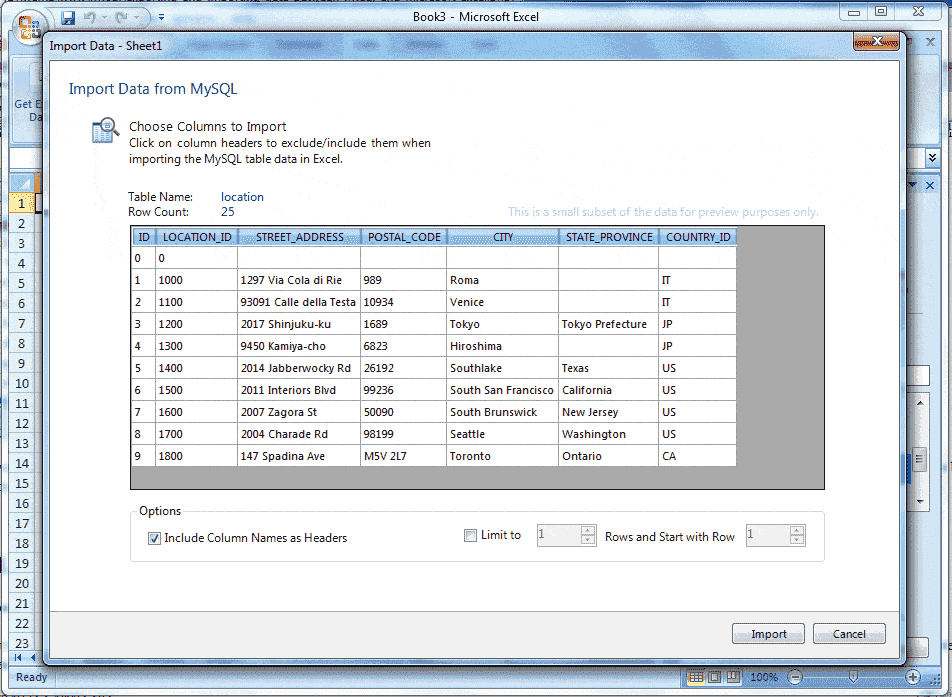
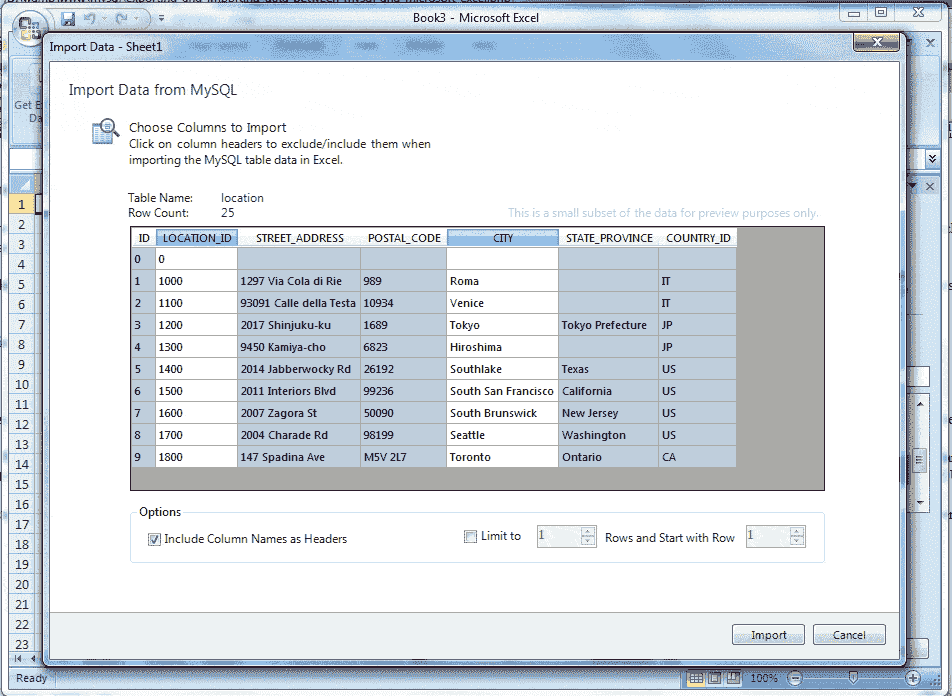
Data can be imported from MySQL into a Microsoft Excel spreadsheet by using the Import MySQL Data option after selecting either a table, view, or procedure to import.
First of all, you do the first 6 steps describe above in “Edit MySQL Data in Excel” then select your table which you want to import. Here our table is location. So select the location table and then click “Import MySQL Data” and look the appeared screen shot here in the below.
Choosing columns to import
By default, all columns are selected and will be imported. Specific columns may be selected (or unselected) using the standard Microsoft Windows method of either Control + Mouse click to select the individual columns, or Shift + Mouse click to select a range of columns.
The background color white indicates, the column or columns have been selected and they are ready to be imported, on the other hand, the gray color indicates that the columns are not selected and the column will not be imported.
Right-clicking anywhere in the preview grid opens a context-menu with either a Select None or Select All option, depending on the current status.
Importing Table
Include Column Names as Headers: By default, this option is enabled, and this treats the column names at the top of the Microsoft Excel spreadsheet as a “headers” row and will be inserted as a header.
Limit to and Rows and Start with Row : By default, this option is disabled if enabled, this limits the range of imported data. The Limit to option defaults to 1 and this limit can be changed by defines the number of rows to import. The Start with Row option defaults to 1, i.e. starting from the first row, and it can be changed by defines the number from where the import begins. Each option has a maximum value of COUNT(rows) in the table.
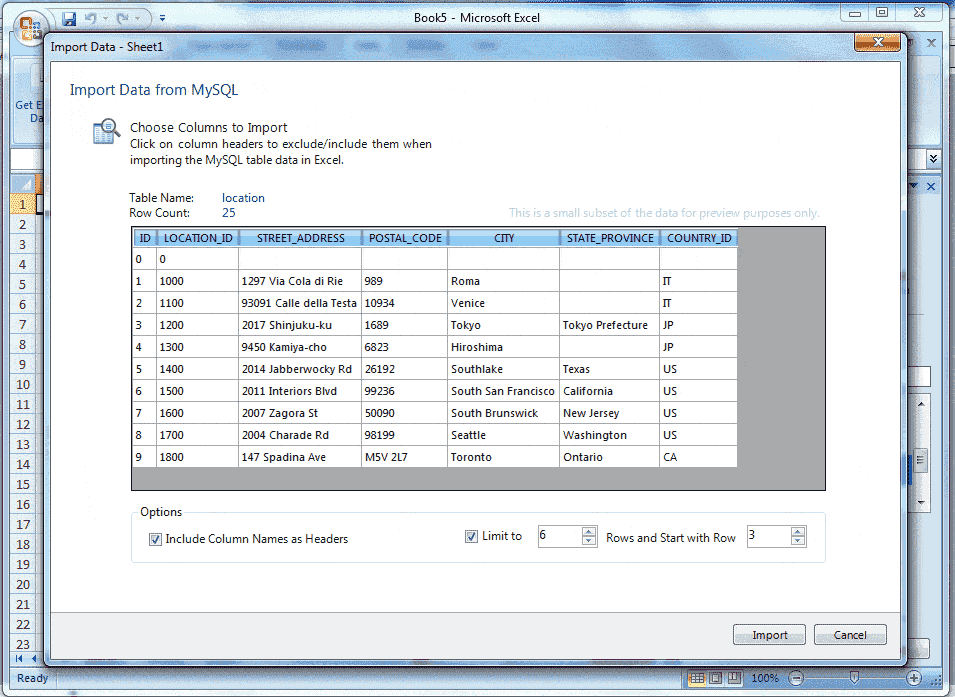
Now assumed that we want to import the columns LOATION_ID and CITY. Click the mouse on LOCATION_ID column and then press and hold CTRL key and click on CITY column, and look the following screen shot.
Now if we click the Import button all the rows for this two columns will be imported in Microsoft Excel Worksheet.
Assumes that, we want to import only 6 rows beginning from the 3rd row. Now look the following screen shot.
Here in the above picture shows all the columns have selected and the value of Limit to is 6, that means a number of 6 rows will be imported and the beginning of importing will start from the 3rd row because we have set the value of Start with Row is 3. Now click the Import button and look the following screen shot.
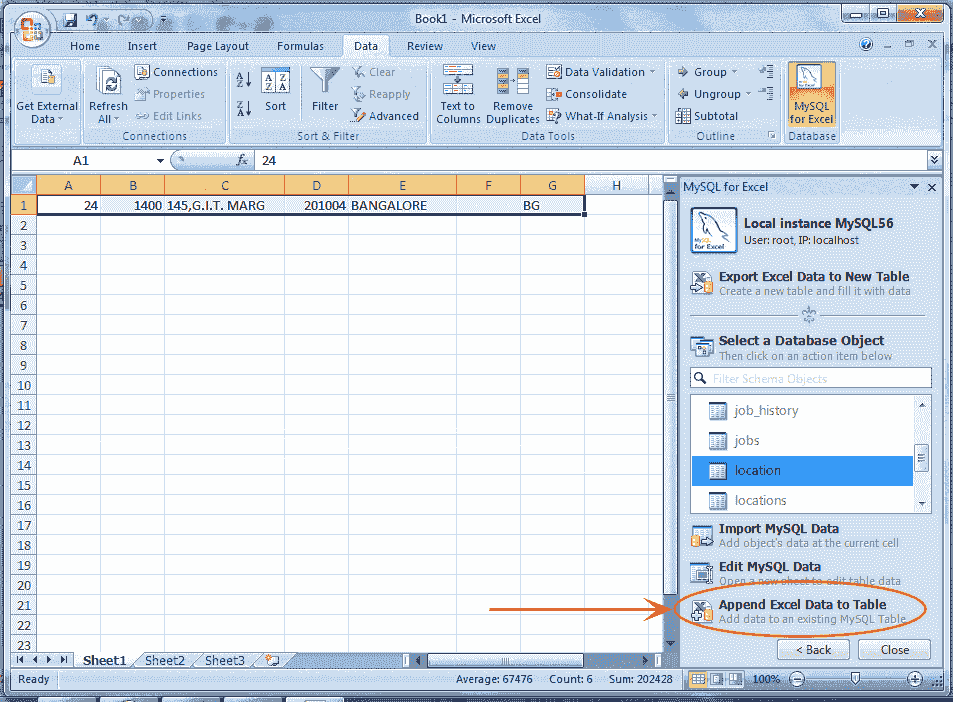
Append Excel Data into MySQL
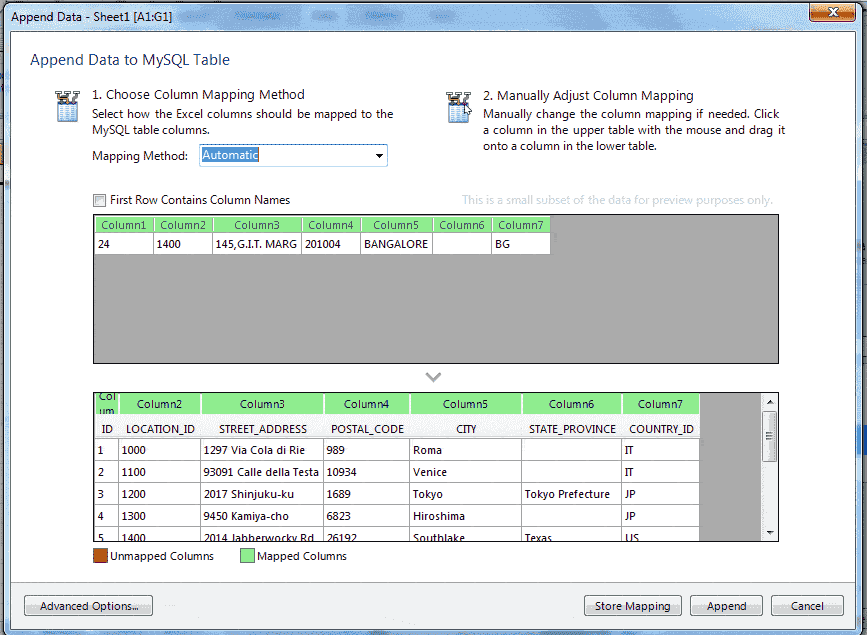
The Microsoft Excel spreadsheet data can be appended to a MySQL database table by using the Append Excel Data to Table option.
Column mappings
Mapping the Excel columns to the MySQL columns can be executed automatically (default), manually, or by using a stored mapping routine. To append the data from Excel toMySQL the following step to be followed:
At first do th e above 6 steps of “Edit MySQL Data in Excel” then input records in excel spreadsheet compatible to the structure of MySQL table in which you want to append the records. Here is the example in which we have taken only one row, you may take more than one rows and then select the records. See the following screen shot.
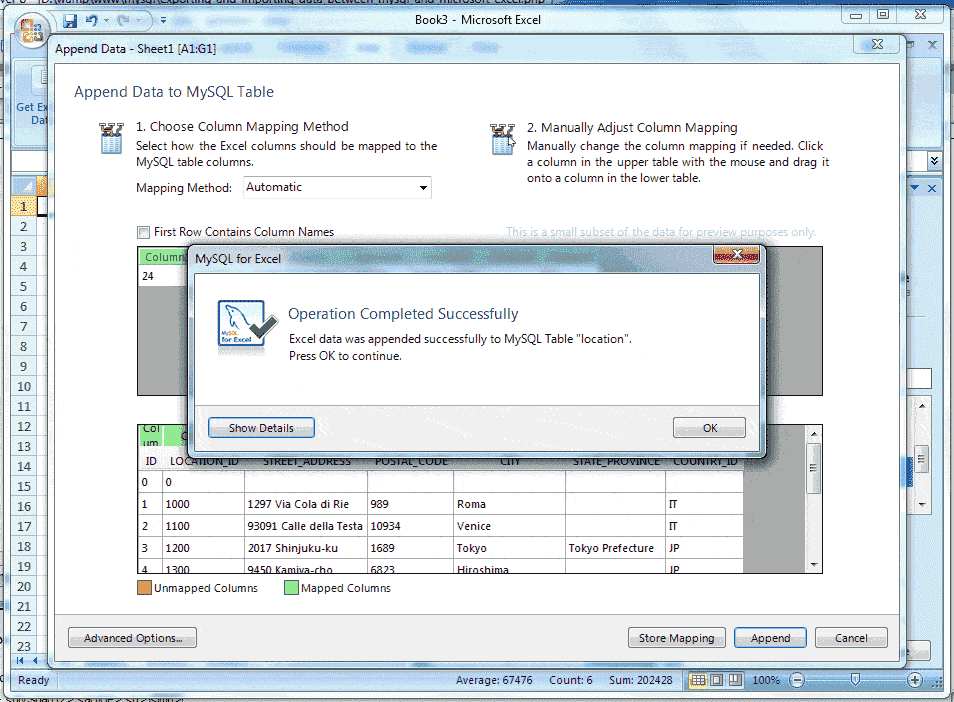
Now click on the Append Excel Data to Table as mention above, and look the screen like.
Here in the above picture, you are looking two colors for the legend. One is Red and another is Green.
The Green color indicate that a source column is mapped ( mapped means the source columns in above grid created in the spreadsheet have been matched with structure of the MySQL table as target columns shown in below grid ) to a target column and here in the above picture shows all the source columns have been mapped with target columns.
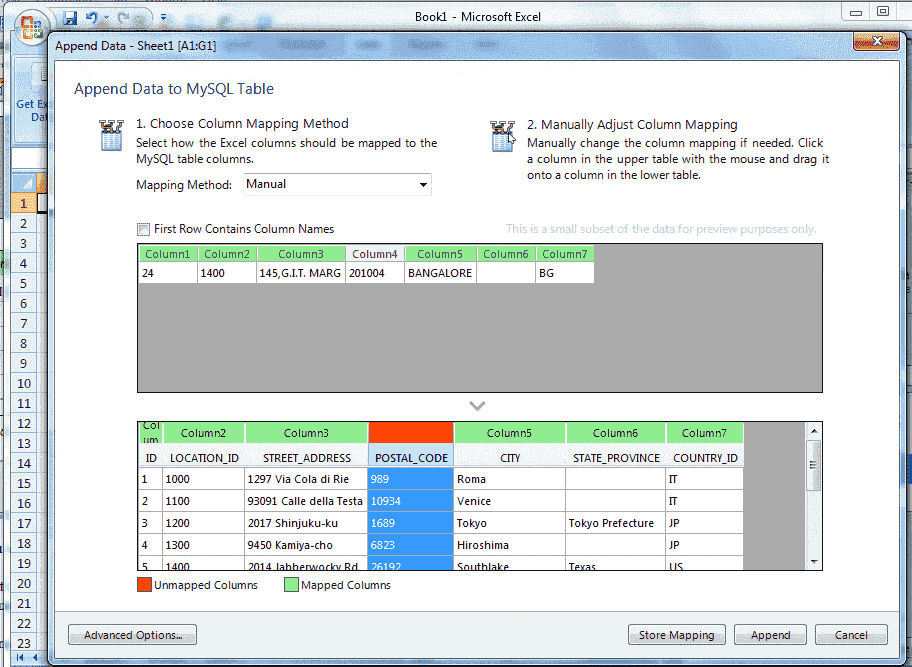
If you drag any target column heading backed by green color and leave it in outside the grid, the color of the target column will be Red and the color of the source column will be Gray. See in below picture.
Here in the above picture, the target column4 became Red and source column4 became Gray.
The Red color indicates that a target column is not mapped and the Gray color indicate that, a source column is not mapped.
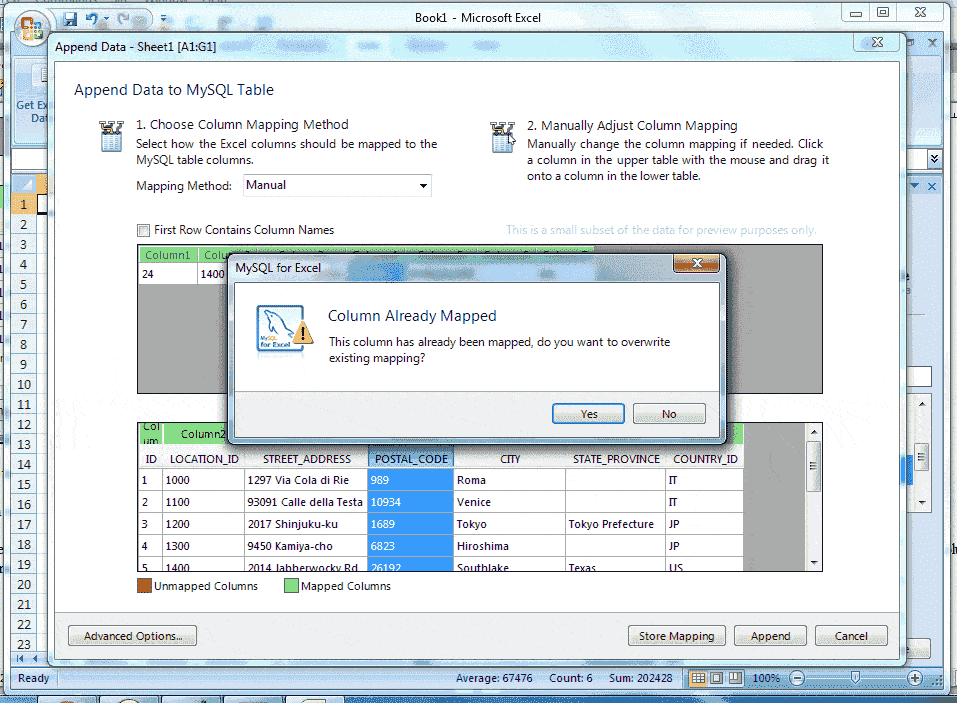
It is to be noted that, a source column may be mapped to multiple target columns, although this action generates a warning dialog and right-clicking on a target column shows a menu with options to either Remove Column Mapping for a single column or to Clear All Mappings for all columns.
Suppose, we are mapping manually by dragging source column4 with target column4 and column5. The target column4 will be mapping simply but when doing the process for target column5 the warning dialog will appear, show below.
Mapping methods
Here look the three mapping methods:
The automatic mapping method attempts to match the Excel source column names with the MySQL target table column names.
In the manual mapping method, source column names are manually dragged with the target column names. After the Automatic method is selected the Manual dragging method can also be performed.
You may store your own mapping styles using the Store Mapping button and saved a name like “name (dbname.tablename)” and it will be available in the Mapping Method combo box.
Stored mappings may be deleted or renamed within the Advanced Options dialog.
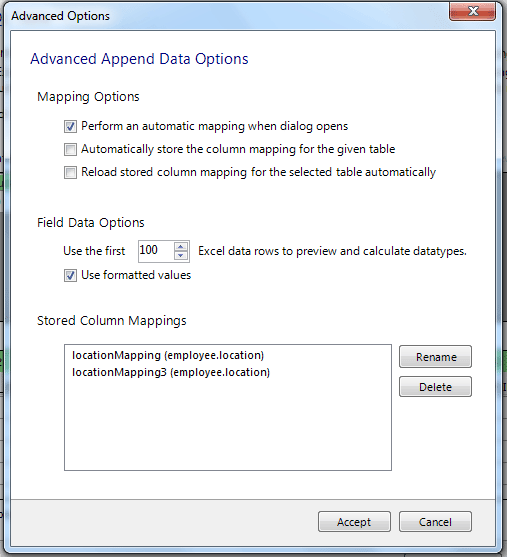
Advanced Options
If we click the Advanced Options button the dialog looks similar to:
Perform an automatic mapping when the dialog opens: By this options, it happens automatically to map the target and source when the Append Data dialog is opened.
Automatically store the column mapping for the given table:To check this option, stores each mapping routine after executing the Append operation. The mapping routine is saved using the “tablenameMapping (dbname.tablename)” format. It can be performed manually by using the Store Mapping button.
Reload stored column mapping for the selected table automatically: If a stored mapping routine exists which matches all column names in the source grid with the target grid, then it is automatically be loaded.
The advanced Field Data Options:
Use the first 100 (default) Excel data rows to preview and calculate data types. This determines the number of rows that the preview displays, and the values that affect the automatic mapping feature.
When you check the Use formatted values, the data from Excel is treated as Text, Double, or Date. This is enabled by default. If we make it disabled, the existing data is never treated as a Date type, so for example, this means that a date may be represented as a number.
The Stored Column Mappings is a list of saved column mappings that were saved with the “Automatically store the column mapping for the given table” feature, or manually with the Store Mapping option.
After completion all the steps if we click Append button the following screen will appear.
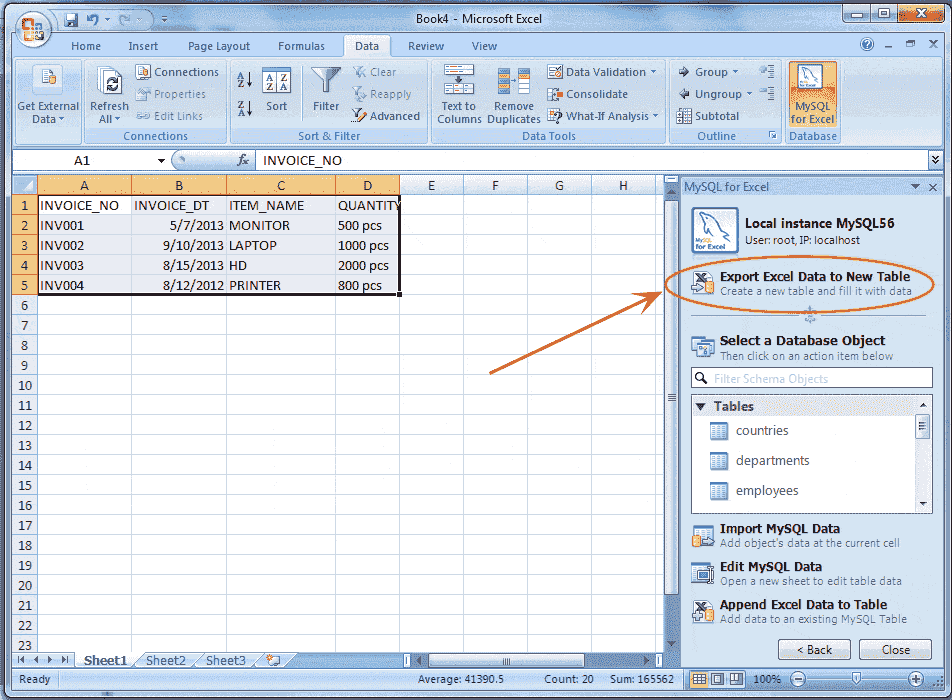
Export Excel Data into MySQL
Microsoft Excel spreadsheet’s data can be exported to a new MySQL database table by using the Export Excel Data to New Table option. At first, you do the first 6 steps above describe in Edit MySQL Data in Excel . Then enter some records with heading as you wish, into your Excel spreadsheet and select the records. Now look the sample records in the following picture –
Now click on Export Excel Data to New Table mention by the arrow in the above picture and look the following screen.
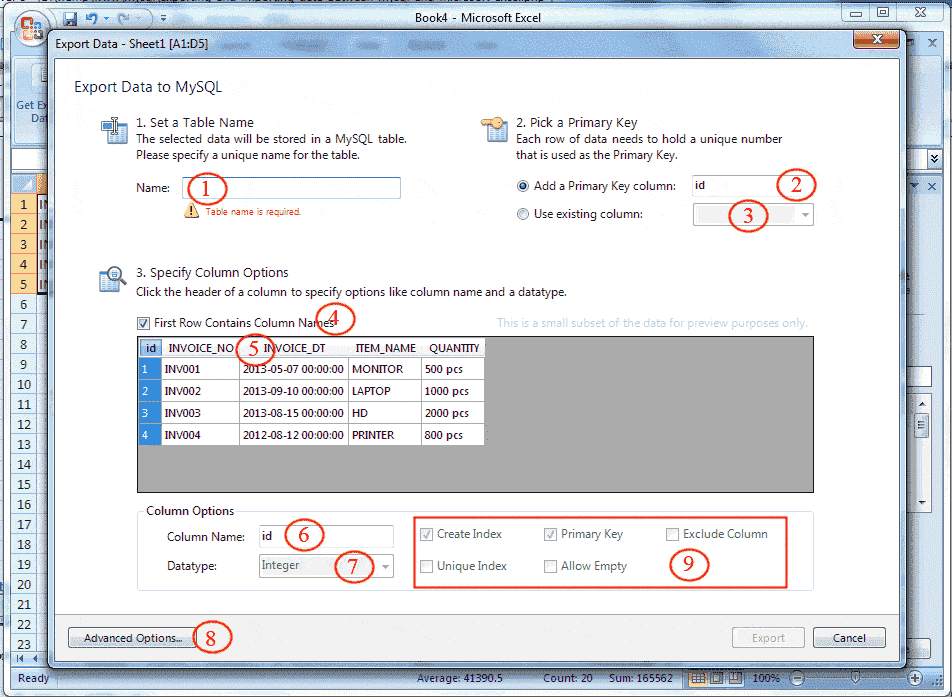
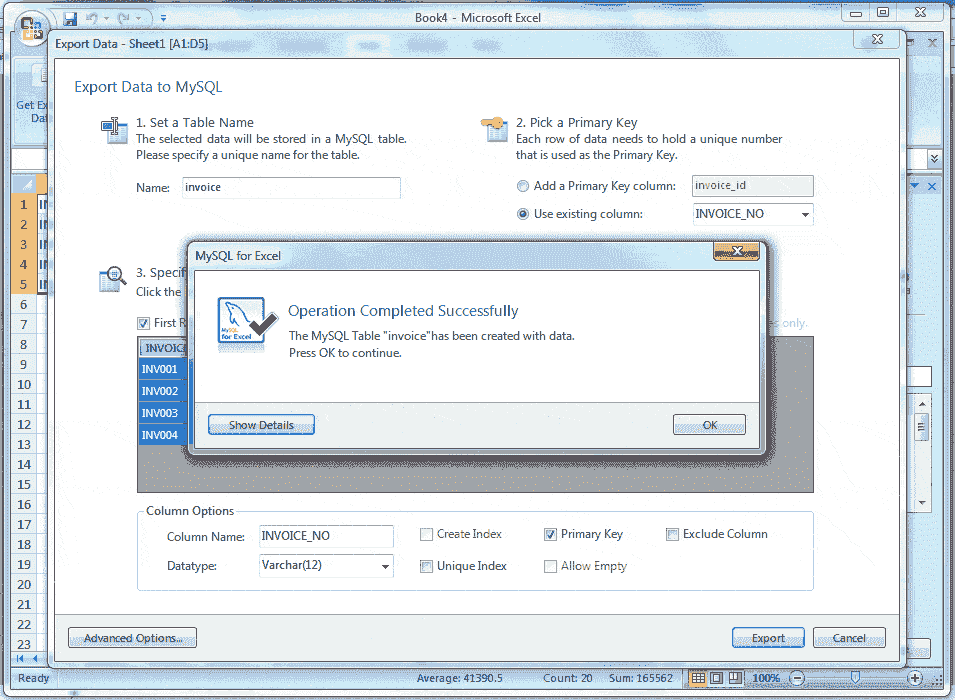
1 – Specify a unique name for the MySQL table. Suppose the name of the MySQL table is “invoice”
2 – If Add a Primary Key column radio button is checked an additional primary key column will be add, you can change the name of the column and by default, the data type will be an integer which is displaying in 7.
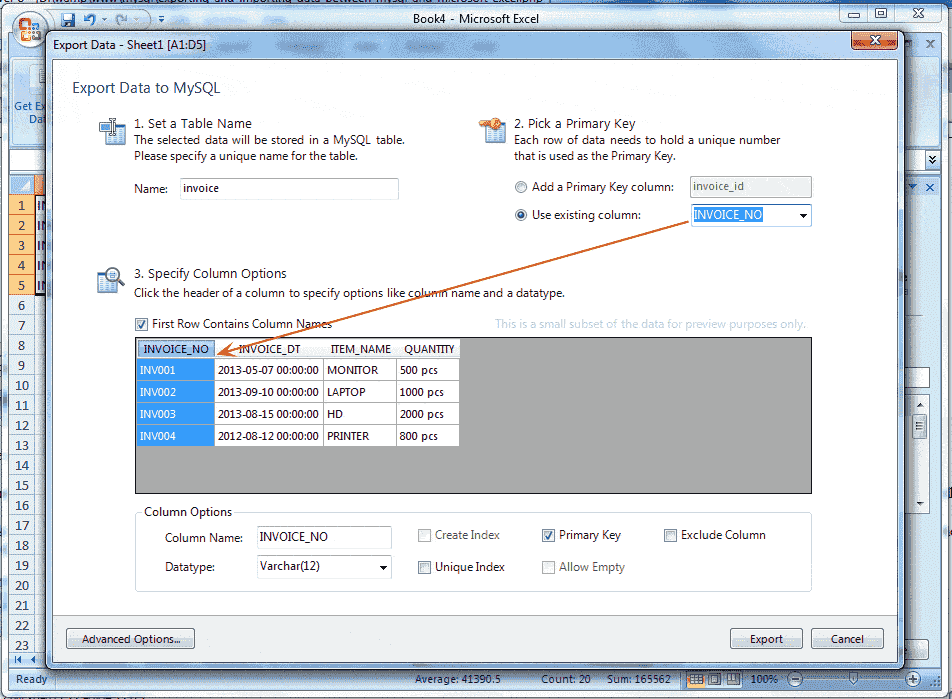
3 – When you check the Use Existing Columns radio button the column names will the available in the combo box and you can choose the primary key column from the list, and the column will be selected. Suppose you selected INVOICE_NO column, look the following picture.
Here in the above picture, the INVOICE_NO column has been selected and now you can change the Column Name (point 6), Data type (point 7) and the constraint (point 9) which are active.
4 – If you check the check box First Row Contains Column Names (point 4) the first column in your excel data will be heading otherwise it will be column1,column2,… etc
5 – Suppose you change the Data type and column name for other columns you can click on the column heading. Assumed that we want to change the Data type of INVOICE_DT, click on INVOICE_DT, and this column will be selected and then you can use point 6,7 and 9.
6 – You can change the Column Name.
7 – You can change the Data type
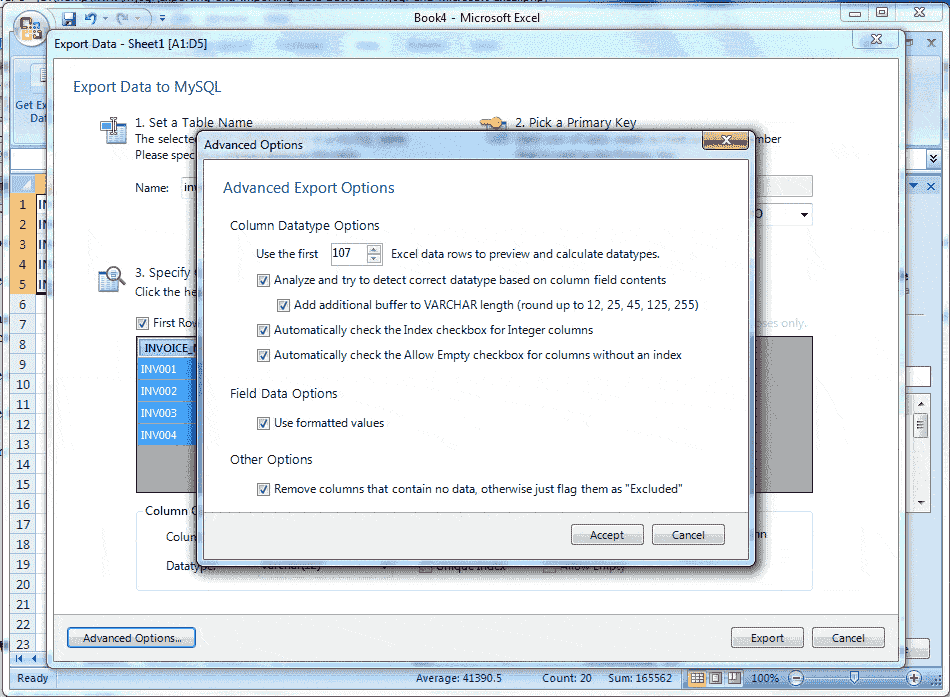
8 – Advance Option shows the following dialog.
Advanced Options
Use the first 100 (default) Excel data rows to preview and calculate data types: This option determines the number of rows that the preview displays and the specified values affect the feature of automatic mapping.
Analyze and try to detect correct data type based on column field contents: This option try to analyze the data and determine the data type for the column. When the column contains multiple types of data then it defined as VARCHAR.
Add additional buffer to VARCHAR length (round up to 12, 25, 45, 125, 255): When it is enabled, it detects the data type automatically and set to VARCHAR, then it find the maximum length for all rows within the column, and rounds it up the maximum length to one of the defined lengths above and when disabled, then the VARCHAR length is set to the length of the longest entry in the Excel spreadsheet.
Automatically check the Index checkbox for Integer columns: By default, this option is enabled , and then columns with an Integer data type will have the Create Index option enabled by default.
Automatically check the Allow Empty checkbox for columns without an index: By default, this option is enabled, and when enabled the columns without the Create Index checkbox checked will automatically enable the Allow Empty configuration option.
Use formatted values: By default, this option is enabled, and the data from Excel is treated as Text, Double, or Date but when disabled the data’s are independent, that is they have no specific data type.
Remove columns that contain no data, otherwise flag them as “Excluded”: When this option is enabled, columns without data in Excel are removed and not shown in the preview panel. By default, this option is disabled and then these columns will exist but have the Exclude Column option checked.
After completion, all setting click Export button the and see the following screen shot –