n this chapter, you will learn about some popular Python IDEs (Integrated Development Environment), and how to use IDE for program development.
To use the scripted mode of Python, you need to save the sequence of Python instructions in a text file and save it with .py extension. You can use any text editor available on the operating system. Whenever the interpreter encounters errors, the source code needs to be edited and run again and again. To avoid this tedious method, IDE is used. An IDE is a one stop solution for typing, editing the source code, detecting the errors and executing the program.
IDLE
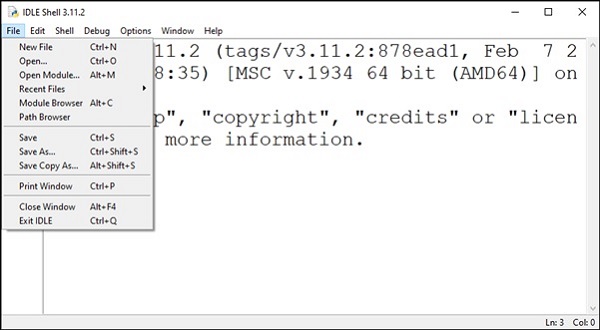
Python’s standard library contains the IDLE module. IDLE stands for Integrated Development and Learning Environment. As the name suggests, it is useful when one is in the learning stage. It includes a Python interactive shell and a code editor, customized to the needs of Python language structure. Some of its important features include syntax highlighting, auto-completion, customizable interface etc.
To write a Python script, open a new text editor window from the File menu.
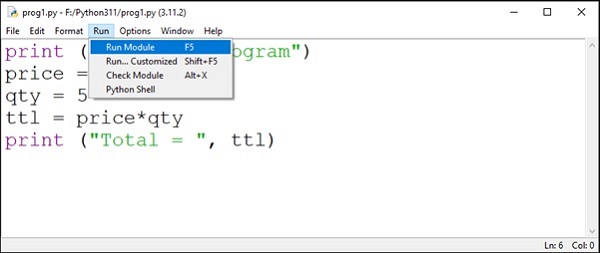
A new editor window opens in which you can enter the Python code. Save it and run it with Run menu.
Jupyter Notebook
Initially developed as a web interface for IPython, Jupyter Notebook supports multiple languages. The name itself derives from the alphabets from the names of the supported languages − Julia, PYThon and R. Jupyter notebook is a client server application. The server is launched at the localhost, and the browser acts as its client.
Install Jupyter notebook with PIP −
pip3 install jupyter
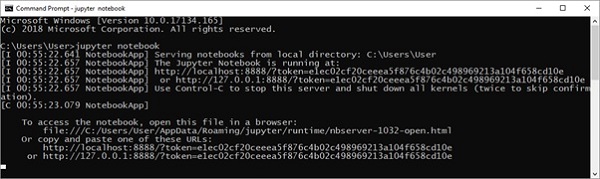
Invoke from the command line.
C:\Users\Acer>jupyter notebook
The server is launched at localhost’s 8888 port number.
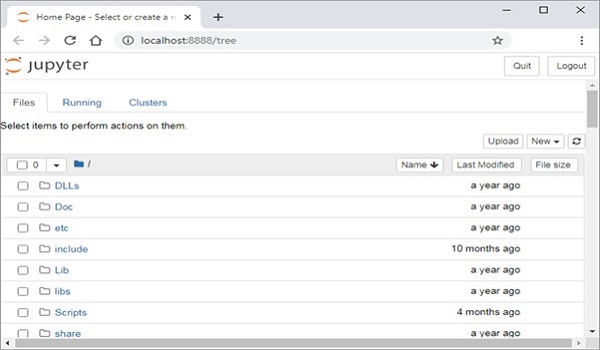
The default browser of your system opens a link http://localhost:8888/tree to display the dashboard.
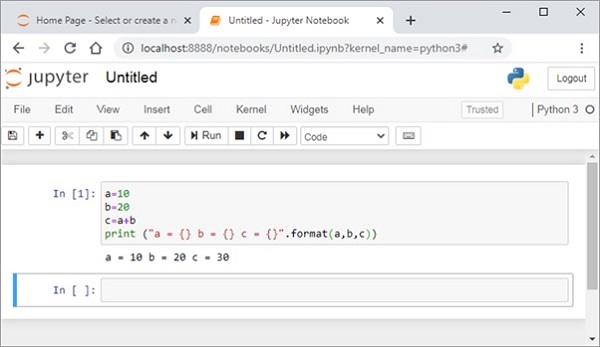
Open a new Python notebook. It shows IPython style input cell. Enter Python instructions and run the cell.
Jupyter notebook is a versatile tool, used very extensively by data scientists to display inline data visualizations. The notebook can be conveniently converted and distributed in PDF, HTML or Markdown format.
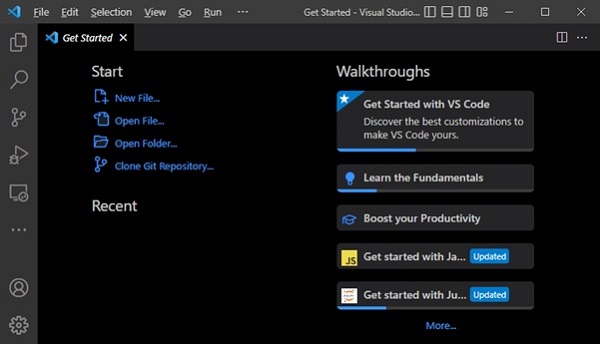
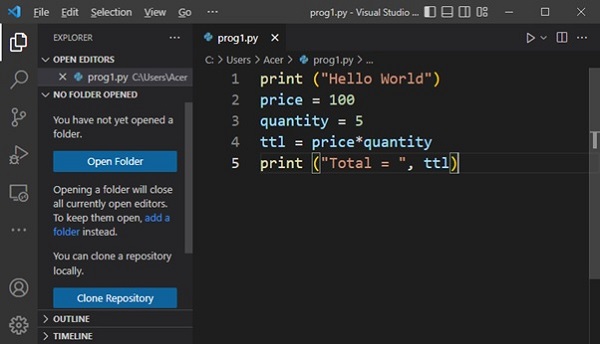
VS Code
Microsoft has developed a source code editor called VS Code (Visual Studio Code) that supports multiple languages including C++, Java, Python and others. It provides features such as syntax highlighting, autocomplete, debugger and version control.
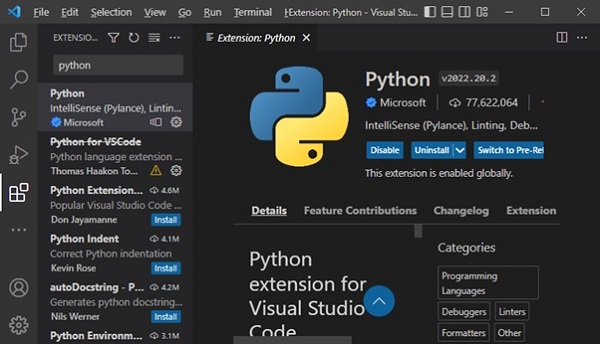
VS Code cannot be used unless respective language extension is not installed. VS Code Extensions marketplace has a number of extensions for language compilers and other utilities. Search for Python extension from the Extension tab (Ctrl+Shift+X) and install it.
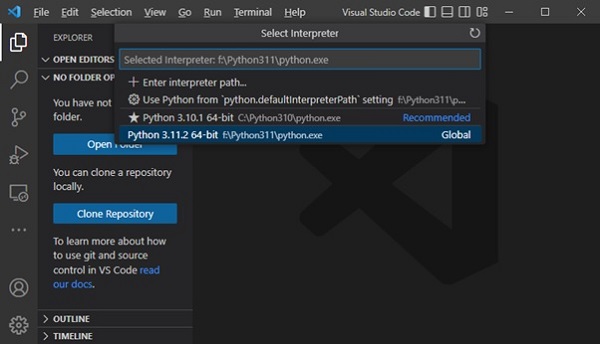
After activating Python extension, you need to set the Python interpreter. Press Ctrl+Shift+P and select Python interpreter.
Open a new text file, enter Python code and save the file.
Open a command prompt terminal and run the program.
PyCharm
PyCharm is another popular Python IDE. It has been developed by JetBrains, a Czech software company. Its features include code analysis, a graphical debugger, integration with version control systems etc. PyCharm supports web development with Django.
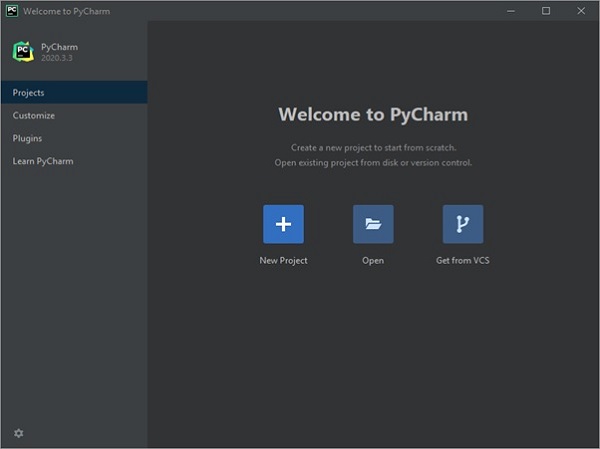
Download, install the latest Version: 2022.3.2 and open PyCharm. The Welcome screen appears as below −
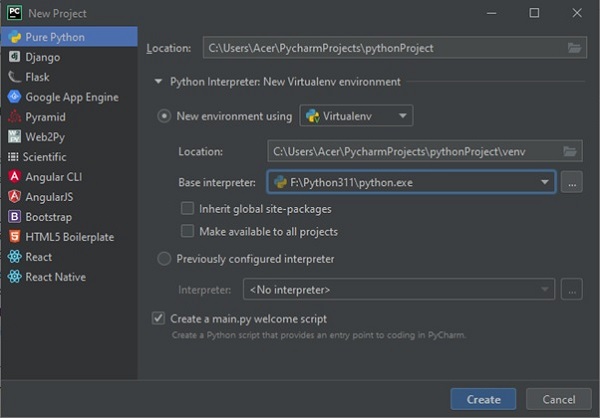
When you start a new project, PyCharm creates a virtual environment for it based on the choice of folder location and the version of Python interpreter chosen.
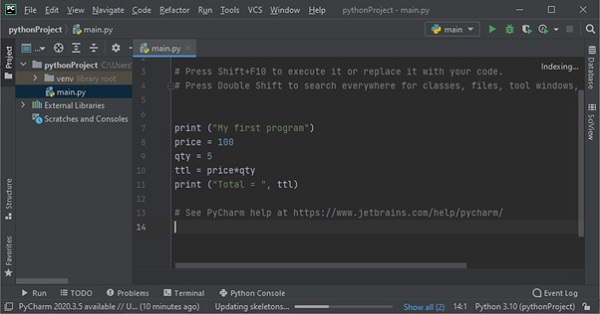
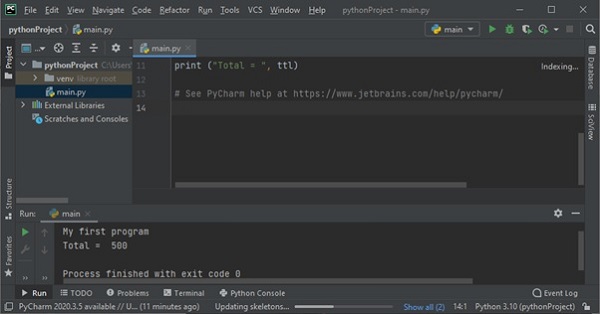
You can now add one or more Python scripts required for the project. Here we add a sample Python code in main.py file.
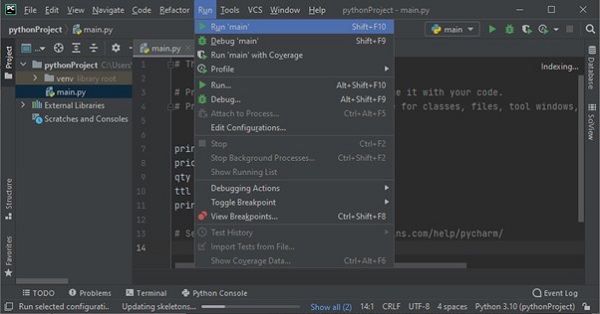
To execute the program, choose from Run menu or use Shift+F10 shortcut.
Output will be displayed in the console window as shown below −
The standard library comes with a number of modules that can be used both as modules and as command-line utilities.
The dis Module
The dis module is the Python disassembler. It converts byte codes to a format that is slightly more appropriate for human consumption.
You can run the disassembler from the command line. It compiles the given script and prints the disassembled byte codes to the STDOUT. You can also use dis as a module. The dis function takes a class, method, function or code object as its single argument.
Example
import dis
defsum():
   vara =10
   varb =20sum= vara + varb
   print("vara + varb = %d"%sum)# Call dis function for the function.
dis.dis(sum)
--Return-->/test/sum.py(14)<module>()->None-v dis.dis(sum)(Pdb) n
--Return--><string>(1)<module>()->None(Pdb)
The profile Module
The profile module is the standard Python profiler. You can run the profiler from the command line −
Example
Let us try to profile the following program −
vara =10
varb =20sum= vara + varb
print"vara + varb = %d"%sum
Now, try running cProfile.py over this file sum.py as follow −
$cProfile.py sum.py
vara + varb =304 function calls in0.000 CPU seconds
   Ordered by: standard name
ncalls   tottime  percall  cumtime  percall filename:lineno
 10.0000.0000.0000.000<string>:1(<module>)10.0000.0000.0000.000sum.py:3(<module>)10.0000.0000.0000.000{execfile}10.0000.0000.0000.000{method ......}
The tabnanny Module
The tabnanny module checks Python source files for ambiguous indentation. If a file mixes tabs and spaces in a way that throws off indentation, no matter what tab size you’re using, the nanny complains.
Example
Let us try to profile the following program −
vara =10
varb =20sum= vara + varb
print"vara + varb = %d"%sum
If you would try a correct file with tabnanny.py, then it won’t complain as follows −
$tabnanny.py -v sum.py
'sum.py': Clean bill of health.
Any code that you write using any compiled language like C, C++, or Java can be integrated or imported into another Python script. This code is considered as an “extension.”
A Python extension module is nothing more than a normal C library. On Unix machines, these libraries usually end in .so (for shared object). On Windows machines, you typically see .dll (for dynamically linked library).
Pre-Requisites for Writing Extensions
To start writing your extension, you are going to need the Python header files.
On Unix machines, this usually requires installing a developer-specific package.
Windows users get these headers as part of the package when they use the binary Python installer.
Additionally, it is assumed that you have a good knowledge of C or C++ to write any Python Extension using C programming.
First look at a Python Extension
For your first look at a Python extension module, you need to group your code into four parts −
The header file Python.h.
The C functions you want to expose as the interface from your module..
A table mapping the names of your functions as Python developers see them as C functions inside the extension module..
An initialization function.
The Header File Python.h
You need to include Python.h header file in your C source file, which gives you the access to the internal Python API used to hook your module into the interpreter.
Make sure to include Python.h before any other headers you might need. You need to follow the includes with the functions you want to call from Python.
The C Functions
The signatures of the C implementation of your functions always takes one of the following three forms −
Each one of the preceding declarations returns a Python object. There is no such thing as a void function in Python as there is in C. If you do not want your functions to return a value, return the C equivalent of Python’s None value. The Python headers define a macro, Py_RETURN_NONE, that does this for us.
The names of your C functions can be whatever you like as they are never seen outside of the extension module. They are defined as static function.
Your C functions usually are named by combining the Python module and function names together, as shown here −
static PyObject *module_func(PyObject *self, PyObject *args){/* Do your stuff here.*/
   Py_RETURN_NONE;}
This is a Python function called func inside the module module. You will be putting pointers to your C functions into the method table for the module that usually comes next in your source code.
The Method Mapping Table
This method table is a simple array of PyMethodDef structures. That structure looks something like this −
The last part of your extension module is the initialization function. This function is called by the Python interpreter when the module is loaded. It is required that the function be named initModule, where Module is the name of the module.
The initialization function needs to be exported from the library you will be building. The Python headers define PyMODINIT_FUNC to include the appropriate incantations for that to happen for the particular environment in which we are compiling. All you have to do is use it when defining the function.
Your C initialization function generally has the following overall structure −
A simple example that makes use of all the above concepts −
#include <Python.h>
static PyObject* helloworld(PyObject* self){return Py_BuildValue("s","Hello, Python extensions!!");}
static char helloworld_docs[]="helloworld( ): Any message you want to put here!!\n";
static PyMethodDef helloworld_funcs[]={{"helloworld",(PyCFunction)helloworld,
   METH_NOARGS, helloworld_docs},{NULL}};
void inithelloworld(void){
   Py_InitModule3("helloworld", helloworld_funcs,"Extension module example!");}
Here the Py_BuildValue function is used to build a Python value. Save above code in hello.c file. We would see how to compile and install this module to be called from Python script.
Building and Installing Extensions
The distutils package makes it very easy to distribute Python modules, both pure Python and extension modules, in a standard way. Modules are distributed in the source form, built and installed via a setup script usually called setup.pyas.
For the above module, you need to prepare the following setup.py script −
from distutils.core import setup, Extension
setup(name='helloworld', version='1.0', \
   ext_modules=[Extension('helloworld',['hello.c'])])
Now, use the following command, which would perform all needed compilation and linking steps, with the right compiler and linker commands and flags, and copies the resulting dynamic library into an appropriate directory −
$ python setup.py install
On Unix-based systems, you will most likely need to run this command as root in order to have permissions to write to the site-packages directory. This usually is not a problem on Windows.
Importing Extensions
Once you install your extensions, you would be able to import and call that extension in your Python script as follows −
import helloworld
print helloworld.helloworld()
This would produce the following output −
Hello, Python extensions!!
Passing Function Parameters
As you will most likely want to define functions that accept arguments, you can use one of the other signatures for your C functions. For example, the following function, that accepts some number of parameters, would be defined like this −
static PyObject *module_func(PyObject *self, PyObject *args){/* Parse args and do something interesting here.*/
   Py_RETURN_NONE;}
The method table containing an entry for the new function would look like this −
You can use the API PyArg_ParseTuple function to extract the arguments from the one PyObject pointer passed into your C function.
The first argument to PyArg_ParseTuple is the args argument. This is the object you will be parsing. The second argument is a format string describing the arguments as you expect them to appear. Each argument is represented by one or more characters in the format string as follows.
You can probably come up with even more variations.
The PyArg_ParseTuple Function
re is the standard signature for the PyArg_ParseTuple function −
int PyArg_ParseTuple(PyObject*tuple,char*format,...)
This function returns 0 for errors, and a value not equal to 0 for success. Tuple is the PyObject* that was the C function’s second argument. Here format is a C string that describes mandatory and optional arguments.
Here is a list of format codes for the PyArg_ParseTuple function −
Code
C type
Meaning
c
char
A Python string of length 1 becomes a C char.
d
double
A Python float becomes a C double.
f
float
A Python float becomes a C float.
i
int
A Python int becomes a C int.
l
long
A Python int becomes a C long.
L
long long
A Python int becomes a C long long.
O
PyObject*
Gets non-NULL borrowed reference to Python argument.
S
char*
Python string without embedded nulls to C char*.
s#
char*+int
Any Python string to C address and length.
t#
char*+int
Read-only single-segment buffer to C address and length.
u
Py_UNICODE*
Python Unicode without embedded nulls to C.
u#
Py_UNICODE*+int
Any Python Unicode C address and length.
w#
char*+int
Read/write single-segment buffer to C address and length.
z
char*
Like s, also accepts None (sets C char* to NULL).
z#
char*+int
Like s#, also accepts None (sets C char* to NULL).
(…)
as per …
A Python sequence is treated as one argument per item.
|
The following arguments are optional.
:
Format end, followed by function name for error messages.
;
Format end, followed by entire error message text.
Returning Values
Py_BuildValue takes in a format string much like PyArg_ParseTuple does. Instead of passing in the addresses of the values you are building, you pass in the actual values. Here is an example showing how to implement an add function.
This is what it would look like if implemented in Python −
defadd(a, b):return(a + b)
You can return two values from your function as follows. This would be captured using a list in Python.
static PyObject *foo_add_subtract(PyObject *self, PyObject *args){int a;int b;if(!PyArg_ParseTuple(args,"ii",&a,&b)){return NULL;}return Py_BuildValue("ii", a + b, a - b);}
This is what it would look like if implemented in Python −
defadd_subtract(a, b):return(a + b, a - b)
The Py_BuildValue Function
Here is the standard signature for Py_BuildValue function −
PyObject* Py_BuildValue(char*format,...)
Here format is a C string that describes the Python object to build. The following arguments of Py_BuildValue are C values from which the result is built. ThePyObject* result is a new reference.
The following table lists the commonly used code strings, of which zero or more are joined into a string format.
Code
C type
Meaning
c
char
A C char becomes a Python string of length 1.
d
double
A C double becomes a Python float.
f
float
A C float becomes a Python float.
i
int
C int becomes a Python int
l
long
A C long becomes a Python int
N
PyObject*
Passes a Python object and steals a reference.
O
PyObject*
Passes a Python object and INCREFs it as normal.
O&
convert+void*
Arbitrary conversion
s
char*
C 0-terminated char* to Python string, or NULL to None.
s#
char*+int
C char* and length to Python string, or NULL to None.
u
Py_UNICODE*
C-wide, null-terminated string to Python Unicode, or NULL to None.
u#
Py_UNICODE*+int
C-wide string and length to Python Unicode, or NULL to None.
w#
char*+int
Read/write single-segment buffer to C address and length.
z
char*
Like s, also accepts None (sets C char* to NULL).
z#
char*+int
Like s#, also accepts None (sets C char* to NULL).
(…)
as per …
Builds Python tuple from C values.
[…]
as per …
Builds Python list from C values.
{…}
as per …
Builds Python dictionary from C values, alternating keys and values.
Code {…} builds dictionaries from an even number of C values, alternately keys and values. For example, Py_BuildValue(“{issi}”,23,”zig”,”zag”,42) returns a dictionary like Python’s {23:’zig’,’zag’:42}
You can send email in Python by using several libraries, but the most common ones are smtplib and email.
The “smtplib” module in Python defines an SMTP client session object that can be used to send mail to any Internet machine with an SMTP or ESMTP listener daemon. The email “package” is a library for managing email messages, including MIME and other RFC 2822-based message documents.
An application that handles and delivers e-mail over the Internet is called a “mail server”. Simple Mail Transfer Protocol (SMTP) is a protocol, which handles sending an e-mail and routing e-mail between mail servers. It is an Internet standard for email transmission.
Python smptlib.SMTP() Function
The Python smtplib.SMTP() function is used to create an SMTP client session object, which establishes a connection to an SMTP server. This connection allows you to send emails through the server.
Setting Up an SMTP Server
Before sending an email, you need to set up an SMTP server. Common SMTP servers include those provided by Gmail, Yahoo, or other mail service providers.
Creating an SMTP Object
To send an email, you need to obtain the object of SMTP class with the following function −
import smtplib

smtpObj = smtplib.SMTP([host [, port [, local_hostname]]])
Here is the detail of the parameters −
host − This is the host running your SMTP server. You can specify IP address of the host or a domain name like tutorialspoint.com. This is an optional argument.
port − If you are providing host argument, then you need to specify a port, where SMTP server is listening. Usually this port would be 25.
local_hostname − If your SMTP server is running on your local machine, then you can specify just localhost as the option.
Example
The following script connects to the SMTP server at “smtp.example.com” on port 25, optionally identifies and secures the connection, logs in (if required), sends an email, and then quits the session −
import smtplib

# Create an SMTP object and establish a connection to the SMTP server
smtpObj = smtplib.SMTP('smtp.example.com',25)# Identify yourself to an ESMTP server using EHLO
smtpObj.ehlo()# Secure the SMTP connection
smtpObj.starttls()# Login to the server (if required)
smtpObj.login('username','password')# Send an email
from_address ='[email protected]'
to_address ='[email protected]'
message ="""\
Subject: Test Email

This is a test email message.
"""

smtpObj.sendmail(from_address, to_address, message)# Quit the SMTP session
smtpObj.quit()
The Python smtpd Module
The Python smtpd module is used to create and manage a simple Mail Transfer Protocol (SMTP) server. This module allows you to set up an SMTP server that can receive and process incoming email messages, making it valuable for testing and debugging email functionalities within applications.
Setting Up an SMTP Debugging Server
The smtpd module comes pre-installed with Python and includes a local SMTP debugging server. This server is useful for testing email functionality without actually sending emails to specified addresses; instead, it prints the email content to the console.
Running this local server eliminates the need to handle message encryption or use credentials to log in to an email server.
Starting the SMTP Debugging Server
You can start the local SMTP debugging server using the following command in Command Prompt or terminal −
The following example demonstrates how to send a dummy email using the smtplib functionality along with the local SMTP debugging server −
import smtplib

defprompt(prompt):returninput(prompt).strip()

fromaddr = prompt("From: ")
toaddrs = prompt("To: ").split()print("Enter message, end with ^D (Unix) or ^Z (Windows):")# Add the From: and To: headers at the start!
msg =("From: %s\r\nTo: %s\r\n\r\n"%(fromaddr,", ".join(toaddrs)))whileTrue:try:
  line =input()except EOFError:breakifnot line:break   msg = msg + line

print("Message length is",len(msg))
server = smtplib.SMTP('localhost',1025)
server.set_debuglevel(1)
server.sendmail(fromaddr, toaddrs, msg)
server.quit()
In this example −
From − You input the sender’s email address (fromaddr).
To − You input the recipient’s email address (toaddrs), which can be multiple addresses separated by spaces.
Message − You input the message content, terminated by ^D (Unix) or ^Z (Windows).
The sendmail() method of “smtplib” sends the email using the specified sender, recipient(s), and message content to the local SMTP debugging server running on “localhost” at port “1025”.
Output
When you run the program, the console outputs the communication between the program and the SMTP server. Meanwhile, the terminal running the SMTPD server displays the incoming message content, helping you debug and verify the email sending process.
To send an HTML email using Python, you can use the smtplib library to connect to an SMTP server and the email.mime modules to construct and format your email content appropriately.
Constructing the HTML Email Message
When sending an HTML email, you need to specify certain headers and structure the message content accordingly to ensure it is recognized and rendered as HTML by the recipient’s email client.
Example
Following is the example to send HTML content as an e-mail in Python −
import smtplib
from email.mime.multipart import MIMEMultipart
from email.mime.text import MIMEText
# Email content
sender ='[email protected]'
receivers =['[email protected]']# Create message container - the correct MIME type is multipart/alternative.
msg = MIMEMultipart('alternative')
msg['From']='From Person <[email protected]>'
msg['To']='To Person <[email protected]>'
msg['Subject']='SMTP HTML e-mail test'# HTML message content
html ="""\
<html>
<head></head>
<body>
<p>This is an e-mail message to be sent in <b>HTML format</b></p>
<p><b>This is HTML message.</b></p>
<h1>This is headline.</h1>
</body>
</html>
"""# Attach HTML content to the email
part2 = MIMEText(html,'html')
msg.attach(part2)# Connect to SMTP server and send emailtry:
smtpObj = smtplib.SMTP('localhost')
smtpObj.sendmail(sender, receivers, msg.as_string())print("Successfully sent email")except smtplib.SMTPException as e:print(f"Error: unable to send email. Error message: {str(e)}")
Sending Attachments as an E-mail
To send email attachments in Python, you can use the smtplib library to connect to an SMTP server and the email.mime modules to construct and format your email content, including attachments.
Constructing an Email with Attachments
When sending an email with attachments, you need to format the email correctly using MIME (Multipurpose Internet Mail Extensions). This involves setting the Content-Type header to multipart/mixed to denote that the email contains both text and attachments. Each part of the email (text and attachments) is separated by boundaries.
Example
Following is the example, which sends an email with a file /tmp/test.txt as an attachment −
import smtplib
import base64

filename ="/tmp/test.txt"# Read a file and encode it into base64 format
fo =open(filename,"rb")
filecontent = fo.read()
encodedcontent = base64.b64encode(filecontent)# base64

sender ='[email protected]'
reciever ='[email protected]'

marker ="AUNIQUEMARKER"

body ="""
This is a test email to send an attachment.
"""# Define the main headers.
part1 ="""From: From Person <[email protected]>
To: To Person <[email protected]>
Subject: Sending Attachment
MIME-Version: 1.0
Content-Type: multipart/mixed; boundary=%s
--%s
"""%(marker, marker)# Define the message action
part2 ="""Content-Type: text/plain
Content-Transfer-Encoding:8bit

%s
--%s
"""%(body,marker)# Define the attachment section
part3 ="""Content-Type: multipart/mixed; name=\"%s\"
Content-Transfer-Encoding:base64
Content-Disposition: attachment; filename=%s

%s
--%s--
"""%(filename, filename, encodedcontent, marker)
message = part1 + part2 + part3

try:
   smtpObj = smtplib.SMTP('localhost')
   smtpObj.sendmail(sender, reciever, message)print"Successfully sent email"except Exception:print"Error: unable to send email"
Sending Email Using Gmail’s SMTP Server
To send an email using Gmail’s SMTP server in Python, you need to set up a connection to smtp.gmail.com on port “587” with “TLS” encryption, authenticate using your Gmail credentials, construct the email message using Python’s smtplib and email.mime libraries, and send it using the sendmail() method. Finally, close the SMTP connection with quit().
Example
Following is an example script that demonstrates how to send an email using Gmail’s SMTP server −
import smtplib

# Email content
content ="Hello World"# Set up SMTP connection to Gmail's SMTP server
mail = smtplib.SMTP('smtp.gmail.com',587)# Identify yourself to the SMTP server
mail.ehlo()# Start TLS encryption for the connection
mail.starttls()# Gmail account credentials
sender ='[email protected]'
password ='your_password'# Login to Gmail's SMTP server
mail.login(sender, password)# Email details
recipient ='[email protected]'
subject ='Test Email'# Construct email message with headers
header =f'To: {recipient}\nFrom: {sender}\nSubject: {subject}\n'
content = header + content

# Send email
mail.sendmail(sender, recipient, content)# Close SMTP connection
mail.quit()
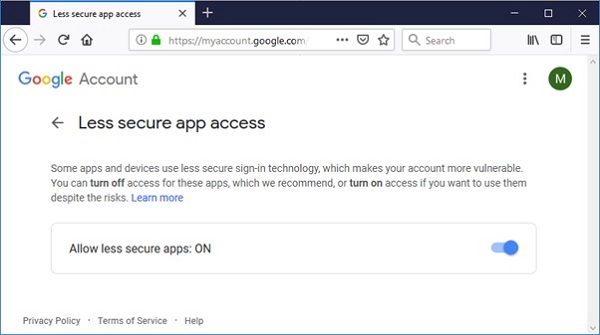
Before running above script, sender’s gmail account must be configured to allow access for ‘less secure apps’. Visit following link.
JSON in Python is a popular data format used for data exchange between systems. The json module provides functions to work with JSON data, allowing you to serialize Python objects into JSON strings and deserialize JSON strings back into Python objects.
JSON (JavaScript Object Notation) is a lightweight data interchange format that is easy for humans to read and write, and easy for machines to parse and generate. It is mainly used to transmit data between a server and web application as text.
JSON Serialization
JSON serialization is the process of converting a Python object into a JSON format. This is useful for saving data in a format that can be easily transmitted or stored, and later reconstructed back into its original form.
Python provides the json module to handle JSON serialization and deserialization. We can use the json.dumps() method for serialization in this module.
You can serialize the following Python object types into JSON strings −
dict
list
tuple
str
int
float
bool
None
Example
Following a basic example of how to serialize a Python dictionary into a JSON string −
import json

# Python dictionary
data ={"name":"Alice","age":30,"city":"New York"}# Serialize to JSON string
json_string = json.dumps(data)print(json_string)
It will produce the following output −
{"name": "Alice", "age": 30, "city": "New York"}
JSON Deserialization
JSON deserialization is the process of converting a JSON string back into a Python object. This is essential for reading and processing data that has been transmitted or stored in JSON format.
In Python, we can use json.loads() method to deserialize JSON data from a string, and json.load() method to deserialize JSON data from a file.
Example: Deserialize JSON string to Python object
In the following example we are deserializing a JSON string into a Python dictionary using the json.loads() method −
If your JSON data includes objects that need special handling (e.g., custom classes), you can define custom deserialization functions. Use the object_hookparameter of json.loads() or json.load() method to specify a function that will be called with the result of every JSON object decoded.
Example
In the example below, we are demonstrating the usage of custom object serialization −
The JSONEncoder class in Python is used to encode Python data structures into JSON format. Each Python data type is converted into its corresponding JSON type, as shown in the following table −
Python
JSON
Dict
object
list, tuple
array
Str
string
int, float, int- & float-derived Enums
number
True
true
False
false
None
null
The JSONEncoder class is instantiated using the JSONEncoder() constructor. The following important methods are defined in this class −
encode(obj) − Serializes a Python object into a JSON formatted string.
iterencode(obj) − Encodes the object and returns an iterator that yields the encoded form of each item in the object.
indent − Determines the indent level of the encoded string.
sort_keys − If True, the keys appear in sorted order.
check_circular − If True, checks for circular references in container-type objects.
Example
In the following example, we are encoding Python list object. We use the iterencode() method to display each part of the encoded string −
import json

data =['Rakesh',{'marks':(50,60,70)}]
e = json.JSONEncoder()# Using iterencode() method for obj in e.iterencode(data):print(obj)
It will produce the following output −
["Rakesh", { "marks" : [50, 60, 70]}]
JSONDecoder class
The JSONDecoder class is used to decode a JSON string back into a Python data structure. The main method in this class is decode().
Example
In this example, the “JSONEncoder” is used to encode a Python list into a JSON string, and the “JSONDecoder” is then used to decode the JSON string back into a Python list −
import json

data =['Rakesh',{'marks':(50,60,70)}]
e = json.JSONEncoder()
s = e.encode(data)
d = json.JSONDecoder()
obj = d.decode(s)print(obj,type(obj))
The json module in Python provides methods for working with JSON (JavaScript Object Notation). It allows you to serialize and deserialize Python objects to and from JSON format, which is a commonly used data interchange format.
Core Functions
The core functions in the json module allow you to serialize and deserialize JSON data.
Sr.No.
Function & Description
1
json.dump()Serializes a Python object and writes it to a file-like object.
2
json.dumps()Serializes a Python object and returns it as a JSON-formatted string.
3
json.load()Deserializes a JSON-formatted stream into a Python object.
4
json.loads()Deserializes a JSON-formatted string into a Python object.
JSON Encoder Methods
JSON encoder methods handle the conversion of Python objects to JSON format.
Sr.No.
Function & Description
1
json.JSONEncoderEncoder class for converting Python objects to JSON format.
In Python, docstrings are a way of documenting modules, classes, functions, and methods. They are written within triple quotes (“”” “””) and can span multiple lines.
Docstrings serve as convenient way of associating documentation with Python code. They are accessible through the __doc__ attribute of the respective Python objects they document. Below are the different ways to write docstrings −
Single-Line Docstrings
Single-line docstrings are used for brief and simple documentation. They provide a concise description of what the function or method does. Single-line docstrings should fit on one line within triple quotes and end with a period.
Example
In the following example, we are using a single line docstring to write a text −
defadd(a, b):"""Return the sum of two numbers."""return a + b

result = add(5,3)print("Sum:", result)
Multi-Line Docstrings
Multi-line docstrings are used for more detailed documentation. They provide a more comprehensive description, including the parameters, return values, and other relevant details. Multi-line docstrings start and end with triple quotes and include a summary line followed by a blank line and a more detailed description.
Example
The following example uses multi-line docstrings as an explanation of the code −
defmultiply(a, b):"""
   Multiply two numbers and return the result.

   Parameters:
   a (int or float): The first number.
   b (int or float): The second number.

   Returns:
   int or float: The result of multiplying a and b.
   """return a * b
result = multiply(5,3)print("Product:", result)
Docstrings for Modules
When writing docstrings for modules, place the docstring at the top of the module, right after any import statements. The module docstring provide an overview of the module’s functionality and list its primary components, such as list of functions, classes, and exceptions provided by the module.
Example
In this example, we demonstrate the use of docstrings for modules in Python −
import os

"""
This module provides Utility functions for file handling operations.

Functions:
- 'read_file(filepath)': Reads and returns the contents of the file.
- 'write_file(filepath, content)': Writes content to the specified file.

Classes:
- 'FileNotFoundError': Raised when a file is not found.

Example usage:

   >>> import file_utils
   >>> content = file_utils.read_file("example.txt")
   >>> print(content)
   'Hello, world!'
   >>> file_utils.write_file("output.txt", "This is a test.")
"""print("This is os module")
Docstrings for Classes
Classes can have docstrings to describe their purpose and usage. Each method within the class can also have its own docstring. The class docstring should provide an overview of the class and its methods.
Example
In the example below, we showcase the use of docstrings for classes in Python −
classCalculator:"""
   A simple calculator class to perform basic arithmetic operations.

   Methods:
   - add(a, b): Return the sum of two numbers.
   - multiply(a, b): Return the product of two numbers.
   """defadd(self, a, b):"""Return the sum of two numbers."""return a + b

   defmultiply(self, a, b):"""
  Multiply two numbers and return the result.
  Parameters:
  a (int or float): The first number.
  b (int or float): The second number.
  Returns:
  int or float: The result of multiplying a and b.
  """return a * b
cal = Calculator()print(cal.add(87,98))print(cal.multiply(87,98))
Accessing Docstrings
Docstrings in Python are accessed using the __doc__ attribute of the object they document. This attribute contains the documentation string (docstring) associated with the object, providing a way to access and display information about the purpose and usage of functions, classes, modules, or methods.
Example
In the following example, we are defining two functions, “add” and “multiply”, each with a docstring describing their parameters and return values. We then use the “__doc__” attribute to access and print these docstrings −
# Define a function with a docstringdefadd(a, b):"""
Adds two numbers together.
Parameters:
a (int): The first number.
b (int): The second number.
Returns:
int: The sum of a and b.
"""return a + b
result = add(5,3)print("Sum:", result)# Define another function with a docstringdefmultiply(x, y):"""
Multiplies two numbers together.
Parameters:
x (int): The first number.
y (int): The second number.
Returns:
int: The product of x and y.
"""return x * y
result = multiply(4,7)print("Product:", result)# Accessing the docstringsprint(add.__doc__)print(multiply.__doc__)
Best Practices for Writing Docstrings
Following are the best practices for writing docstrings in Python −
Be Clear and Concise − Ensure the docstring clearly explains the purpose and usage of the code, avoiding unnecessary details.
Use Proper Grammar and Spelling − Ensure the docstring is well-written with correct grammar and spelling.
Follow Conventions − Use the standard conventions for formatting docstrings, such as the Google style, NumPy style, or Sphinx style.
Include Examples − Provide examples where applicable to illustrate how to use the documented code.
Google Style Docstring
Google style docstrings provide a structured way to document Python code using indentation and headings. They are designed to be readable and informative, following a specific format.
Example
Following is an example of a function with a Google style docstring −
defdivide(dividend, divisor):"""
   Divide two numbers and return the result.

   Args:
  dividend (float): The number to be divided.
  divisor (float): The number to divide by.
   Returns:
  float: The result of the division.
   Raises:
  ValueError: If divisor is zero.   """if divisor ==0:raise ValueError("Cannot divide by zero")return dividend / divisor

result = divide(4,7)print("Division:", result)
NumPy/SciPy Style Docstring
NumPy/SciPy style docstrings are common in scientific computing. They include sections for parameters, returns, and examples.
Example
Following is an example of a function with a NumPy/SciPy style docstring −
deffibonacci(n):"""
   Compute the nth Fibonacci number.

   Parameters
   ----------
   n : int
  The index of the Fibonacci number to compute.
   Returns
   -------
   int
  The nth Fibonacci number.
   Examples
   --------
   >>> fibonacci(0)
   0
   >>> fibonacci(5)
   5
   >>> fibonacci(10)
   55
   """if n ==0:return0elif n ==1:return1else:return fibonacci(n-1)+ fibonacci(n-2)

result = fibonacci(4)print("Result:", result)
Sphinx Style Docstring
Sphinx style docstrings are compatible with the Sphinx documentation generator and use reStructuredText formatting.
The reStructuredText (reST) is a lightweight markup language used for creating structured text documents. The Sphinx documentation generator takes “reStructuredText” files as input and generates high-quality documentation in various formats, including HTML, PDF, ePub, and more.
Example
Following is an example of a function with a Sphinx style docstring −
defdivide(dividend, divisor):"""
   Divide two numbers and return the result.

   Args:
  dividend (float): The number to be divided.
  divisor (float): The number to divide by.
   Returns:
  float: The result of the division.
   Raises:
  ValueError: If divisor is zero.   """if divisor ==0:raise ValueError("Cannot divide by zero")return dividend / divisor

result = divide(76,37)print("Result:", result)
Docstring vs Comment
Following are the differences highlighted between Python docstrings and comments, focusing on their purposes, formats, usages, and accessibility respectively −
Docstring
Comment
Used to document Python objects such as functions, classes, methods, modules, or packages.
Used to annotate code for human readers, provide context, or temporarily disable code.
Written within triple quotes (“”” “”” or ”’ ”’) and placed immediately after the object’s definition.
Start with the # symbol and are placed on the same line as the annotated code.
Stored as an attribute of the object and accessible programmatically.
Ignored by the Python interpreter during execution, purely for human understanding.
Accessed using the __doc__ attribute of the object.
Not accessible programmatically; exists only in the source code.
Python Command Line Arguments provides a convenient way to accept some information at the command line while running the program. We usually pass these values along with the name of the Python script.
To run a Python program, we execute the following command in the command prompt terminal of the operating system. For example, in windows, the following command is entered in Windows command prompt terminal.
$ python script.py arg1 arg2 arg3
Here Python script name is script.py and rest of the three arguments – arg1 arg2 arg3 are command line arguments for the program.
If the program needs to accept input from the user, Python’s input() function is used. When the program is executed from command line, user input is accepted from the command terminal.
Example
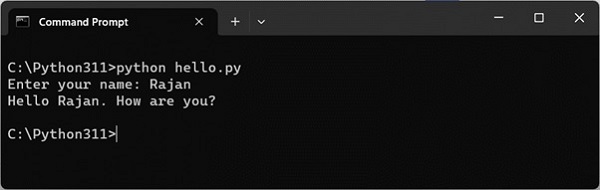
name =input("Enter your name: ")print("Hello {}. How are you?".format(name))
The program is run from the command prompt terminal as follows −
Passing Arguments at the Time of Execution
Very often, you may need to put the data to be used by the program in the command line itself and use it inside the program. An example of giving the data in the command line could be any DOS commands in Windows or Linux.
In Windows, you use the following DOS command to rename a file hello.py to hi.py.
C:\Python311>ren hello.py hi.py
In Linux you may use the mv command −
$ mv hello.py hi.py
Here ren or mv are the commands which need the old and new file names. Since they are put in line with the command, they are called command-line arguments.
You can pass values to a Python program from command line. Python collects the arguments in a list object. Python’s sys module provides access to any command-line arguments via the sys.argv variable. sys.argv is the list of command-line arguments and sys.argv[0] is the program i.e. the script name.
Example
The hello.py script used input() function to accept user input after the script is run. Let us change it to accept input from command line.
import sys
print('argument list', sys.argv)
name = sys.argv[1]print("Hello {}. How are you?".format(name))
Run the program from command-line as shown in the following figure −
The output is shown below −
C:\Python311>python hello.py Rajan
argument list ['hello.py', 'Rajan']
Hello Rajan. How are you?
The command-line arguments are always stored in string variables. To use them as numerics, you can them suitably with type conversion functions.
Example
In the following example, two numbers are entered as command-line arguments. Inside the program, we use int() function to parse them as integer variables.
import sys
print('argument list', sys.argv)
first =int(sys.argv[1])
second =int(sys.argv[2])print("sum = {}".format(first+second))
Python’s standard library includes a couple of useful modules to parse command line arguments and options −
getopt − C-style parser for command line options.
argparse − Parser for command-line options, arguments and sub-commands.
Python getopt Module
Python provides a getopt module that helps you parse command-line options and arguments. This module provides two functions and an exception to enable command line argument parsing.
getopt.getopt() method
This method parses the command line options and parameter list. Following is a simple syntax for this method −
getopt.getopt(args, options,[long_options])
Here is the detail of the parameters −
args − This is the argument list to be parsed.
options − This is the string of option letters that the script wants to recognize, with options that require an argument should be followed by a colon (:).
long_options − This is an optional parameter and if specified, must be a list of strings with the names of the long options, which should be supported. Long options, which require an argument should be followed by an equal sign (‘=’). To accept only long options, options should be an empty string.
This method returns a value consisting of two elements − the first is a list of (option, value) pairs, the second is a list of program arguments left after the option list was stripped.
Each option-and-value pair returned has the option as its first element, prefixed with a hyphen for short options (e.g., ‘-x’) or two hyphens for long options (e.g., ‘–long-option’).
Exception getopt.GetoptError
This is raised when an unrecognized option is found in the argument list or when an option requiring an argument is given none.
The argument to the exception is a string indicating the cause of the error. The attributes msg and opt give the error message and related option.
Example
Suppose we want to pass two file names through command line and we also want to give an option to check the usage of the script. Usage of the script is as follows −
The argparse module provides tools for writing very easy to use command line interfaces. It handles how to parse the arguments collected in sys.argv list, automatically generate help and issues error message when invalid options are given.
First step to design the command line interface is to set up parser object. This is done by ArgumentParser() function in argparse module. The function can be given an explanatory string as description parameter.
To start with our script will be executed from command line without any arguments. Still use parse_args() method of parser object, which does nothing because there aren’t any arguments given.
C:\Python311>python parser1.py
C:\Python311>python parser1.py -h
usage: parser1.py [-h]
sample argument parser
options:-h,--help show this help message and exit
The second command line usage gives −help option which produces a help message as shown. The −help parameter is available by default.
Now let us define an argument which is mandatory for the script to run and if not given script should throw error. Here we define argument ‘user’ by add_argument() method.
This script’s help now shows one positional argument in the form of ‘user’. The program checks if it’s value is ‘Admin’ or not and prints corresponding message.
C:\Python311>python parser2.py --help
usage: parser2.py [-h] user
sample argument parser
positional arguments:
   user
options:-h,--help show this help message and exit
Use the following command −
C:\Python311>python parser2.py Admin
Hello Admin
But the following usage displays Hello Guest message.
C:\Python311>python parser2.py Rajan
Hello Guest
The add_argument() method
We can assign default value to an argument in add_argument() method.
Here nargs is the number of command-line arguments that should be consumed. ‘?’. One argument will be consumed from the command line if possible, and produced as a single item. If no command-line argument is present, the value from default will be produced.
By default, all arguments are treated as strings. To explicitly mention type of argument, use type parameter in the add_argument() method. All Python data types are valid values of type.
import argparse
parser=argparse.ArgumentParser(description="add numbers")
parser.add_argument("first",type=int)
parser.add_argument("second",type=int)
args=parser.parse_args()
x=args.first
y=args.second
z=x+y
print('addition of {} and {} = {}'.format(x,y,z))
It will produce the following output −
C:\Python311>python parser3.py 10 20
addition of 10 and 20 = 30
In the above examples, the arguments are mandatory. To add optional argument, prefix its name by double dash –. In following case surname argument is optional because it is prefixed by double dash (–surname).
import argparse
parser=argparse.ArgumentParser()
parser.add_argument("name")
parser.add_argument("--surname")
args=parser.parse_args()print("My name is ", args.name, end=' ')if args.surname:print(args.surname)
A one letter name of argument prefixed by single dash acts as a short name option.
C:\Python311>python parser3.py Anup
My name is Anup
C:\Python311>python parser3.py Anup --surname Gupta
My name is Anup Gupta
If it is desired that an argument should value only from a defined list, it is defined as choices parameter.
import argparse
parser=argparse.ArgumentParser()
parser.add_argument("sub", choices=['Physics','Maths','Biology'])
args=parser.parse_args()print("My subject is ", args.sub)
Note that if value of parameter is not from the list, invalid choice error is displayed.
C:\Python311>python parser3.py Physics
My subject is Physics
C:\Python311>python parser3.py History
usage: parser3.py [-h] {Physics,Maths,Biology}
parser3.py: error: argument sub: invalid choice: 'History' (choose from
'Physics', 'Maths', 'Biology')
Python provides various options for developing graphical user interfaces (GUIs). The most important features are listed below.
Tkinter − Tkinter is the Python interface to the Tk GUI toolkit shipped with Python. We would look at this option in this chapter.
wxPython − This is an open-source Python interface for wxWidgets GUI toolkit. You can find a complete tutorial on WxPython here.
PyQt − This is also a Python interface for a popular cross-platform Qt GUI library. TutorialsPoint has a very good tutorial on PyQt5 here.
PyGTK − PyGTK is a set of wrappers written in Python and C for GTK + GUI library. The complete PyGTK tutorial is available here.
PySimpleGUI − PySimpleGui is an open source, cross-platform GUI library for Python. It aims to provide a uniform API for creating desktop GUIs based on Python’s Tkinter, PySide and WxPython toolkits. For a detaile PySimpleGUI tutorial, click here.
Pygame − Pygame is a popular Python library used for developing video games. It is free, open source and cross-platform wrapper around Simple DirectMedia Library (SDL). For a comprehensive tutorial on Pygame, visitthis link.
Jython − Jython is a Python port for Java, which gives Python scripts seamless access to the Java class libraries on the local machinehttp: //www.jython.org.
There are many other interfaces available, which you can find them on the net.
Tkinter Programming
Tkinter is the standard GUI library for Python. Python when combined with Tkinter provides a fast and easy way to create GUI applications. Tkinter provides a powerful object-oriented interface to the Tk GUI toolkit.
The tkinter package includes following modules −
Tkinter − Main Tkinter module.
tkinter.colorchooser − Dialog to let the user choose a color.
tkinter.commondialog − Base class for the dialogs defined in the other modules listed here.
tkinter.filedialog − Common dialogs to allow the user to specify a file to open or save.
tkinter.font − Utilities to help work with fonts.
tkinter.messagebox − Access to standard Tk dialog boxes.
tkinter.scrolledtext − Text widget with a vertical scroll bar built in.
tkinter.simpledialog − Basic dialogs and convenience functions.
tkinter.ttk − Themed widget set introduced in Tk 8.5, providing modern alternatives for many of the classic widgets in the main tkinter module.
Creating a GUI application using Tkinter is an easy task. All you need to do is perform the following steps.
Import the Tkinter module.
Create the GUI application main window.
Add one or more of the above-mentioned widgets to the GUI application.
Enter the main event loop to take action against each event triggered by the user.
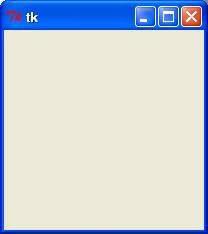
Example
# note that module name has changed from Tkinter in Python 2# to tkinter in Python 3import tkinter
top = tkinter.Tk()# Code to add widgets will go here...
top.mainloop()
This would create a following window −
When the program becomes more complex, using an object-oriented programming approach makes the code more organized.
import tkinter as tk
classApp(tk.Tk):def__init__(self):super().__init__()

app = App()
app.mainloop()
Tkinter Widgets
Tkinter provides various controls, such as buttons, labels and text boxes used in a GUI application. These controls are commonly called widgets.
There are currently 15 types of widgets in Tkinter. We present these widgets as well as a brief description in the following table −
Sr.No.
Operator & Description
1
ButtonThe Button widget is used to display the buttons in your application.
2
CanvasThe Canvas widget is used to draw shapes, such as lines, ovals, polygons and rectangles, in your application.
3
CheckbuttonThe Checkbutton widget is used to display a number of options as checkboxes. The user can select multiple options at a time.
4
EntryThe Entry widget is used to display a single-line text field for accepting values from a user.
5
FrameThe Frame widget is used as a container widget to organize other widgets.
6
LabelThe Label widget is used to provide a single-line caption for other widgets. It can also contain images.
7
ListboxThe Listbox widget is used to provide a list of options to a user.
8
MenubuttonThe Menubutton widget is used to display menus in your application.
9
MenuThe Menu widget is used to provide various commands to a user. These commands are contained inside Menubutton.
10
MessageThe Message widget is used to display multiline text fields for accepting values from a user.
11
RadiobuttonThe Radiobutton widget is used to display a number of options as radio buttons. The user can select only one option at a time.
12
ScaleThe Scale widget is used to provide a slider widget.
13
ScrollbarThe Scrollbar widget is used to add scrolling capability to various widgets, such as list boxes.
14
TextThe Text widget is used to display text in multiple lines.
15
ToplevelThe Toplevel widget is used to provide a separate window container.
16
SpinboxThe Spinbox widget is a variant of the standard Tkinter Entry widget, which can be used to select from a fixed number of values.
17
PanedWindowA PanedWindow is a container widget that may contain any number of panes, arranged horizontally or vertically.
18
LabelFrameA labelframe is a simple container widget. Its primary purpose is to act as a spacer or container for complex window layouts.
19
tkMessageBoxThis module is used to display message boxes in your applications.
Let us study these widgets in detail.
Standard Attributes
Let us look at how some of the common attributes, such as sizes, colors and fonts are specified.
All Tkinter widgets have access to the specific geometry management methods, which have the purpose of organizing widgets throughout the parent widget area. Tkinter exposes the following geometry manager classes: pack, grid, and place.
The pack() Method − This geometry manager organizes widgets in blocks before placing them in the parent widget.
The grid() Method − This geometry manager organizes widgets in a table-like structure in the parent widget.
The place() Method − This geometry manager organizes widgets by placing them in a specific position in the parent widget.
Let us study the geometry management methods briefly −
SimpleDialog
The simpledialog module in tkinter package includes a dialog class and convenience functions for accepting user input through a modal dialog. It consists of a label, an entry widget and two buttons Ok and Cancel. These functions are −
askfloat(title, prompt, **kw) − Accepts a floating point number.
askinteger(title, prompt, **kw) − Accepts an integer input.
askstring(title, prompt, **kw) − Accepts a text input from the user.
The above three functions provide dialogs that prompt the user to enter a value of the desired type. If Ok is pressed, the input is returned, if Cancel is pressed, None is returned.
askinteger
from tkinter.simpledialog import askinteger
from tkinter import*from tkinter import messagebox
top = Tk()

top.geometry("100x100")defshow():
   num = askinteger("Input","Input an Integer")print(num)

B = Button(top, text ="Click", command = show)
B.place(x=50,y=50)

top.mainloop()
It will produce the following output −
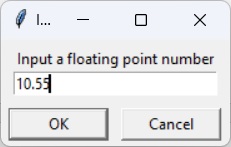
askfloat
from tkinter.simpledialog import askfloat
from tkinter import*
top = Tk()

top.geometry("100x100")defshow():
   num = askfloat("Input","Input a floating point number")print(num)

B = Button(top, text ="Click", command = show)
B.place(x=50,y=50)

top.mainloop()
It will produce the following output −
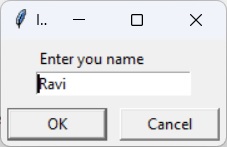
askstring
from tkinter.simpledialog import askstring
from tkinter import*

top = Tk()

top.geometry("100x100")defshow():
   name = askstring("Input","Enter you name")print(name)

B = Button(top, text ="Click", command = show)
B.place(x=50,y=50)

top.mainloop()
It will produce the following output −
The FileDialog Module
The filedialog module in Tkinter package includes a FileDialog class. It also defines convenience functions that enable the user to perform open file, save file, and open directory activities.
filedialog.asksaveasfilename()
filedialog.asksaveasfile()
filedialog.askopenfilename()
filedialog.askopenfile()
filedialog.askdirectory()
filedialog.askopenfilenames()
filedialog.askopenfiles()
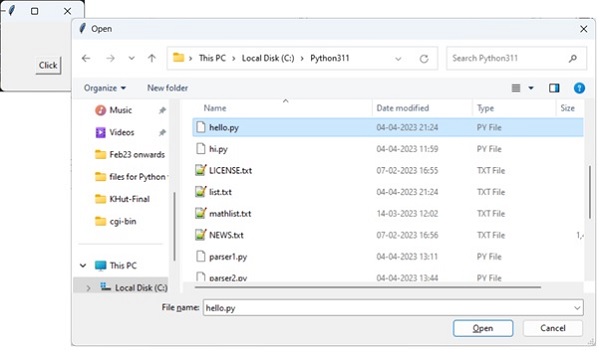
askopenfile
This function lets the user choose a desired file from the filesystem. The file dialog window has Open and Cancel buttons. The file name along with its path is returned when Ok is pressed, None if Cancel is pressed.
from tkinter.filedialog import askopenfile
from tkinter import*

top = Tk()

top.geometry("100x100")defshow():
   filename = askopenfile()print(filename)

B = Button(top, text ="Click", command = show)
B.place(x=50,y=50)

top.mainloop()
It will produce the following output −
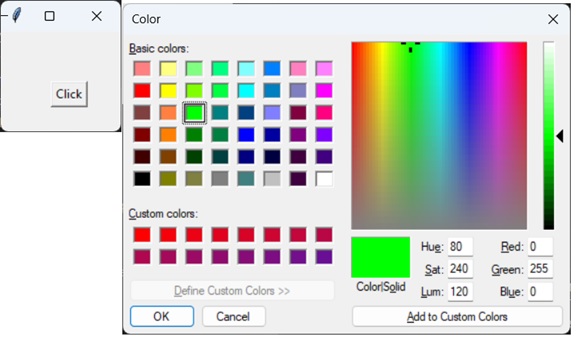
ColorChooser
The colorchooser module included in tkinter package has the feature of letting the user choose a desired color object through the color dialog. The askcolor() function presents with the color dialog with predefined color swatches and facility to choose custome color by setting RGB values. The dialog returns a tuple of RGB values of chosen color as well as its hex value.
from tkinter.colorchooser import askcolor
from tkinter import*

top = Tk()

top.geometry("100x100")defshow():
   color = askcolor()print(color)

B = Button(top, text ="Click", command = show)
B.place(x=50,y=50)

top.mainloop()
It will produce the following output −
((0,255,0),'#00ff00')
ttk module
The term ttk stands from Tk Themed widgets. The ttk module was introduced with Tk 8.5 onwards. It provides additional benefits including anti-aliased font rendering under X11 and window transparency. It provides theming and styling support for Tkinter.
The ttk module comes bundled with 18 widgets, out of which 12 are already present in Tkinter. Importing ttk over-writes these widgets with new ones which are designed to have a better and more modern look across all platforms.
The 6 new widgets in ttk are, the Combobox, Separator, Sizegrip, Treeview, Notebook and ProgressBar.
To override the basic Tk widgets, the import should follow the Tk import −
from tkinter import*from tkinter.ttk import*
The original Tk widgets are automatically replaced by tkinter.ttk widgets. They are Button, Checkbutton, Entry, Frame, Label, LabelFrame, Menubutton, PanedWindow, Radiobutton, Scale and Scrollbar.
New widgets which gives a better look and feel across platforms; however, the replacement widgets are not completely compatible. The main difference is that widget options such as “fg”, “bg” and others related to widget styling are no longer present in Ttk widgets. Instead, use the ttk.Style class for improved styling effects.
The new widgets in ttk module are −
Notebook − This widget manages a collection of “tabs” between which you can swap, changing the currently displayed window.
ProgressBar − This widget is used to show progress or the loading process through the use of animations.
Separator − Used to separate different widgets using a separator line.
Treeview − This widget is used to group together items in a tree-like hierarchy. Each item has a textual label, an optional image, and an optional list of data values.
ComboBox − Used to create a dropdown list of options from which the user can select one.
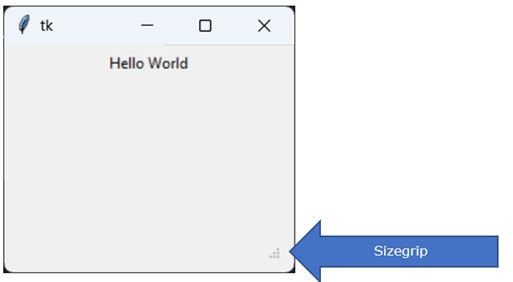
Sizegrip − Creates a little handle near the bottom-right of the screen, which can be used to resize the window.
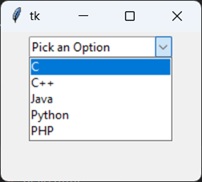
Combobox Widget
The Python ttk Combobox presents a drop down list of options and displays them one at a time. It is a sub class of the widget Entry. Hence it inherits many options and methods from the Entry class.
Syntax
from tkinter import ttk

Combo = ttk.Combobox(master, values.......)
The get() function to retrieve the current value of the Combobox.
Example
from tkinter import*from tkinter import ttk

top = Tk()
top.geometry("200x150")

frame = Frame(top)
frame.pack()

langs =["C","C++","Java","Python","PHP"]

Combo = ttk.Combobox(frame, values = langs)
Combo.set("Pick an Option")
Combo.pack(padx =5, pady =5)
top.mainloop()
It will produce the following output −
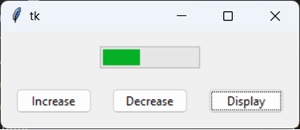
Progressbar
The ttk ProgressBar widget, and how it can be used to create loading screens or show the progress of a current task.
Syntax
ttk.Progressbar(parent, orient, length, mode)
Parameters
Parent − The container in which the ProgressBar is to be placed, such as root or a Tkinter frame.
Orient − Defines the orientation of the ProgressBar, which can be either vertical of horizontal.
Length − Defines the width of the ProgressBar by taking in an integer value.
Mode − There are two options for this parameter, determinate and indeterminate.
Example
The code given below creates a progressbar with three buttons which are linked to three different functions.
The first function increments the “value” or “progress” in the progressbar by 20. This is done with the step() function which takes an integer value to change progress amount. (Default is 1.0)
The second function decrements the “value” or “progress” in the progressbar by 20.
The third function prints out the current progress level in the progressbar.
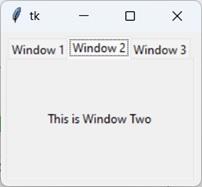
Tkinter ttk module has a new useful widget called Notebook. It is a of collection of of containers (e.g frames) which have many widgets as children inside.
Each “tab” or “window” has a tab ID associated with it, which is used to determine which tab to swap to.
You can swap between these containers like you would on a regular text editor.
Syntax
notebook = ttk.Notebook(master,*options)
Example
In this example, add 3 windows to our Notebook widget in two different ways. The first method involves the add() function, which simply appends a new tab to the end. The other method is the insert() function which can be used to add a tab to a specific position.
The add() function takes one mandatory parameter which is the container widget to be added, and the rest are optional parameters such as text (text to be displayed as tab title), image and compound.
The insert() function requires a tab_id, which defines the location where it should be inserted. The tab_id can be either an index value or it can be string literal like “end”, which will append it to the end.
import tkinter as tk
from tkinter import ttk

root = tk.Tk()
nb = ttk.Notebook(root)# Frame 1 and 2
frame1 = ttk.Frame(nb)
frame2 = ttk.Frame(nb)

label1 = ttk.Label(frame1, text ="This is Window One")
label1.pack(pady =50, padx =20)
label2 = ttk.Label(frame2, text ="This is Window Two")
label2.pack(pady =50, padx =20)

frame1.pack(fill= tk.BOTH, expand=True)
frame2.pack(fill= tk.BOTH, expand=True)
nb.add(frame1, text ="Window 1")
nb.add(frame2, text ="Window 2")

frame3 = ttk.Frame(nb)
label3 = ttk.Label(frame3, text ="This is Window Three")
label3.pack(pady =50, padx =20)
frame3.pack(fill= tk.BOTH, expand=True)
nb.insert("end", frame3, text ="Window 3")
nb.pack(padx =5, pady =5, expand =True)

root.mainloop()
It will produce the following output −
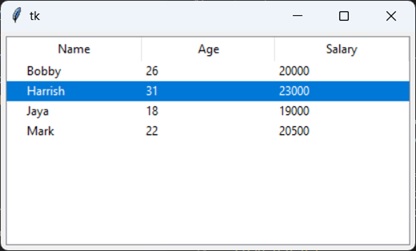
Treeview
The Treeview widget is used to display items in a tabular or hierarchical manner. It has support for features like creating rows and columns for items, as well as allowing items to have children as well, leading to a hierarchical format.
Syntax
tree = ttk.Treeview(container,**options)
Options
Sr.No.
Option & Description
1
columnsA list of column names
2
displaycolumnsA list of column identifiers (either symbolic or integer indices) specifying which data columns are displayed and the order in which they appear, or the string “#all”.
3
heightThe number of rows visible.
4
paddingSpecifies the internal padding for the widget. Can be either an integer or a list of 4 values.
5
selectmodeOne of “extended”, “browse” or “none”. If set to “extended” (default), multiple items can be selected. If “browse”, only a single item can be selected at a time. If “none”, the selection cannot be changed by the user.
6
showA list containing zero or more of the following values, specifying which elements of the tree to display. The default is “tree headings”, i.e., show all elements.
Example
In this example we will create a simple Treeview ttk Widget and fill in some data into it. We have some data already stored in a list which will be reading and adding to the Treeview widget in our read_data() function.
We first need to define a list/tuple of column names. We have left out the column “Name” because there already exists a (default) column with a blank name.
We then assign that list/tuple to the columns option in Treeview, followed by defining the “headings”, where the column is the actual column, whereas the heading is just the title of the column that appears when the widget is displayed. We give each a column a name. “#0” is the name of the default column.
The tree.insert() function has the following parameters −
Parent − which is left as an empty string if there is none.
Position − where we want to add the new item. To append, use tk.END
Iid − which is the item ID used to later track the item in question.
Text − to which we will assign the first value in the list (the name).
Value we will pass the the other 2 values we obtained from the list.
The Complete Code
import tkinter as tk
import tkinter.ttk as ttk
from tkinter import simpledialog
root = tk.Tk()
data =[["Bobby",26,20000],["Harrish",31,23000],["Jaya",18,19000],["Mark",22,20500],]
index=0defread_data():for index, line inenumerate(data):
The Sizegrip widget is basically a small arrow-like grip that is typically placed at the bottom-right corner of the screen. Dragging the Sizegrip across the screen also resizes the container to which it is attached to.
Syntax
sizegrip = ttk.Sizegrip(parent,**options)
Example
import tkinter as tk
import tkinter.ttk as ttk

root = tk.Tk()
root.geometry("100x100")

frame = ttk.Frame(root)
label = ttk.Label(root, text ="Hello World")
label.pack(padx =5, pady =5)
sizegrip = ttk.Sizegrip(frame)
sizegrip.pack(expand =True, fill = tk.BOTH, anchor = tk.SE)
frame.pack(padx =10, pady =10, expand =True, fill = tk.BOTH)

root.mainloop()
It will produce the following output −
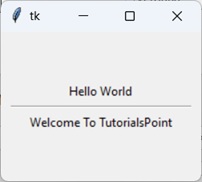
Separator
The ttk Separator widget is a very simple widget, that has just one purpose and that is to help “separate” widgets into groups/partitions by drawing a line between them. We can change the orientation of this line (separator) to either horizontal or vertical, and change its length/height.
Syntax
separator = ttk.Separator(parent,**options)
The “orient”, which can either be tk.VERTICAL or tk.HORIZTONAL, for a vertical and horizontal separator respectively.
Example
Here we have created two Label widgets, and then created a Horizontal Separator between them.
import tkinter as tk
import tkinter.ttk as ttk

root = tk.Tk()
root.geometry("200x150")

frame = ttk.Frame(root)

label = ttk.Label(frame, text ="Hello World")
label.pack(padx =5)

separator = ttk.Separator(frame,orient= tk.HORIZONTAL)
separator.pack(expand =True, fill = tk.X)

label = ttk.Label(frame, text ="Welcome To TutorialsPoint")
label.pack(padx =5)

frame.pack(padx =10, pady =50, expand =True, fill = tk.BOTH)

root.mainloop()
XML is a portable, open-source language that allows programmers to develop applications that can be read by other applications, regardless of operating system and/or developmental language.
What is XML?
The Extensible Markup Language (XML) is a markup language much like HTML or SGML. This is recommended by the World Wide Web Consortium and available as an open standard.
XML is extremely useful for keeping track of small to medium amounts of data without requiring an SQL- based backbone.
XML Parser Architectures and APIs.
The Python standard library provides a minimal but useful set of interfaces to work with XML. All the submodules for XML processing are available in the xml package.
xml.etree.ElementTree − the ElementTree API, a simple and lightweight XML processor
xml.dom − the DOM API definition.
xml.dom.minidom − a minimal DOM implementation.
xml.dom.pulldom − support for building partial DOM trees.
xml.sax − SAX2 base classes and convenience functions.
xml.parsers.expat − the Expat parser binding.
The two most basic and broadly used APIs to XML data are the SAX and DOM interfaces.
Simple API for XML (SAX) − Here, you register callbacks for events of interest and then let the parser proceed through the document. This is useful when your documents are large or you have memory limitations, it parses the file as it reads it from the disk and the entire file is never stored in the memory.
Document Object Model (DOM) − This is a World Wide Web Consortium recommendation wherein the entire file is read into the memory and stored in a hierarchical (tree-based) form to represent all the features of an XML document.
SAX obviously cannot process information as fast as DOM, when working with large files. On the other hand, using DOM exclusively can really kill your resources, especially if used on many small files.
SAX is read-only, while DOM allows changes to the XML file. Since these two different APIs literally complement each other, there is no reason why you cannot use them both for large projects.
For all our XML code examples, let us use a simple XML file movies.xml as an input −
<collection shelf="New Arrivals"><movie title="Enemy Behind"><type>War, Thriller</type><format>DVD</format><year>2003</year><rating>PG</rating><stars>10</stars><description>Talk about a US-Japan war</description></movie><movie title="Transformers"><type>Anime, Science Fiction</type><format>DVD</format><year>1989</year><rating>R</rating><stars>8</stars><description>A schientific fiction</description></movie><movie title="Trigun"><type>Anime, Action</type><format>DVD</format><episodes>4</episodes><rating>PG</rating><stars>10</stars><description>Vash the Stampede!</description></movie><movie title="Ishtar"><type>Comedy</type><format>VHS</format><rating>PG</rating><stars>2</stars><description>Viewable boredom</description></movie></collection>
Parsing XML with SAX APIs
SAX is a standard interface for event-driven XML parsing. Parsing XML with SAX generally requires you to create your own ContentHandler by subclassing xml.sax.ContentHandler.
Your ContentHandler handles the particular tags and attributes of your flavor(s) of XML. A ContentHandler object provides methods to handle various parsing events. Its owning parser calls ContentHandler methods as it parses the XML file.
The methods startDocument and endDocument are called at the start and the end of the XML file. The method characters(text) is passed the character data of the XML file via the parameter text.
The ContentHandler is called at the start and end of each element. If the parser is not in namespace mode, the methods startElement(tag, attributes) andendElement(tag) are called; otherwise, the corresponding methodsstartElementNS and endElementNS are called. Here, tag is the element tag, and attributes is an Attributes object.
Here are other important methods to understand before proceeding −
The make_parser Method
The following method creates a new parser object and returns it. The parser object created will be of the first parser type, the system finds.
xml.sax.make_parser([parser_list])
Here is the detail of the parameters −
parser_list − The optional argument consisting of a list of parsers to use, which must all implement the make_parser method.
The parse Method
The following method creates a SAX parser and uses it to parse a document.
self.CurrentData =""
self.type=""
self.format=""
self.year =""
self.rating =""
self.stars =""
self.description =""# Call when an element startsdefstartElement(self, tag, attributes):
self.CurrentData = tag
if tag =="movie":print("*****Movie*****")
title = attributes["title"]print("Title:", title)# Call when an elements endsdefendElement(self, tag):if self.CurrentData =="type":print("Type:", self.type)elif self.CurrentData =="format":print("Format:", self.format)elif self.CurrentData =="year":print("Year:", self.year)elif self.CurrentData =="rating":print("Rating:", self.rating)elif self.CurrentData =="stars":print("Stars:", self.stars)elif self.CurrentData =="description":print("Description:", self.description)
self.CurrentData =""# Call when a character is readdefcharacters(self, content):if self.CurrentData =="type":
self.type= content
elif self.CurrentData =="format":
self.format= content
elif self.CurrentData =="year":
self.year = content
elif self.CurrentData =="rating":
self.rating = content
elif self.CurrentData =="stars":
self.stars = content
elif self.CurrentData =="description":
self.description = content
if( __name__ =="__main__"):# create an XMLReader
parser = xml.sax.make_parser()# turn off namepsaces
parser.setFeature(xml.sax.handler.feature_namespaces,0)# override the default ContextHandler
Handler = MovieHandler()
parser.setContentHandler( Handler )
parser.parse("movies.xml")
This would produce the following result −
*****Movie*****
Title: Enemy Behind
Type: War, Thriller
Format: DVD
Year: 2003
Rating: PG
Stars: 10
Description: Talk about a US-Japan war
*****Movie*****
Title: Transformers
Type: Anime, Science Fiction
Format: DVD
Year: 1989
Rating: R
Stars: 8
Description: A schientific fiction
*****Movie*****
Title: Trigun
Type: Anime, Action
Format: DVD
Rating: PG
Stars: 10
Description: Vash the Stampede!
*****Movie*****
Title: Ishtar
Type: Comedy
Format: VHS
Rating: PG
Stars: 2
Description: Viewable boredom
For a complete detail on SAX API documentation, please refer to standard Python SAX APIs.
Parsing XML with DOM APIs
The Document Object Model (“DOM”) is a cross-language API from the World Wide Web Consortium (W3C) for accessing and modifying the XML documents.
The DOM is extremely useful for random-access applications. SAX only allows you a view of one bit of the document at a time. If you are looking at one SAX element, you have no access to another.
Here is the easiest way to load an XML document quickly and to create a minidom object using the xml.dom module. The minidom object provides a simple parser method that quickly creates a DOM tree from the XML file.
The sample phrase calls the parse( file [,parser] ) function of the minidom object to parse the XML file, designated by file into a DOM tree object.
from xml.dom.minidom import parse
import xml.dom.minidom

# Open XML document using minidom parser
DOMTree = xml.dom.minidom.parse("movies.xml")
collection = DOMTree.documentElement
if collection.hasAttribute("shelf"):print("Root element : %s"% collection.getAttribute("shelf"))# Get all the movies in the collection
movies = collection.getElementsByTagName("movie")# Print detail of each movie.for movie in movies:print("*****Movie*****")if movie.hasAttribute("title"):print("Title: %s"% movie.getAttribute("title"))type= movie.getElementsByTagName('type')[0]print("Type: %s"%type.childNodes[0].data)format= movie.getElementsByTagName('format')[0]print("Format: %s"%format.childNodes[0].data)
   rating = movie.getElementsByTagName('rating')[0]print("Rating: %s"% rating.childNodes[0].data)
   description = movie.getElementsByTagName('description')[0]print("Description: %s"% description.childNodes[0].data)
This would produce the following output −
Root element : New Arrivals
*****Movie*****
Title: Enemy Behind
Type: War, Thriller
Format: DVD
Rating: PG
Description: Talk about a US-Japan war
*****Movie*****
Title: Transformers
Type: Anime, Science Fiction
Format: DVD
Rating: R
Description: A schientific fiction
*****Movie*****
Title: Trigun
Type: Anime, Action
Format: DVD
Rating: PG
Description: Vash the Stampede!
*****Movie*****
Title: Ishtar
Type: Comedy
Format: VHS
Rating: PG
Description: Viewable boredom
For a complete detail on DOM API documentation, please refer to standard Python DOM APIs.
ElementTree XML API
The xml package has an ElementTree module. This is a simple and lightweight XML processor API.
XML is a tree-like hierarchical data format. The ‘ElementTree’ in this module treats the whole XML document as a tree. The ‘Element’ class represents a single node in this tree. Reading and writing operations on XML files are done on the ElementTree level. Interactions with a single XML element and its sub-elements are done on the Element level.
Create an XML File
The tree is a hierarchical structure of elements starting with root followed by other elements. Each element is created by using the Element() function of this module.
import xml.etree.ElementTree as et
e=et.Element('name')
Each element is characterized by a tag and attrib attribute which is a dict object. For tree’s starting element, attrib is an empty dictionary.
You may now set up one or more child elements to be added under the root element. Each child may have one or more sub elements. Add them using the SubElement() function and define its text attribute.
Each child is added to root by append() function as −
root.append(child)
After adding required number of child elements, construct a tree object by elementTree() function −
tree = et.ElementTree(root)
The entire tree structure is written to a binary file by tree object’s write() function −
f=open('employees.xml',"wb")
tree.write(f)
Example
In this example, a tree is constructed out of a list of dictionary items. Each dictionary item holds key-value pairs describing a student data structure. The tree so constructed is written to ‘myfile.xml’
import xml.etree.ElementTree as et
employees=[{'name':'aaa','age':21,'sal':5000},{'name':xyz,'age':22,'sal':6000}]
root = et.Element("employees")for employee in employees:
   child=xml.Element("employee")
   root.append(child)
   nm = xml.SubElement(child,"name")
   nm.text = student.get('name')
   age = xml.SubElement(child,"age")
   age.text =str(student.get('age'))
   sal=xml.SubElement(child,"sal")
   sal.text=str(student.get('sal'))
tree = et.ElementTree(root)withopen('employees.xml',"wb")as fh:
   tree.write(fh)
The ‘myfile.xml’ is stored in current working directory.
Let us now read back the ‘myfile.xml’ created in above example. For this purpose, following functions in ElementTree module will be used −
ElementTree() − This function is overloaded to read the hierarchical structure of elements to a tree objects.
tree = et.ElementTree(file='students.xml')
getroot() − This function returns root element of the tree.
root = tree.getroot()
You can obtain the list of sub-elements one level below of an element.
children =list(root)
In the following example, elements and sub-elements of the ‘myfile.xml’ are parsed into a list of dictionary items.
Example
import xml.etree.ElementTree as et
tree = et.ElementTree(file='employees.xml')
root = tree.getroot()
employees=[]
children =list(root)for child in children:
employee={}
pairs =list(child)for pair in pairs:
We shall use iter() function of Element. It creates a tree iterator for given tag with the current element as the root. The iterator iterates over this element and all elements below it, in document (depth first) order.
Let us build iterator for all ‘marks’ subelements and increment text of each sal tag by 100.
import xml.etree.ElementTree as et
tree = et.ElementTree(file='students.xml')
root = tree.getroot()for x in root.iter('sal'):
   s=int(x.text)
   s=s+100
   x.text=str(s)withopen("employees.xml","wb")as fh:
   tree.write(fh)
Our ’employees.xml’ will now be modified accordingly. We can also use set() to update value of a certain key.
The Common Gateway Interface, or CGI, is a set of standards that define how information is exchanged between the web server and a custom script. The CGI specs are currently maintained by the NCSA.
What is CGI?
The Common Gateway Interface, or CGI, is a standard for external gateway programs to interface with information servers such as HTTP servers.
The current version is CGI/1.1 and CGI/1.2 is under progress.
Web Browsing
To understand the concept of CGI, let us see what happens when we click a hyper link to browse a particular web page or URL.
Your browser contacts the HTTP web server and demands for the URL, i.e., filename.
Web Server parses the URL and looks for the filename. If it finds that file then sends it back to the browser, otherwise sends an error message indicating that you requested a wrong file.
Web browser takes response from web server and displays either the received file or error message.
However, it is possible to set up the HTTP server so that whenever a file in a certain directory is requested that file is not sent back; instead it is executed as a program, and whatever that program outputs is sent back for your browser to display. This function is called the Common Gateway Interface or CGI and the programs are called CGI scripts. These CGI programs can be a Python Script, PERL Script, Shell Script, C or C++ program, etc.
CGI Architecture Diagram
Web Server Support and Configuration
Before you proceed with CGI Programming, make sure that your Web Server supports CGI and it is configured to handle CGI Programs. All the CGI Programs to be executed by the HTTP server are kept in a pre-configured directory. This directory is called CGI Directory and by convention it is named as /var/www/cgi-bin. By convention, CGI files have extension as. cgi, but you can keep your files with python extension .py as well.
By default, the Linux server is configured to run only the scripts in the cgi-bin directory in /var/www. If you want to specify any other directory to run your CGI scripts, comment the following lines in the httpd.conf file −
<Directory "/var/www/cgi-bin">
   AllowOverride None
   Options ExecCGI
   Order allow,deny
   Allow fromall</Directory><Directory "/var/www/cgi-bin">
Options All
</Directory>
The following line should also be added for apache server to treat .py file as cgi script.
AddHandler cgi-script .py
Here, we assume that you have Web Server up and running successfully and you are able to run any other CGI program like Perl or Shell, etc.
First CGI Program
Here is a simple link, which is linked to a CGI script called hello.py. This file is kept in /var/www/cgi-bin directory and it has following content. Before running your CGI program, make sure you have change mode of file using chmod 755 hello.py UNIX command to make file executable.
print("Content-type:text/html\r\n\r\n")print('<html>')print('<head>')print('<title>Hello Word - First CGI Program</title>')print('</head>')print('<body>')print('<h2>Hello Word! This is my first CGI program</h2>')print('</body>')print('</html>')
Note − First line in the script must be the path to Python executable. It appears as a comment in Python program, but it is called shebang line.
In Linux, it should be #!/usr/bin/python3.
In Windows, it should be #!c:/python311/python.exd.
Enter the following URL in your browser −
http://localhost/cgi-bin/hello.py
Hello Word! This is my first CGI program
This hello.py script is a simple Python script, which writes its output on STDOUT file, i.e., screen. There is one important and extra feature available which is first line to be printed Content-type:text/html\r\n\r\n. This line is sent back to the browser and it specifies the content type to be displayed on the browser screen.
By now you must have understood basic concept of CGI and you can write many complicated CGI programs using Python. This script can interact with any other external system also to exchange information such as RDBMS.
HTTP Header
The line Content-type:text/html\r\n\r\n is part of HTTP header which is sent to the browser to understand the content. All the HTTP header will be in the following form −
HTTP Field Name: Field Content

For Example
Content-type: text/html\r\n\r\n
There are few other important HTTP headers, which you will use frequently in your CGI Programming.
Sr.No.
Header & Description
1
Content-type:A MIME string defining the format of the file being returned. Example is Content-type:text/html
2
Expires: DateThe date the information becomes invalid. It is used by the browser to decide when a page needs to be refreshed. A valid date string is in the format 01 Jan 1998 12:00:00 GMT.
3
Location: URLThe URL that is returned instead of the URL requested. You can use this field to redirect a request to any file.
4
Last-modified: DateThe date of last modification of the resource.
5
Content-length: NThe length, in bytes, of the data being returned. The browser uses this value to report the estimated download time for a file.
6
Set-Cookie: StringSet the cookie passed through the string
CGI Environment Variables
All the CGI programs have access to the following environment variables. These variables play an important role while writing any CGI program.
Sr.No.
Variable Name & Description
1
CONTENT_TYPEThe data type of the content. Used when the client is sending attached content to the server. For example, file upload.
2
CONTENT_LENGTHThe length of the query information. It is available only for POST requests.
3
HTTP_COOKIEReturns the set cookies in the form of key & value pair.
4
HTTP_USER_AGENTThe User-Agent request-header field contains information about the user agent originating the request. It is name of the web browser.
5
PATH_INFOThe path for the CGI script.
6
QUERY_STRINGThe URL-encoded information that is sent with GET method request.
7
REMOTE_ADDRThe IP address of the remote host making the request. This is useful logging or for authentication.
8
REMOTE_HOSTThe fully qualified name of the host making the request. If this information is not available, then REMOTE_ADDR can be used to get IR address.
9
REQUEST_METHODThe method used to make the request. The most common methods are GET and POST.
10
SCRIPT_FILENAMEThe full path to the CGI script.
11
SCRIPT_NAMEThe name of the CGI script.
12
SERVER_NAMEThe server’s hostname or IP Address
13
SERVER_SOFTWAREThe name and version of the software the server is running.
Here is small CGI program to list out all the CGI variables. Click this link to see the result Get Environment
import os

print("Content-type: text/html\r\n\r\n");print("<font size=+1>Environment</font><\br>");for param in os.environ.keys():print("<b>%20s</b>: %s<\br>"%(param, os.environ[param]))
GET and POST Methods
You must have come across many situations when you need to pass some information from your browser to web server and ultimately to your CGI Program. Most frequently, browser uses two methods two pass this information to web server. These methods are GET Method and POST Method.
Passing Information using GET method
The GET method sends the encoded user information appended to the page request. The page and the encoded information are separated by the ? character as follows −
The GET method is the default method to pass information from the browser to the web server and it produces a long string that appears in your browser’s Location:box.
Never use GET method if you have password or other sensitive information to pass to the server.
The GET method has size limtation: only 1024 characters can be sent in a request string.
The GET method sends information using QUERY_STRING header and will be accessible in your CGI Program through QUERY_STRING environment variable.
You can pass information by simply concatenating key and value pairs along with any URL or you can use HTML <FORM> tags to pass information using GET method.
Simple URL Example:Get Method
Here is a simple URL, which passes two values to hello_get.py program using GET method.
Given below is the hello_get.py script to handle the input given by web browser. We are going to use the cgi module, which makes it very easy to access the passed information −
# Import modules for CGI handlingimport cgi, cgitb

# Create instance of FieldStorage
form = cgi.FieldStorage()# Get data from fields
first_name = form.getvalue('first_name')
last_name = form.getvalue('last_name')print("Content-type:text/html")print()print("<html>")print('<head>')print("<title>Hello - Second CGI Program</title>")print('</head>')print('<body>')print("<h2>Hello %s %s</h2>"%(first_name, last_name))print('</body>')print('</html>')
This would generate the following result −
Hello Malhar Lathkar
Simple FORM Example:GET Method
This example passes two values using HTML FORM and submit button. We use same CGI script hello_get.py to handle this input.
<form action ="/cgi-bin/hello_get.py" method ="get">
   First Name:<inputtype="text" name ="first_name"><br />

   Last Name:<inputtype="text" name ="last_name"/><inputtype="submit" value ="Submit"/></form>
Here is the actual output of the above form, you enter First and Last Name and then click submit button to see the result.First Name: Last Name:
Passing Information Using POST Method
A generally more reliable method of passing information to a CGI program is the POST method. This packages the information in exactly the same way as GET methods, but instead of sending it as a text string after a ? in the URL it sends it as a separate message. This message comes into the CGI script in the form of the standard input.
Below is same hello_get.py script which handles GET as well as POST method.
# Import modules for CGI handling import cgi, cgitb

# Create instance of FieldStorage
form = cgi.FieldStorage()# Get data from fields
first_name = form.getvalue('first_name')
last_name  = form.getvalue('last_name')print"Content-type:text/html\r\n\r\n"print"<html>"print"<head>"print"<title>Hello - Second CGI Program</title>"print"</head>"print"<body>"print"<h2>Hello %s %s</h2>"%(first_name, last_name)print"</body>"print"</html>"
Let us take again same example as above which passes two values using HTML FORM and submit button. We use same CGI script hello_get.py to handle this input.
<form action ="/cgi-bin/hello_get.py" method ="post">
First Name:<inputtype="text" name ="first_name"><br />
Last Name:<inputtype="text" name ="last_name"/><inputtype="submit" value ="Submit"/></form>
Here is the actual output of the above form. You enter First and Last Name and then click submit button to see the result.First Name: Last Name:
Passing Checkbox Data to CGI Program
Checkboxes are used when more than one option is required to be selected.
Here is example HTML code for a form with two checkboxes −
<form action ="/cgi-bin/checkbox.cgi" method ="POST" target ="_blank"><inputtype="checkbox" name ="maths" value ="on"/> Maths
   <inputtype="checkbox" name ="physics" value ="on"/> Physics
   <inputtype="submit" value ="Select Subject"/></form>
The result of this code is the following form − Maths Physics
Below is checkbox.cgi script to handle input given by web browser for checkbox button.
# Import modules for CGI handling import cgi, cgitb

# Create instance of FieldStorage
form = cgi.FieldStorage()# Get data from fieldsif form.getvalue('maths'):
   math_flag ="ON"else:
   math_flag ="OFF"if form.getvalue('physics'):
   physics_flag ="ON"else:
   physics_flag ="OFF"print"Content-type:text/html\r\n\r\n"print"<html>"print"<head>"print"<title>Checkbox - Third CGI Program</title>"print"</head>"print"<body>"print"<h2> CheckBox Maths is : %s</h2>"% math_flag
print"<h2> CheckBox Physics is : %s</h2>"% physics_flag
print"</body>"print"</html>"
Passing Radio Button Data to CGI Program
Radio Buttons are used when only one option is required to be selected.
Here is example HTML code for a form with two radio buttons −
<form action ="/cgi-bin/radiobutton.py" method ="post" target ="_blank"><inputtype="radio" name ="subject" value ="maths"/> Maths
   <inputtype="radio" name ="subject" value ="physics"/> Physics
   <inputtype="submit" value ="Select Subject"/></form>
The result of this code is the following form − Maths Physics
Below is radiobutton.py script to handle input given by web browser for radio button −
# Import modules for CGI handling import cgi, cgitb

# Create instance of FieldStorage
form = cgi.FieldStorage()# Get data from fieldsif form.getvalue('subject'):
   subject = form.getvalue('subject')else:
   subject ="Not set"print"Content-type:text/html\r\n\r\n"print"<html>"print"<head>"print"<title>Radio - Fourth CGI Program</title>"print"</head>"print"<body>"print"<h2> Selected Subject is %s</h2>"% subject
print"</body>"print"</html>"
Passing Text Area Data to CGI Program
TEXTAREA element is used when multiline text has to be passed to the CGI Program.
Here is example HTML code for a form with a TEXTAREA box −
Type your text here...</textarea><inputtype="submit" value ="Submit"/></form></pre>
The result of this code is the following form −
Below is textarea.cgi script to handle input given by web browser −
# Import modules for CGI handling import cgi, cgitb
# Create instance of FieldStorage
form = cgi.FieldStorage()# Get data from fieldsif form.getvalue('textcontent'):
text_content = form.getvalue('textcontent')else:
text_content ="Not entered"print"Content-type:text/html\r\n\r\n"print"<html>"print"<head>";print"<title>Text Area - Fifth CGI Program</title>"print"</head>"print"<body>"print"<h2> Entered Text Content is %s</h2>"% text_content
print"</body>"
Passing Drop Down Box Data to CGI Program
Drop Down Box is used when we have many options available but only one or two will be selected.
Here is example HTML code for a form with one drop down box −
<form action ="/cgi-bin/dropdown.py" method ="post" target ="_blank"><select name ="dropdown"><option value ="Maths" selected>Maths</option><option value ="Physics">Physics</option></select><inputtype="submit" value ="Submit"/></form>
The result of this code is the following form − Maths Physics
Below is dropdown.py script to handle input given by web browser.
# Import modules for CGI handling import cgi, cgitb
# Create instance of FieldStorage
form = cgi.FieldStorage()# Get data from fieldsif form.getvalue('dropdown'):
subject = form.getvalue('dropdown')else:
subject ="Not entered"print"Content-type:text/html\r\n\r\n"print"<html>"print"<head>"print"<title>Dropdown Box - Sixth CGI Program</title>"print"</head>"print"<body>"print"<h2> Selected Subject is %s</h2>"% subject
print"</body>"print"</html>"
Using Cookies in CGI
HTTP protocol is a stateless protocol. For a commercial website, it is required to maintain session information among different pages. For example, one user registration ends after completing many pages. How to maintain user's session information across all the web pages?
In many situations, using cookies is the most efficient method of remembering and tracking preferences, purchases, commissions, and other information required for better visitor experience or site statistics.
How It Works?
Your server sends some data to the visitor's browser in the form of a cookie. The browser may accept the cookie. If it does, it is stored as a plain text record on the visitor's hard drive. Now, when the visitor arrives at another page on your site, the cookie is available for retrieval. Once retrieved, your server knows/remembers what was stored.
Cookies are a plain text data record of 5 variable-length fields −
Expires − The date the cookie will expire. If this is blank, the cookie will expire when the visitor quits the browser.
Domain − The domain name of your site.
Path − The path to the directory or web page that sets the cookie. This may be blank if you want to retrieve the cookie from any directory or page.
Secure − If this field contains the word "secure", then the cookie may only be retrieved with a secure server. If this field is blank, no such restriction exists.
Name = Value − Cookies are set and retrieved in the form of key and value pairs.
Setting up Cookies
It is very easy to send cookies to browser. These cookies are sent along with HTTP Header before to Content-type field. Assuming you want to set UserID and Password as cookies. Setting the cookies is done as follows −
print"Set-Cookie:UserID = XYZ;\r\n"print"Set-Cookie:Password = XYZ123;\r\n"print"Set-Cookie:Expires = Tuesday, 31-Dec-2007 23:12:40 GMT;\r\n"print"Set-Cookie:Domain = www.tutorialspoint.com;\r\n"print"Set-Cookie:Path = /perl;\n"print"Content-type:text/html\r\n\r\n"...........Rest of the HTML Content....
From this example, you must have understood how to set cookies. We use Set-Cookie HTTP header to set cookies.
It is optional to set cookies attributes like Expires, Domain, and Path. It is notable that cookies are set before sending magic line "Content-type:text/html\r\n\r\n.
Retrieving Cookies
It is very easy to retrieve all the set cookies. Cookies are stored in CGI environment variable HTTP_COOKIE and they will have following form −
key1 = value1;key2 = value2;key3 = value3....
Here is an example of how to retrieve cookies.
# Import modules for CGI handling from os import environ
import cgi, cgitb

if environ.has_key('HTTP_COOKIE'):for cookie inmap(strip, split(environ['HTTP_COOKIE'],';')):(key, value )= split(cookie,'=');if key =="UserID":
     user_id = value
  if key =="Password":
     password = value
print"User ID  = %s"% user_id
print"Password = %s"% password
This produces the following result for the cookies set by above script −
User ID = XYZ
Password = XYZ123
File Upload Example
To upload a file, the HTML form must have the enctype attribute set to multipart/form-data. The input tag with the file type creates a "Browse" button.
<html><body><form enctype ="multipart/form-data" action ="save_file.py" method ="post"><p>File:<inputtype="file" name ="filename"/></p><p><inputtype="submit" value ="Upload"/></p></form></body></html>
The result of this code is the following form −
File:
Above example has been disabled intentionally to save people uploading file on our server, but you can try above code with your server.
Here is the script save_file.py to handle file upload −
import cgi, os
import cgitb; cgitb.enable()
form = cgi.FieldStorage()# Get filename here.
fileitem = form['filename']# Test if the file was uploadedif fileitem.filename:# strip leading path from file name to avoid # directory traversal attacks
fn = os.path.basename(fileitem.filename)open('/tmp/'+ fn,'wb').write(fileitem.file.read())
message ='The file "'+ fn +'" was uploaded successfully'else:
message ='No file was uploaded'print"""\
Content-Type: text/html\n
<html>
<body>
<p>%s</p>
</body>
</html>
"""%(message,)
If you run the above script on Unix/Linux, then you need to take care of replacing file separator as follows, otherwise on your windows machine above open() statement should work fine.
Sometimes, it is desired that you want to give option where a user can click a link and it will pop up a "File Download" dialogue box to the user instead of displaying actual content. This is very easy and can be achieved through HTTP header. This HTTP header is be different from the header mentioned in previous section.
For example, if you want make a FileName file downloadable from a given link, then its syntax is as follows −
# HTTP Headerprint"Content-Type:application/octet-stream; name = \"FileName\"\r\n";print"Content-Disposition: attachment; filename = \"FileName\"\r\n\n";# Actual File Content will go here.
fo =open("foo.txt","rb")str= fo.read();printstr# Close opend file
fo.close()