Category: Layouts

  • Style Guide

    What is Style Guide in HTML?

    In HTML, the style guide is a set of rules and conventions that define how to write and format code. It helps to ensure that the written code is readable, understandable and easy to modify. A style guide also helps to avoid common errors and bugs that can affect the functionality and appearance of a web page. In this tutorial, we are going to cover the most important style guidelines for creating better HTML code.

    Start with HTML5 Doctype

    Always start all HTML and XHTML documents with <!DOCTYPE html> declaration. Note that this declaration is case-insensitive. It is required to enforce the full standard mode (also known as no-quirks mode) to provide more consistent rendering of web pages. It is the latest web standard described by W3C and used by the layout engines of modern web browsers.

    Example

    <!DOCTYPE html><html><head><!-- Content inside head tag --></head><body><!-- Content inside body tag -->
       Hello, Welcome to Tutorialspoint
    </body></html>

    Specify document language

    Always specify the document language with the help of lang attribute. This attribute is defined within the opening <html> tag, which is the root of HTML document. Specifying the document language will help in accessibility, speech analysis, translation and other functionalities.

    Example

    <!DOCTYPE html><html lang="en"><head><!-- Content inside head tag --></head><body><!-- Content inside body tag -->
       Hello, Welcome to Tutorialspoint
    </body></html>

    Define Charset

    The W3C always recommend developers to declare the charset or character encoding explicitly. It can be done by using the charset attribute of <meta> tag. Pass UTF-8 as a value to charset attribute as it is the most commonly used character encoding and provides over a million characters.

    Example

    <!DOCTYPE html><html lang="en"><head><meta charset = "UTF-8"></head><body><!-- Content inside body tag -->
       Hello, Welcome to Tutorialspoint
    </body></html>

    Use Lowercase for elements and attributes

    Dont capitalize the element names, attribute names and values of attributes. In other programming languages like Java, C and C++, developers often use the camel case or snake case for declaring the variable names. However, for writing HTML code, W3C recommends the use of lowercase letters. Doing so will enhance the clarity and readability of our HTML code.

    Example

    <body><h1><!-- Heading comes here --></h1><p style = "font-size: 25px; "><!-- contains paragraph -->
    
      Hello, Welcome to Tutorialspoint
    </p></body>

    Quote the attribute values

    According to W3C recommendations, it is better to enclose attribute values in double quotes. This is important for values containing spaces, as HTML may not parse them correctly without the quotes. The use of double quotes is more common than single quotes. However, we can use single quotes as well.

    <p style = "font-size: 25px; "><!-- contains paragraph --></p>

    Use closing tags

    In HTML, all elements must be closed properly, even if some elements have optional closing tags. Please note that there are certain elements that are self-closing including <img>, <hr>, <br> and many more.

    Example

    <!DOCTYPE html><html><head><!-- Content inside head tag --></head><body><h1><!-- Heading comes here --></h1><p><!-- contains paragraph --></p><br><p><!-- contains paragraph -->
    
      Hello, Welcome to Tutorialspoint
    </p></body></html>

    Use proper Indentation

    The use of proper indentation shows the structure and hierarchy of our HTML code. Use spaces instead of tabs for indentation, and use a consistent number of spaces (usually two or three) per level. Also, we can use the blank lines to separate large code blocks.

    Example

    <!DOCTYPE html><html><head><!-- Content inside head tag --></head><body><h1><!-- Heading comes here --></h1><p><!-- contains paragraph --></p><p><!-- contains paragraph -->
    
      Hello, Welcome to Tutorialspoint
    </p></body></html>

    Set the viewport

    Setting the viewport helps web pages render well on different devices. It is achieved by controlling the width and scale of the page. It is used for ensuring the responsiveness of a particular web page.

    <meta name = "viewport" content = "width=device-width, initial-scale = 1.0">

    Add Comments

    We use comments to explain the purpose or functionalities of the particular HTML code. Comments should start with <!– and end with –>. Avoid using comments for styling or scripting purposes.

    Example

    <!DOCTYPE html><html lang="en"><head><!-- Content inside head tag --></head><body><h1><!-- Heading comes here --></h1><p><!-- contains paragraph -->
    
      Hello, Welcome to Tutorialspoint
    </p></body></html>

  • Emojis

    Emojis are allowed to include in our webpages to represent emotions in plain text. Emojis are widely used in social media, messaging apps, and web pages to add some humour and feelings to the text. For example, 😈, 😁, šŸ˜‰

    What are Emojis?

    Emojis are small graphical symbols or icons that represent emotions, objects, animals, flags, nature, food items and many more related entities. Although emojis looks like graphical symbols, they are actually characters of the UTF-8 character set.

    UTF-8 Emojis

    EmojiHexadecimal CodeDecimal Code
    😈&#x1F608;&#128520;
    šŸ˜‚&#x1F602;&#128514;
    šŸ‘&#x1F44D;&#128077;
    😁&#x1F601;&#128513;
    😃&#x1F603;&#128515;
    šŸ˜‡&#x1F607;&#128519;
    šŸ˜‰&#x1F609;&#128521;
    šŸ˜&#x1F60D;&#128525;
    😭&#x1F62D;&#128557;
    😘&#x1F618;&#128536;
    😢&#x1F622;&#128546;
    šŸ™‚&#x1F642;&#128578;
    😪&#x1F62A;&#128554;
    😷&#x1F637;&#128567;

    How to add Emojis to HTML document?

    To add emojis into an HTML document, our first step should be defining the character encoding for the web page. For this purpose, we use the charset attribute of <meta> tag. Note that <meta> tag is used within the <head> tag. The most appropriate value for the charset attribute is UTF-8 as it covers over a million characters including the emojis.

    The character encoding is specified by the following <meta> tag:

    <meta charset = "UTF-8">

    There are two ways of adding emojis to the HTML document:

    • Using Decimal Code
    • Using Hexadecimal Code

    Using Decimal Code to add Emojis

    We can add emojis into the HTML document using their corresponding decimal codes. These codes start with &#, ends with “;” and in-between they contain numerics.

    Example

    In the following example, we are going to display a few emojis on the web page using their respective decimal codes.

    <!DOCTYPE html><html><head><title>Emojis in HTML</title><meta charset="UTF-8"></head><body><h2>
    
      Adding emojis in HTML document using 
      decimal code
    </h2><div><p>
         Devil Emoji: 
         &lt;span&gt;&amp;#128520;&lt;/span&gt;&lt;/p&gt;&lt;p&gt;
         Face having Tears of Joy Emoji: 
         &lt;span&gt;&amp;#128514;&lt;/span&gt;&lt;/p&gt;&lt;p&gt;
         Thumbs Up Emoji: 
         &lt;span&gt;&amp;#128077;&lt;/span&gt;&lt;/p&gt;&lt;/div&gt;&lt;/body&gt;&lt;/html&gt;</pre>

    Using Hexadecimal Code to add Emojis

    We can also specify emojis using their respective hexadecimal codes. The hexadecimal codes for emojis start with &#x and end with ";" to inform the browser the character represented by the code needs to be displayed.

    Example

    The following example illustrates the use of hexadecimal codes in displaying emojis.

    <!DOCTYPE html><html><head><title>Emojis in HTML</title><meta charset="UTF-8"></head><body><h2>
    
      Adding emojis in HTML document 
      using Hexadecimal code
    </h2><div><p>
         Devil Emoji: 
         &lt;span&gt;&amp;#X1F608;&lt;/span&gt;&lt;/p&gt;&lt;p&gt;
         Face having Tears of Joy Emoji: 
         &lt;span&gt;&amp;#x1F602;&lt;/span&gt;&lt;/p&gt;&lt;p&gt;
         Thumbs Up Emoji: 
         &lt;span&gt;&amp;#x1F44D;&lt;/span&gt;&lt;/p&gt;&lt;/div&gt;&lt;/body&gt;&lt;/html&gt;</pre>

    Drawbacks of using HTML Emojis

    The drawback of using emojis in HTML documents is that these characters are not directly available for our use. There are no specific keys available on the computer keyboards. We are required to memorize or look up their respective codes.

  • Symbols

    In HTML, you can embed theĀ symbolsĀ and special characters that are not available on the keyboard using theĀ HTML entities.

    What are HTML Symbols?

    HTML symbols are some characters that hold a special meaning and are difficult to type directly on the keyboard. They are often termed as “symbols.” For example, other than the dollar symbol, we can’t find any currency symbols like rupees and euros on normal keyboards. However, HTML provides other ways to insert these symbols into webpages. In this tutorial, we are going to learn how to use special characters or symbols in an HTML document.

    Inserting Symbols in HTML Document

    To insert symbols into an HTML document, we use entities. If no entity name exists, then we are allowed to use the entity number, which is a decimal or a hexadecimal reference. An HTML entity is a piece of text that begins with an ampersand (&) and ends with a semicolon (;). They are used to represent characters and symbols that are either reserved in HTML or not directly available on keyboards for use on the web page.

    There are two types of HTML entities: named entities and numeric entities. The named entities use a descriptive name to refer to a character or symbol, such as &copy; for the copyright symbol. Numeric entities use a number to refer to a character or symbol, such as &#169; for the same symbol.

    Example

    The following example shows how to insert the most commonly used symbols into an HTML document.

    <!DOCTYPE html><html><head><title> Symbols in HTML </title></head><body><h1>Common HTML Symbols</h1><p>Registered trademark Symbol : &reg;</p><p>Trademark Symbol : &trade;</p><p>Copyright Symbol : &copy;</p><p>Left Arrow Symbol : &larr;</p></body></html>

    When a user executes the above code, it will produce four different symbols, namely copyright, trademark, registered trademark, and left arrow.

    HTML Currency Symbols

    The following table shows currency symbols and their corresponding entities āˆ’

    SymbolsDescriptionEntity NameEntity Number
    ₹Indian Rupee SymbolNA&#8377;
    €Euro Symbol&euro;&#8364;
    ₿Bitcoin SymbolNA&#8383;
    „Japanese Yen Symbol&yen;&#165;
    ₽Ruble SymbolNA&#8381;

    Example: Inserting Currency Symbols in HTML

    In the following example, we are going to display a few currency symbols using their corresponding entities āˆ’

    <!DOCTYPE html><html><head><title> Symbols in HTML </title></head><body><h1>Common Currency Symbols</h1><p>Indian Rupee Symbol : &#8377;</p><p>Euro Symbol : &euro;</p><p>Bitcoin Symbol : &#8383;</p><p>Japanese Yen Symbol : &yen;</p></body></html>

    HTML Mathematical Symbols

    The following table shows mathematical symbols and their corresponding entities āˆ’

    SymbolsDescriptionEntity NameEntity Number
    āˆ€For all symbol&forall;&#8704;
    āˆ…Empty sets symbol&empty;&#8709;
    āˆ‡Nabla symbol&nabla;&#8711;
    āˆ‘Summation symbol&sum;&#8721;
    ∈Element of&isin;&#8712;

    Example: Inserting Mathematical Symbols in HTML

    In this example, we will demonstrate how to insert mathematical symbols into an HTML document.

    <!DOCTYPE html><html><head><title> Symbols in HTML </title></head><body><h1>Common Mathematical Symbols</h1><p>For all symbol : &#8704;</p><p>Nabla symbol : &nabla;</p><p>Empty sets symbol : &empty;</p><p>Summation symbol : &sum;</p></body></html>

    HTML Arrow Symbols

    The following table shows arrows symbols and their corresponding entities āˆ’

    SymbolEntity NameEntity NumberDescription & Example
    ←&larr;&#8592;Left Arrow: ←
    ↑&uarr;&#8593;Up Arrow: ↑
    →&rarr;&#8594;Right Arrow: →
    ↓&darr;&#8595;Down Arrow: ↓
    ↔&harr;&#8596;Left-Right Arrow: ↔

    Example: Inserting Arrow Symbols in HTML

    In this example, we will demonstrate how to insert arrow symbols into an HTML document.

    <!DOCTYPE html><html lang="en"><head><meta charset="UTF-8"><title>HTML Arrow Symbols</title></head><body><h2>HTML Arrow Symbols</h2><p>Left Arrow: ← (&larr; or ←)</p><p>Up Arrow: ↑ (&uarr; or ↑)</p><p>Right Arrow: → (&rarr; or →)</p><p>Down Arrow: ↓ (&darr; or ↓)</p><p>Left-Right Arrow: ↔ (&harr; or ↔)</p></body></html>

    HTML Miscellaneous Symbols

    The following table shows miscellaneous symbols and their corresponding entities āˆ’

    SymbolEntity NameEntity NumberDescription & Example
    Ā©&copy;&#169;Copyright: Ā©
    Ā®&reg;&#174;Registered Trademark: Ā®
    ā„¢&trade;&#8482;Trademark: ā„¢
    §&sect;&#167;Section: §
    ¶&para;&#182;Paragraph: ¶

    Example: Inserting Miscellaneous Symbols in HTML

    In this example, we will miscellaneous how to insert arrow symbols into an HTML document:

    <!DOCTYPE html><html lang="en"><head><meta charset="UTF-8"><title>HTML Miscellaneous Symbols</title></head><body><h2>HTML Miscellaneous Symbols</h2><p>Copyright Symbol: Ā© (&copy; or Ā©)</p><p>Registered Trademark: Ā® (&reg; or Ā®)</p><p>Trademark Symbol: ā„¢ (&trade; or ā„¢)</p><p>Section Symbol: § (&sect; or §)</p><p>Paragraph Symbol: ¶ (&para; or ¶)</p></body></html>
  • Responsive Web Design

    Responsive web design means creating HTML webpages that work well on different devices and browsers. The pages automatically adjust to fit various screen sizes and viewports.

    What is a Responsive Web Design?

    Responsive web design is an approach that allows the creation of the webpages compatible with different screen sizes, resolutions, and devices, such as desktops, laptops, tablets, and smartphones. It helps in improving the user experience, accessibility, and performance of a website.

    When a responsive website, such as TutorialsPoint.com, is accessed on any device of different dimensions, the content is displayed optimally without any overflow or overlap with other elements. The content remains consistent across devices, but its arrangement adapts to ensure readability.

    Best Practices for Making Webpages Responsive

    There are several ways by which we can make our webpage responsive. A general practice is to make use of inbuilt CSS or bootstrap frameworks that provide pre-designed components and grid systems. Here are some general steps to ensure the responsiveness of a webpage.

    • Use Responsive Grid Layouts
      Always design your layout with a flexible grid structure, so when the size of the screen increases, the grid will extend accordingly.
    • Use Responsive Images and Media
      Ensure that the images on the webpage are properly scaled within their containers. You can useĀ CSS propertiesĀ likeĀ “max-width: 100%;”Ā andĀ “height: auto.”.
    • Use Media Queries
      You can useĀ CSS media queriesĀ to apply different styles for different screen sizes. This allows you to adjust the layout, font sizes, and other design elements based on the device’s width.
    • Use a Meta Tag with Viewport
      The viewport meta tag inside theĀ HTML <head> tagĀ ensures proper scaling and rendering on mobile devices.
    • Use Relative Units
      Use relative units like em, rem, or percentages for font sizes,Ā padding, andĀ marginsĀ to ensure that text scales appropriately.

    Using the Viewport for Responsive Design

    The viewport represents the visible area of a user’s device. The content that is outside of the viewport can be seen if scrolled. It helps web pages render well on different devices by controlling the width and scale of the page.

    To control the viewport, add the followingĀ <meta>Ā tagĀ in theĀ <head>Ā section āˆ’

    <meta name = "viewport" content = "width=device-width, initial-scale = 1.0">

    The above tag tells the browser to match the page width to the screen’s width and set the initial zoom level when the page is first loaded by the user.

    We can adjust viewport settings for width, initial-scalemaximum-scaleminimum-scale, and user-scalable. These adjustments can make our website more accessible and user-friendly.

    Attributes of the Meta Viewport Tag for Responsiveness

    The following attributes of the <meta> viewport tag are used for responsiveness āˆ’

    S.No.Attribute & Description
    1widthIt controls the width of the virtual viewport.
    2heightIt controls the height of the virtual viewport.
    3initial-scaleIt specifies the initial zoom level of the viewport when a web page is first loaded.
    4minimum-scaleIt specifies the minimum zoom level to which the user can zoom the page.
    5maximum-scaleIt defines the maximum zoom level to which the user can zoom the page.
    6user-scalableIt specifies whether the user can zoom in or out.
    7interactive-widgetIt defines how the interactive UI widgets affect the viewport.

    Example

    The following example illustrates how to use the <meta> viewport tag to make a web page responsive:

    <html><head><meta name="viewport" content="width=device-width, initial-scale=1.0"><style>
    
      .container {
         background-color: #f1f1f1;
         display: flex;
         flex-direction: row;
      }
      .col {
         width: 47%;
         margin: auto 1%;
         background-color: #4CAF50;
         color: white;
         text-align: center;
         line-height: 100px;
         font-size: 10px;
      }
    </style></head><body><h2>Setting up dimensions in percentage for the HTML element </h2><div class="container"><div class="col"> Column 1 </div><div class="col"> Column 2 </div></div></body></html>

    On executing the above HTML code, a two-column responsive layout will be displayed.

    Creating Responsive Text

    In HTML, to make responsive text that adjusts its font size automatically based on the viewport, we need to use the font-size property of CSS along with the “vw” length unit. The vw is an abbreviation that stands for view width or viewport width, which is a relative length unit of CSS.

    The relative length units are always calculated with respect to another element’s size. Note that 1vw is equal to 1% of the width of the viewport.

    Example

    In this example, we are using the “vw” length unit to make the text responsive:

    <html><head><meta name="viewport" content="width=device-width, initial-scale=1.0"></head><body><h1 style="font-size:6vw;">Example of Responsive Typography</h1><h2 style="font-size:5vw;">Responsive text by Using the vw length unit.</h2><p style="font-size:3vw;"> The text will adapt the font size according to the device's width. </p></body></html>

    The above HTML code will generate a responsive Text.

    Creating Responsive Images

    In HTML, we can create images that are responsive, meaning they can adjust their size to fit the viewport. To do so, we can either set the image’s width property to 100% or the max-width property to 100%. The width property can scale the image larger than its original size, on the other hand, the max-width property ensures the image does not scale beyond its original size.

    Example

    The following example shows how to create responsive images. For the first image, we are using the width property, and for the second one max-width property:

    <html><head><meta name="viewport" content="width=device-width, initial-scale=1.0"></head><body><h2>Setting the width property to 100% </h2><img src="https://www.tutorialspoint.com/images/logo.png" alt="logo" style="width:100%; "><h2> Creating the responsive image by setting the max-width property to 100% </h2><img src="https://www.tutorialspoint.com/images/logo.png" alt="logo" style="max-width:100%; height:auto; "></body></html>

    On running the above code, we will get a responsive image.

    Responsive Design Using Media Queries

    The CSS media query serves as a filter that enables us to style the web page selectively for different devices. A single web page can have multiple media queries, each for a specific screen size. To define these screen sizes, we use the media query breakpoints and style the HTML elements accordingly. Here are the common breakpoints āˆ’

    Mobile: 360 x 640 px
    Tablet: 768 x 1024 px
    Laptop: 1366 x 768 px
    HDdesktop: 1920 x 1080 px
    

    Example

    The following HTML code demonstrates the use of media queries in designing a responsive layout.

    <html><head><style>
    
      .main {
         width: 50%;
         height: 50vh;
         display: flex;
         align-items: center;
         text-align: center;
         margin: 10px auto;
         flex-direction: column;
      }
      img {
         width: 100%;
         height: 100%;
      }
      .description {
         width: 100%;
         height: 100%;
         font-size: 30px;
         color: red;
         margin-top: 20px;
      }
      /* using media query */
      @media screen and (max-width: 600px) {
         .main {
            width: 100%;
            height: 100vh;
            margin: 5px auto;
         }
         .description {
            font-size: 20px;
            color: blue;
            margin-top: 10px;
         }
      }
    </style></head><body><div class="main"><img src="https://www.tutorialspoint.com/images/logo.png" alt="logo" width="100" height="200"><div class="description"> The above is a logo of Tutorilaspoint. The logo is responsive, and it will be displayed in the centre of the screen. </div></div></body></html>

    In addition to the above-mentioned techniques, other methods such asĀ FlexboxĀ andĀ CSS GridĀ can also be used to design responsive web pages. We have explored these techniques in detail in the previous chapters.

  • Layout Using CSS

    HTML layoutĀ using CSSĀ involves creating the structural content of a webpage and styling it with CSS properties. By using theĀ CSS properties, you can create responsive and attractive webpages.

    HTML Layout Using CSS Properties

    The following properties of CSS are used to design an HTML layout āˆ’

    • CSS float
    • CSS display: flex
    • CSS display: grid

    Let’s understand each CSS property with the help of examples and detailed examples. In the below explanation and examples, we will create responsive HTML layouts using these CSS properties.

    HTML Layout Using CSS float Property

    TheĀ floatĀ property of CSSĀ allows you to control the positioning of the web page components. When an element is floated, it is taken out of the normal flow of the document and shifted to the specified position, such asĀ leftĀ orĀ right.

    Example

    In the following example, theĀ <nav>Ā andĀ <article>Ā tags have been floated to the left using theĀ float:leftĀ property of CSS:

    <!DOCTYPE html><html><head><title>The float Property</title><style>
       * {
    
      box-sizing: border-box;
    } header {
      font-size: 25px;
      color: whitesmoke;
      padding: 1px;
      text-align: center;
      background-color: lightslategray;
    } nav {
      float: left;
      width: 20%;
      height: 250px;
      background: lightgray;
      padding: 20px;
    } nav ul {
      padding: 1px;
    } article {
      float: left;
      padding: 20px;
      width: 80%;
      background-color: lightyellow;
      height: 250px;
    } footer {
      background-color: lightslategray;
      padding: 10px;
      text-align: center;
      color: white;
      padding-top: 20px;
      padding-bottom: 10px;
    } footer a {
      margin: 10px;
    } footer p {
      margin-top: 30px;
    } </style></head><body><!--header segment--><header><div><p>Tutorialspoint</p></div></header><section><!--Menu Navigation segment--><nav><ul><li><a href="#">Home</a></li><li><a href="#">Jobs</a></li><li><a href="#">Library</a></li><li><a href="#">Articles</a></li><li><a href="#">Certification</a></li></ul></nav><!--Content segment--><article><h1>Welcome to Tutorials point</h1><p> Tutorialspoint.com is a dedicated website to provide quality online education in the domains of Computer Science, Information Technology, Programming Languages, and other Engineering as well as Management subjects. </p></article></section><!--Footer segment--><footer><div><p>Copyrights TUTORIALS POINT (INDIA) PRIVATE LIMITED. All rights reserved.</p></div></footer></body></html>

    On running the above code, we will get a layout structure consisting of a header, a navigation bar, a content section, and a footer.

    HTML Layout Using CSS display:flex Property

    TheĀ CSS flexboxĀ (also known as Flexible Box Layout) is a more efficient way of designing a layout. It allows developers to arrange and distribute spaces among multiple components of a web page. To use the features of Flexbox, we need to set theĀ displayĀ propertyĀ toĀ flexĀ orĀ inline-flex.

    Note: We have a dedicated Flexbox tutorial on our website. Please refer to it for a better understanding.

    Example

    The following example illustrates how to use the display:flex property of CSS to design a layout of a web page:

    <!DOCTYPE html><html><head><style>
    
      header {
         text-align: center;
         background-color: lightslategray;
         font-size: 50px;
         color: whitesmoke;
      }
      .contain {
         display: flex;
         background: lightgray;
         height: 250px;
         width: 100%;
      }
      .flex-item1 {
         flex-basis: 25%;
         background-color: lightslategray;
         color: whitesmoke;
         margin: 10px;
         padding: 5px;
         letter-spacing: 1px;
      }
      .flex-item2 {
         flex-basis: 75%;
         background-color: lightslategray;
         margin: 10px;
         padding: 5px;
         letter-spacing: 1px;
      }
      footer {
         background-color: lightslategray;
         text-align: center;
         color: white;
         padding: 10px;
      }
    </style></head><body><header><div>Tutorialspoint</div></header><div class = "contain"><div class = "flex-item1"><ul><li><a href="#">Home</a></li><li><a href="#">Jobs</a></li><li><a href="#">Library</a></li><li><a href="#">Articles</a></li><li><a href="#">Certification</a></li></ul></div><div class = "flex-item2"><h2>Welcome to Tutorials point</h2><p>Tutorialspoint.com is a dedicated website to provide quality online education in the domains of Computer Science, Information Technology, Programming Languages, and other Engineering as well as Management subjects. </p></div></div><footer><div>
         Copyrights  TUTORIALS POINT (INDIA) PRIVATE LIMITED. All rights reserved.
      &lt;/div&gt;&lt;/footer&gt;&lt;/body&gt;&lt;/html&gt;</pre>

    On executing the above HTML code, we will get a layout structure.

    HTML Layout Using CSS display:grid Property

    The CSS grid layout is another addition to the HTML layout designing techniques that define a grid of rows and columns. It also provides abilities to control the sizing as well as the positioning of web page contents.

    Example

    In this example, we are going to design the same web page layout by using the display:grid property of CSS.

    <!DOCTYPE html><html><head><style>
    
      header {
         text-align: center;
         background-color: lightslategray;
         font-size: 50px;
         color: whitesmoke;
      }
      .contain {
         display: grid;
         background-color: lightgray;
         grid-template-columns: auto auto;
         padding: 5px;
         grid-gap: 5px;
         height: 250px;
      }
      .item1 {
         background-color: lightslategray;
         margin: 5px;
         padding: 5px;
         letter-spacing: 1px;
      }
      .item2 {
         background-color: lightslategray;
         margin: 5px;
         padding: 5px;
         letter-spacing: 1px;
      }
      footer {
         background-color: lightslategray;
         text-align: center;
         color: white;
         padding: 10px;
      }
    </style></head><body><header><div>Tutorialspoint</div></header><div class="contain"><div class="item1"><ul><li><a href="#">Home</a></li><li><a href="#">Jobs</a></li><li><a href="#">Library</a></li><li><a href="#">Articles</a></li><li><a href="#">Certification</a></li></ul></div><div class="item2"><h2>Welcome to Tutorials point</h2><p>Tutorialspoint.com is a dedicated website to provide quality online education in the domains of Computer Science, Information Technology, Programming Languages, and other Engineering as well as Management subjects.
         &lt;/p&gt;&lt;/div&gt;&lt;/div&gt;&lt;footer&gt;&lt;div&gt;Copyrights  TUTORIALS POINT (INDIA) PRIVATE LIMITED. All rights reserved.&lt;/div&gt;&lt;/footer&gt;&lt;/body&gt;&lt;/html&gt;</pre>

    On running the above code, it will generate a layout structure.

  • Layout Elements

    What are HTML Layout Elements?

    HTML layout elements are special semantic elements that are used to define the structure and layout of a web page. These layout elements are useful to arrange (divide) the content into logical sections that improve the readability and accessibility of the webpage for readers.

    HTML Design Using Layout Elements

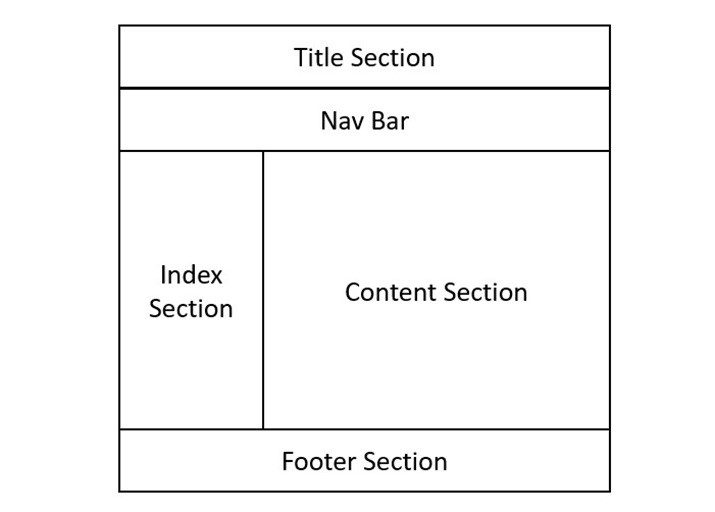
    The below figure illustrates how a typical HTML webpage layout is designed. Most of the web pages have a title section, a nav bar, an index section, a content section, and a footer section, which can be defined using the <header><nav><section><article>, and <footer> elements, respectively.

    Visual Representation of a Layout Structure

    Key HTML Layout Elements

    Each layout element has a specific meaning and function and can be customized with attributes and styles. They describe the content they contain, not just the appearance of a web page. They are as follows:

    • HTMLĀ <header>Ā Element
    • HTMLĀ <nav>Ā Element
    • HTMLĀ <section>Ā Element
    • HTMLĀ <footer>Ā Element
    • HTMLĀ <article>Ā Element
    • HTMLĀ <aside>Ā Element

    HTML <header> Element

    TheĀ <header>Ā elementĀ is used to add a header section in an HTML web page. It serves as a container for the introductory and navigational part of a page. All the content inside this tag will be on top of the webpage. Providing a header section to your webpage helps search engines to understand your contents easily and rank the page accordingly.

    Example

    The following example demonstrates how you can create a header layout for an HTML webpage:

    Open Compiler

    <!DOCTYPE html><html lang="en"><head><title>Tutorialspoint</title></head><body><header><div><h1>Tutorialspoint</h1><h3>Simply easy learning!</h3></div></header></body></html>

    HTML <nav> Element

    TheĀ <nav>Ā elementĀ represents a section of a page within the webpage, where it has hyperlinks to other pages or parts within the page (just like the menu bar). It is usually included inside aĀ <header>Ā element orĀ <section>Ā element.

    Example

    The following example demonstrates how you can create a navigation menu (nav section) in an HTML page:

    <!DOCTYPE html><html lang="en"><head><title>Tutorialspoint</title></head><body><header><div><h1>Tutorialspoint</h1><h3>Simply easy learning!</h3></div><div><nav><ul><li><a href="#">
    
                  Home
               &lt;/a&gt;&lt;/li&gt;&lt;li&gt;&lt;a href="#"&gt;
                  HTML
               &lt;/a&gt;&lt;/li&gt;&lt;li&gt;&lt;a href="#"&gt;
                  CSS
               &lt;/a&gt;&lt;/li&gt;&lt;li&gt;&lt;a href="#"&gt;
                  Python
               &lt;/a&gt;&lt;/li&gt;&lt;li&gt;&lt;a href="#"&gt;
                  JavaScript
               &lt;/a&gt;&lt;/li&gt;&lt;/ul&gt;&lt;/nav&gt;&lt;/div&gt;&lt;/header&gt;&lt;/body&gt;&lt;/html&gt;</pre>

    HTML <section> Element

    TheĀ <section>Ā elementĀ defines a major part of the web page where all the important content will be displayed. There can be multiple sections in a single page

    Example

    The following example demonstrates how to use HTML layout elements like <header><nav>, and <section> to structure a web page:

    Open Compiler

    <!DOCTYPE html><html lang="en"><head><title>Tutorialspoint</title></head><body><header><h1>Tutorialspoint</h1><h3>Simply easy learning!</h3><nav>navigation bar</nav></header><section>Section 1</section><section>Section 2</section><section>Section 2</section></body></html>

    TheĀ <footer>Ā elementĀ defines the footer section of the webpage. This section contains copyright information, social media links, and other important details. It will always be at the bottom of the webpage.

    Example

    The following example demonstrates how to create a responsive HTML footer with copyright information and social media links, styled using CSS for a consistent layout at the bottom of the webpage:

    <!DOCTYPE html><html lang="en"><head><title>Footer Example</title><style>
    
      body {
         display: flex;
         flex-direction: column;
         min-height: 100vh;
         margin: 0;
      }
      .content {
         flex: 1;
      }
      footer {
         background-color: #333;
         color: #fff;
         text-align: center;
         padding: 20px 0;
      }
      footer .social-media a {
         color: #fff;
         margin: 0 10px;
         text-decoration: none;
      }
      footer .social-media a:hover {
         color: #ddd;
      }
    </style></head><body><div class="content"><h2>Footer Element of HTML Layout</h2><p>
         The footer tag defines the footer section of 
         the webpage. This section contains copyright 
         information, social media links, and other 
         important details. It will be always at the 
         bottom of the webpage.
      &lt;/p&gt;&lt;/div&gt;&lt;footer&gt;&lt;p&gt;Ā© 
         2024 Tutorialspoint. All rights reserved.
      &lt;/p&gt;&lt;div class="social-media"&gt;&lt;a href="#"&gt;Facebook&lt;/a&gt;&lt;a href="#"&gt;Twitter&lt;/a&gt;&lt;a href="#"&gt;Instagram&lt;/a&gt;&lt;a href="#"&gt;LinkedIn&lt;/a&gt;&lt;/div&gt;&lt;/footer&gt;&lt;/body&gt;&lt;/html&gt;</pre>

    HTML <article> Element

    TheĀ <article>Ā elementĀ specifies independent, self-contained content such as a forum post, magazine, blog post, and so on. When an HTML article element is nested, the inner element represents the article related to the outer element. For example, comments on social media posts can be an article element nested in the article representing the social media post. It is mostly used for forum posts, magazine or newspaper articles, blog entries, product cards, etc.

    Example

    The following example demonstrates how to use the HTML <article> tag to structure a blog post with a title, metadata, and content, styled for a clean layout:

    <!DOCTYPE html><html lang="en"><head><title>Article Example</title><style>
    
      article {
         background: #fff;
         margin: 20px 0;
         padding: 20px;
      }
    </style></head><body><header><h1>My Blog</h1></header><main><article><h2>Understanding the HTML Article Tag</h2><p>
            Posted on &lt;time datetime="2024-06-20"&gt;
            June 20, 2024&lt;/time&gt; by Farhan
         &lt;/p&gt;&lt;p&gt;
            The article tag is commonly used for content 
            such as blog posts, news articles, and user 
            comments.
         &lt;/p&gt;&lt;p&gt;
            Lorem ipsum dolor sit amet, consectetuer a
            cing elit. Aenean commodo ligula eget dolor. 
            Aenean massa. Cum sociis natoque penatib
            magnis dis parturient montes, nascet
            mus. Donec quam felis, ultric
      &lt;/article&gt;&lt;/main&gt;&lt;/body&gt;&lt;/html&gt;</pre>

    HTML <aside> Element

    TheĀ <aside>Ā elementĀ exampleĀ specifies a section of content that is directly or indirectly related to the main content (like a sidebar). If you remove aside content from a web page, the main content will not be impacted because aside content is a separate, optional component of the page. This tag is often used for advertisements.

    Example

    The following example demonstrates how to use the HTML <aside> tag to display related content, such as links to tutorials, alongside the main article content in a structured and responsive layout.

    <!DOCTYPE html><html lang="en"><head><title>Aside Tag Example</title><style>
    
      body {
         display: flex;
         flex-direction: column;
         background-color: #f4f4f4;
      }
      main {
         display: flex;
         flex: 1;
         padding: 20px;
      }
      article {
         flex: 3;
         background: #fff;
         padding: 20px;
         margin-right: 20px;
      }
      aside {
         flex: 1;
         background: #fff;
         padding: 20px;
         border-radius: 8px;
      }
    </style></head><body><header><h1>My Blog</h1></header><main><article><h3>Articles...</h3></article><aside><h2>Related Articles</h2><ul><li><a href="/html/index.htm">
                  HTML Tutorial
               &lt;/a&gt;&lt;/li&gt;&lt;li&gt;&lt;a href="/css/index.htm"&gt;
                  CSS Tutorial
               &lt;/a&gt;&lt;/li&gt;&lt;li&gt;&lt;a href="/python/index.htm"&gt;
                  Python Tutorial
               &lt;/a&gt;&lt;/li&gt;&lt;/ul&gt;&lt;/aside&gt;&lt;/main&gt;&lt;/body&gt;&lt;/html&gt;</pre>

    Creating HTML Layout Using Layout Elements

    The layout elements help to improve the readability and accessibility of the web page, as well as its SEO (search engine optimization) performance. Here, we are going to create a simple layout of a web page with the help of the above-mentioned semantic elements.

    <!DOCTYPE html><html><head><title>Layout structure of HTML</title><style>
    
      * {
         box-sizing: border-box;
      }
      header {
         font-size: 25px;
         color: whitesmoke;
         padding: 1px;
         text-align: center;
         background-color: lightslategray;
      }
      nav {
         float: left;
         width: 20%;
         height: 350px;
         background: lightgray;
         padding: 20px;
      }
      nav ul {
         padding: 1px;
      }
      article {
         float: left;
         padding: 20px;
         width: 80%;
         background-color: lightyellow;
         height: 350px;
      }
      footer {
         background-color: lightslategray;
         padding: 10px;
         text-align: center;
         color: white;
         padding-top: 20px;
         padding-bottom: 10px;
      }
      footer a {
         margin: 10px;
      }
      footer p {
         margin-top: 30px;
      }
    </style></head><body><!--header segment--><header><div><p>Tutorialspoint</p><p>Simply easy learning!</p></div></header><section><!--Menu Navigation segment--><nav><ul><li><a href="#">Home</a></li><li><a href="#">Jobs</a></li><li><a href="#">Library</a></li><li><a href="#">Articles</a></li><li><a href="#">Certification</a></li></ul></nav><!--Content segment--><article><h1>Welcome to Tutorials point</h1><p>
            Tutorialspoint.com is a dedicated page 
            to provide quality online education in 
            domains of Computer Science and other
            Technology, Programming Languages, and 
            other Engineering subjects. 
         &lt;/p&gt;&lt;/article&gt;&lt;/section&gt;&lt;!--Footer segment--&gt;&lt;footer&gt;&lt;h2&gt;Tutorialspoint&lt;/h2&gt;&lt;div&gt;&lt;a href="#"&gt; About us &lt;/a&gt;&lt;a href="#"&gt; Refund policy &lt;/a&gt;&lt;a href="#"&gt; Terms of use &lt;/a&gt;&lt;a href="#"&gt; Privacy policy &lt;/a&gt;&lt;a href="#"&gt; FAQ's &lt;/a&gt;&lt;a href="#"&gt; Affiliates &lt;/a&gt;&lt;a href="#"&gt; Contact &lt;/a&gt;&lt;/div&gt;&lt;div&gt;&lt;p&gt;
            Copyrights  TUTORIALS POINT (INDIA) 
            PRIVATE LIMITED. All rights reserved.
         &lt;/p&gt;&lt;/div&gt;&lt;/footer&gt;&lt;/body&gt;&lt;/html&gt;</pre>
  • Layouts

    HTML Layouts specifies the arrangement of components on an HTML web page. A good layout structure of the webpage is important to provide a user-friendly experience on our website. It takes considerable time to design a website’s layout with a great look and feel.

    HTML Layout

    HTML Layout Elements

    The below-listed elements are used to create the HTML layout’s structure:

    ElementsDescription
    headerThe header tag is used to add a header section in an HTML web page. All the content inside this tag will be on top of the webpage.
    navIt represents a section of a page within the webpage, where it has hyperlinks to other pages or parts within the page (just like the menu bar).
    sectionIt defines a major part of the web page where all the important content will be displayed.
    footerThe footer tag defines the footer section of the webpage. This section contains copyright information and other important details. It will always be at the bottom of the webpage.
    articleIt specifies independent self-containing content such as a forum post, magazine, any blog post, and so on.
    asideIt specifies a section of content that is directly or indirectly related to the main content (like a sidebar).
    summaryIt specifies a caption for the <details> element.
    detailsIt specifies a tag for additional information. It requires the <summary> element.

    Visit this chapter to learn about the various elements with examples that are used for creating HTML layouts:Ā HTML Layout Elements

    Example of HTML Layouts

    Here are some examples that illustrate HTML layout designs. CSS and CSS frameworks are used to design the layout. The above-mentioned elements are used to create layout structure.

    Define an HTML Layout

    We can achieve HTML layout by simply using tags like <header>, <footer>, and <nav>. The following code shows how to make an HTML layout:

    <!DOCTYPE html><html lang="en"><head><style>
    
      .header {
         background-color: #b3e0f2;
         text-align: center;
         padding: 20px;
         font-size: 2em;
         font-weight: bold;
      }
      .container {
         display: flex;
      }
      .sidebar {
         width: 20%;
         background-color: #f4f4f4;
         padding: 20px;
      }
      .content {
         width: 80%;
         background-color: #f9f9f9;
         padding: 20px;
      }
      .footer {
         background-color: #b3e0f2;
         text-align: center;
         padding: 10px;
         position: fixed;
         width: 100%;
         bottom: 0;
      }
    </style></head><body><div class="header">
         Title
      &lt;/div&gt;&lt;div class="container"&gt;&lt;div class="sidebar"&gt;&lt;a href="#"&gt;Home&lt;/a&gt;&lt;a href="#"&gt;Learn HTML&lt;/a&gt;&lt;a href="#"&gt;About Us&lt;/a&gt;&lt;/div&gt;&lt;div class="content"&gt;&lt;h1&gt;Home&lt;/h1&gt;&lt;p&gt;This is a home page.&lt;/p&gt;&lt;/div&gt;&lt;/div&gt;&lt;div class="footer"&gt;
         Footer
      &lt;/div&gt;&lt;/body&gt;&lt;/html&gt;</pre>

    Define an HTML Layout Using Bootstrap

    The CSS Bootstrap library can be used to make layouts in HTML. The following code shows how it's done:

    <!DOCTYPE html><html lang="en"><head><!--  Bootstrap CDN Link --><link href=
    "https://stackpath.bootstrapcdn.com/bootstrap/4.5.2/css/bootstrap.min.css" 
    
            rel="stylesheet"&gt;&lt;/head&gt;&lt;body&gt;&lt;!-- Header --&gt;&lt;header class="bg-info text-white text-center py-4"&gt;&lt;h1&gt;Title&lt;/h1&gt;&lt;/header&gt;&lt;!-- Main Container --&gt;&lt;div class="container-fluid"&gt;&lt;div class="row"&gt;&lt;!-- Sidebar --&gt;&lt;nav class="col-md-3 col-lg-2 d-md-block bg-light sidebar"&gt;&lt;div class="sidebar-sticky"&gt;&lt;ul class="nav flex-column"&gt;&lt;li class="nav-item"&gt;&lt;a class="nav-link active" href="#"&gt;
                           Home
                        &lt;/a&gt;&lt;/li&gt;&lt;li class="nav-item"&gt;&lt;a class="nav-link" href="#"&gt;
                           Learn HTML
                        &lt;/a&gt;&lt;/li&gt;&lt;li class="nav-item"&gt;&lt;a class="nav-link" href="#"&gt;
                           About Us
                        &lt;/a&gt;&lt;/li&gt;&lt;/ul&gt;&lt;/div&gt;&lt;/nav&gt;&lt;!-- Content --&gt;&lt;main role="main" class="col-md-9 ml-sm-auto col-lg-10 px-4"&gt;&lt;h2&gt;Home&lt;/h2&gt;&lt;p&gt;This is a home page.&lt;/p&gt;&lt;/main&gt;&lt;/div&gt;&lt;/div&gt;&lt;!-- Footer --&gt;&lt;footer class="bg-info text-white text-center py-3"&gt;
      Footer
    </footer></body></html>

    Different Techniques to Create HTML Layouts

    There are four different techniques (ways) to create and design HTML layouts; you can create simple and multicolumn layouts using these techniques:

    • CSS Float Property:Ā A classic way to control position and formatting on a webpage.
    • CSS Flexbox Property:Ā Used for dynamic layout and to position elements in different screen sizes.
    • CSS Grid Property:Ā Create a complex grid-like layout
    • CSS frameworks:Ā The framework, likeBootstrap, allows to create dynamic HTML layouts.

    To learn how to use CSS for making HTML layouts, visit the chapterĀ Layouts Using CSS