Links are used to navigate from one webpage to other with a single click. We can use CSS properties to style links in various ways.
CSS Links Example
We can create a link in webpage using <a> tag. With CSS we can style this to built text link, button link and image link as shown below.
CSSCSS Button
Table of Contents
States of Link
Default Styles of Links
CSS Text Link
Styling States of Link
CSS Button Links
CSS Image Links
States of Link
A link in a webpage exist in various states, and these states of link can be styled using pseudo-classes in CSS. Following are common states of link.
Link: Represents unvisited links. This state of links can be styled with :link pseudo class. (This is default state for anchor tag).
Visited: Represents the links that are already visited (present in browser’s history). This state of links can be styled with :visited pseudo class.
Hover: Represents the state when user hover’s the mouse pointer over link. This state of links can be styled with :hover pseudo class.
Active: Represents the state when user clicks the link. This state of links can be styled with :active pseudo class.
Default Styles of Links
Following are default styles applied to a link in webpage. You can modify this style using CSS.
All the links will be underlined. You can remove this by setting text-decoration property to ‘none’.
All the unvisited links will be in blue color and visited links will be purple. You can use color property to modify this
The mouse pointer changes to a little hand icon when you hover over a link. You can use cursor property to modify this.
Hovered links will be underlined and active links are styled in red.
CSS Text Link
A text content when clicked will navigate to a different webpage or a section of same page is called text link. Following example show how to make a text link.
In this article, we will learn about how to style an image to change its shape, size, and layout by using different CSS properties such as padding, borders, height, width, margins, etc.
Table of Contents
Round Cornered Images
Circular And Elliptical Images
Bordered Images
Image Filters
Image as a Card
Center an Image
Text Inside Image
Image Fade In Overlay
Round Cornered Images
The following example demonstrates how to use border-radius property to create rounded border image.
The following example demonstrates how to use border-radius: 50% property to create images in circle and ellipse shape. When height and width of image are same we will get a circular image and when they are not same we will get elliptical images.
In CSS position property can be used to position text in different locations inside an image.
First we need to set position property for image container as position: relative and position property of text as position: absolute. Now you can position of text elements using inset properties like top, bottom, right and left.
Example
<!DOCTYPE html><html><head><style>
.container {
position: relative;
border: 2px solid #ef2c2c;
}
.center {
position: absolute;
top: 45%;
width: 100%;
text-align: center;
}
.top-left {
position: absolute;
top: 12px;
left: 30px;
}
.top-right {
position: absolute;
top: 12px;
right: 30px;
}
.bottom-left {
position: absolute;
bottom: 12px;
left: 30px;
}
.bottom-right {
position: absolute;
bottom: 12px;
right: 30px;
}
img {
width: 100%;
opacity: 0.7;
}
</style></head><body><div class="container"><img src="/css/images/red-flower.jpg"
width="1000px" height="350px"><h3 class="center">
Text at Center
</h3><h3 class="top-left">
Text at Top Left
</h3><h3 class="top-right">
Text at Top Right
</h3><h3 class="bottom-left">
Text at Bottom Left</h3><h3 class="bottom-right">
Text at Bottom Right
</h3></div></body></html></pre>
Image Fade In Overlay
Fade in overlay effect shows text when you hover over the image. There are several other overlay effects, for complete understanding checkout our tutorial on CSS overlay effects.
Let's look at an example for image fade in overlay effect.
CSS Styling Text involves modifying the appearance of text content by setting proper color, alignment, letter-spacing, and indention to make it more visually appealing. This chapter demonstrates how to style texts on web pages using CSS properties.
How to Style Text in CSS?
We can style text in the following ways to style texts in CSS.
Change Color: The default color of text on a webpage will be black. You can change this according to your webpage theme, using the color property in CSS.
Set Alignment: You can use the text-align property in CSS to specify the alignment (center, left, right) of text inside a container.
Text Decoration: The text-decoration property in CSS can be used to add effects like underline, overline, or strike-through to texts.
Shadow Effect: If you want to create a shadow around text in your webpage you can use text-shadow property in CSS. This can create a 3D effect or a subtle glow around the text.
Change Font Style: The font-style property allows you to style the text as normal, italic, or oblique.
Properties for Styling Text
The following table lists CSS properties for styling text:
Property
Description
color
Sets the color of the text.
text-align
Sets the alignment of the text.
text-align-last
Sets the alignment of the last line of a block of text.
direction
Sets the direction of the text.
text-indent
Sets the indentation of the first line of the text.
letter-spacing
Specifies the space between the letters of a word.
word-spacing
Specifies the space between the words in a block of text.
white-space
Controls the white space flow inside the text in an element.
text-decoration
A shorthand property for setting the text decoration.
text-decoration-line
It specifies the type of line the text decoration will have.
text-decoration-style
It specifies the type of line drawn as a text decoration such as solid, wavy, dotted, dashed, or double.
text-decoration-color
It sets the color of the text-decoration line.
text-decoration-thickness
It sets the thickness of the text-decoration line.
text-justify
It controls how spaces are distributed between words and characters to align text.
text-transform
Transforms the text in either uppercase, lowercase, or capitalize.
line-height
It controls the amount of space between lines of text within an element.
text-emphasis
Applied emphasis marks to text.
text-shadow
Adds shadow to the text.
line-break
Controls how to set the rule for a line break.
word-break
Controls how to set the rule for a word break.
text-combine-upright
Combines multiple typographic character units into the space of a single typographic character unit.
text-orientation
Sets the orientation of the text characters in a line.
text-underline-offset
Adds special visual effects to the text.
text-overflow
Controls how hidden overflow content is displayed to users.
Setting Text Color in CSS
To set the text color, you can use the color property. The color can be specified with color name, Hexadecimal value, rgb/rgba value, or hsl/hsla value.
Example
In this example, we have set the text color of paragraphs using the color property.
The text in a webpage can be aligned horizontally and vertically inside a container. To set the alignment of the text, we use the following CSS properties.
The text-align property specifies the horizontal alignment of text in a container (left, right, center, justify).
The vertical-align property is used to align the text vertically at the top, bottom, baseline, and middle. This property is used with inline elements, inline-block elements, and table cells.
Example
In this example, we have used text-align and vertical-align properties to set the horizontal and vertical alignment of the text.
<!DOCTYPE html><html><head><style>
th{
vertical-align: bottom;
border: 2px solid;
width: 200px;
height: 150px;
}
</style></head><body><h2>Text Alignment</h2><p style="text-align: left;">Text Left Alignment.</p><p style="text-align: right;">Text Right Alignment.</p><p style="text-align: center;">Text Center Alignment.</p><table><th>This is vertical alignment</th></table></body></html></pre>
Aligning the Last Line in CSS
To set the alignment for the last line of a block of text, you can use the text-align-last property. It is useful when text-align: justify; is used to align the last line properly.
Example
In this example, we have used the text-align-last property to align the last line differently.
<!DOCTYPE html><html><head><style>
p {
width: 300px;
text-align: justify;
text-align-last: right;
}
</style></head><body><h2>text-align-last property</h2><p>This is an example of text alignment. The last line of this paragraph will be aligned differently than the rest of the text.</p></body></html></pre>
Aligning Text with text-justify
The text-justify property specifies the justification method of text when text-align: justify; is applied. The text remains unaffected in modern browsers. Try running the code in Firefox.
Example
In this example, we have used the text-justify property to control text justification.
<!DOCTYPE html><html><head><style>
p {
width: 300px;
text-align: justify;
text-justify: inter-word;
}
</style></head><body><h2>text-justify property</h2><p>This paragraph demonstrates how the text-justify property works. It adjusts the spacing between words.</p></body></html></pre>
Setting Text Direction in CSS
The text direction refers to the orientation of text characters in a document or element. You can use the direction property to set the text direction. This property accepts two values which are as follows:
ltr (Left-to-Right): It is the default value, used for languages that are written from left to right, like English.
rtl (Right-to-Left): It is used for languages that are written from right to left, such as Arabic or Hebrew. When using rtl, the text will be aligned right by default.
Additionally, CSS provides a shorthand property, unicode-bidi, to control the bidi algorithm, which specifies how characters with different writing directions are displayed when they appear in the same paragraph.
Example
In this example, we have used the direction property to set the text direction of paragraphs.
Right to Left
</p><p style = "direction: ltr;">
Left to Right
</p></body></html></pre>
Applying Text Decoration in CSS
You can use the text-decoration property for adding extra decoration to the text, such as adding a line (underline, strikethrough, overline), color, style, and thickness to the line.
It is a shorthand property for text-decoration-line, text-decoration-style, text-decoration-color, and text-decoration-thickness.
Syntax
The syntax for the text-decoration property is as follows:
In this example, we have used the text-decoration property to apply overline, line-through, and underline styles with different colors, thicknesses, and line types.
<!DOCTYPE html><html><body><h2>Text Decoration</h2><p style="text-decoration: overline solid red 5px;">
Overline text decoration.
</p><p style="text-decoration: line-through solid green 1px;">
Line-through text decoration.
</p><p style="text-decoration: underline dashed 2pt blue;">
Underline text decoration.
</p></body></html></pre>
Using CSS text-transform for Text Styling
To change the appearance of text, the text-transform property is used. It transforms the text in various ways such as converting the text to uppercase, or lowercase, capitalizing the first letter of each word, or even capitalizing all letters.
Example
In this example, we have used the text-transform property to transform the text to uppercase, lowercase, and capitalize.
<!DOCTYPE html><html><head><style>
p{
font-family: arial, sans-serif;
font-size: 1em;
}
</style></head><body><h2>Text Transform</h2><p style="text-transform: capitalize;">
capitalizes the first character of each word.
</p><p style="text-transform: uppercase;">
Transforms all text to uppercase.
</p><p style="text-transform: lowercase;">
Transforms all text to Lowercase.
</p></body></html></pre>
Adding Text Emphasis in CSS
To apply emphasis marks on a block of text, you can use the text-emphasis property. These marks are typically used to highlight specific content or to indicate pronunciation or stress in certain languages.
It is a shorthand property for text-emphasis-style and text-emphasis-color.
Example
In this example, we have used the text-emphasis property to apply emphasis marks to the text.
<!DOCTYPE html><html><head><style>
p{
font-family: arial, sans-serif;
font-size: 1em;
}
</style></head><body><h2>Text Emphasis</h2><p style="text-emphasis: dot;">
The text is emphasized using dot.
</p><p style="text-emphasis: circle red;">
The text is emphasized using red circle.
</p><p style="text-emphasis: triangle;">
The text is emphasized using triangle.
</p></body></html></pre>
CSS Text Indentation Property
To add space between the margin and the first line of text, you can use the text-indent property. A proper indentation improves the readability and clarity of text on a page.
Example
In this example, we have used the text-indent property to indent the first line of the text of the paragraphs.
To adjust the space between the letters of a text, you can use the letter-spacing property. The space can be increased or decreased between the letters.
Example
In this example, we have used the letter-spacing property to increase and decrease the space between the letters of the text.
Word spacing normal.
</p><p style="word-spacing: 100px;">
Word spacing increased.
</p><p style="word-spacing: -2px;">
Word spacing decreased.
</p></body></html></pre>
Wrapping Text with white-space Property
The white-space property controls how you can handle the white space inside an element. It allows you to manage the handling of spaces, tabs, and line breaks in the text.
Example
Here is an example of the white-space property using different values to control the white space inside the text.
<!DOCTYPE html><html><head><style>
p{
border: 2px solid;
padding: 5px;
width: 50%;
}
</style></head><body><h2>White-space property</h2><p style="white-space: normal;">
This is a paragraph with the white-space property set
to normal. The text will wrap when necessary, and
extra spaces and line breaks are ignored.
</p><p style="white-space: nowrap;">
This is a paragraph with the white-space property set
to nowrap. The text will not wrap to the next line, even
if it overflows the container.
</p><p style="white-space: pre;">
This is a paragraph with white-space property set to pre.
The text will respect all spaces and line breaks. Means,
the text will be displayed as it is in HTML code.
</p><p style="white-space: pre-wrap;">
This is a paragraph with the white-space property set to
pre-wrap. The text will respect all spaces and line breaks,
but will wrap when necessary.
</p><p style="white-space: pre-line;">
This is a paragraph with the white-space property set
to pre-line. The text will collapse spaces and wrap when
necessary, but will respect line breaks.
</p></body></html></pre>
CSS Line-Break Property
To control how line breaks are handled in text, we use the CSS line-break property. This property is useful for handling line breaks in languages like Japanese, Chinese, or Korean. You can use values such as auto, loose, normal, strict, and anywhere with this property.
Example
In this example, we have used the line-break property with different values to control how the text breaks across lines based on language rules.
<!DOCTYPE html><html><head><style>
p{
border: 2px solid;
padding: 5px;
width: 50%;
}
</style></head><body><h2>Line-break property</h2><p style="line-break: auto;">
This paragraph uses the line-break property set to auto.
Line breaking is determined based on the default rules.
</p><p style="line-break: loose;">
This paragraph uses the line-break property set to loose.
Line breaking is done more frequently, typically used in
CJK (Chinese, Japanese, Korean) text.
</p><p style="line-break: normal;">
This paragraph uses the line-break property set to normal.
Line breaking follows the standard rules for the language
being used.
</p><p style="line-break: strict;">
This paragraph uses the line-break property set to strict.
Line breaking is restricted, typically preventing breaks
between characters that are normally kept together.
</p><p style="line-break: anywhere;">
This paragraph uses the line-break property set to anywhere.
Line breaks can happen at any point, even if it means
breaking words in unconventional places.
</p></body></html></pre>
CSS Word-Break Property
The word-break property controls the behavior of word breaking and word wrapping in text. It handles the words when they are too long to fit within their container. You can use values such as normal, break-all, keep-all, and break-word with this property.
Example
In this example, we have used the word-break property with different values to control how the word breaks to fit their container.
This paragraph uses the word-break property set to <strong>normal</strong>.
Words will break only at normal word boundaries (such as
spaces or hyphens).
</p><p style="word-break: break-all;">
This paragraph uses the word-break property set to <strong>break-all</strong>.
Words will break at any character to prevent overflow,
even in the middle of a word.
</p><p style="word-break: keep-all;">
This paragraph uses the word-break property set to <strong>keep-all</strong>.
Words will only break at normal word boundaries, but CJK text
characters will not break unless necessary.
</p><p style="word-break: break-word;">
This paragraph uses the word-break property set to <strong>break-word</strong>.
Words will break at normal boundaries or wherever necessary
to prevent overflow.
</p></body></html></pre>
CSS line-height Property
To specify the height of a line of a text, you can use the CSS line-height property . It controls the spacing between lines.
Example
In this example, we have used the line-height property to increase the space between lines.
<!DOCTYPE html><html><head><style>
p {
width: 300px;
line-height: 2;
}
</style></head><body><h2>line-height property</h2><p>This paragraph has a line height of 2, making the text more readable and spaced out.</p></body></html></pre>
Creating Text Shadows with CSS
The text-shadow property is used to add a shadow effect to the text. It allows you to create a shadow behind the text by specifying the shadow's horizontal and vertical offsets, blur radius, and color.
You can apply multiple shadows by separating each shadow with a comma. The order of the shadows matters, with the first shadow being closest to the text.
Example
In this example, we have used the text-shadow property to apply different shadow effects to the paragraphs, including single and multiple shadows with different offsets, colors, and blur radii.
<!DOCTYPE html><html><head><style>
.txt1 {
text-shadow: 2px 2px 5px grey;
}
.txt2 {
text-shadow: -2px -2px 3px red;
}
.txt3 {
text-shadow: 3px 3px 0px blue, -3px -3px 0px yellow;
}
</style></head><body><h2>Text-shadow property</h2><p class="txt1">
This text has a grey shadow with a blur radius of 5px.
</p><p class="txt2">
This text has a red shadow with a blur radius of 3px
and offset to the top-left.
</p><p class="txt3">
This text has two shadows: a blue shadow offset to the
bottom-right and a yellow shadow offset to the top-left.
</p></body></html></pre>
CSS text-orientation Property
To control the text orientation in vertical writing modes, we use the text-orientation property.
Example
In this example, we have used the text-orientation property to rotate the text vertically.
<!DOCTYPE html><html><head><style>
p {
writing-mode: vertical-rl;
text-orientation: upright;
}
</style></head><body><h2>text-orientation property</h2><p>This text is displayed in a vertical layout using text-orientation.</p></body></html></pre>
CSS fonts allows to customize font style of webpages using various font related properties. In this tutorial we will understand the font styling in CSS.
What is CSS Font?
In CSS, the font property is used to style and adjust type of text used in webpage.
You can define fonts and customize their appearance by setting properties like font-family, font-size, font-weight and font-style. You can also use the shorthand property font to manipulate all the font style.
Types of CSS Fonts
Monospace Fonts: The font in which every letter have equal width.
Serif Fonts: Have small stroke at the edge of each letter.
San-Serif Fonts: Clean fonts with out any strokes.
Fantasy Fonts: Decorative fancy fonts.
Cursive Fonts: The font that resembles human handwriting.
Popular CSS Fonts
Here is a table with some popular font and their generic font-family.
Generic Font Family
Examples of Font Names
Serif
Times New Roman Georgia Garamond
Sans-serif
Arial Verdana Helvetica
Monospace
Courier New Lucida Console Monaco
Cursive
Brush Script MT Lucida Handwriting
Fantasy
Copperplate Papyrus
Setting Text Fonts
The font-family property is used to specify font name for a text content.
Example
In this example, we have used the font-family property to set the font of the paragraph element.
<html><head><style>
p {
font-family: Lucida Handwriting, Cursive;
}
</style></head><body><p >
This is a font that written in Lucida
Handwriting. THis is a font that looks
like human handwriting.
</p></body></html></pre>
Setting Text Font Size
To set the font size of the text, we use font-size property. You can use its values such as small, medium, and, large to get a variety of font sizes of the text.
Example
In this example, we have used the font-size property with its different values to set the size of the text.
.percent {
font-size: 120%;
}
</style></head><body><h2>CSS Font-Size Examples</h2><p class="small">This text has a 'small' font size.</p><p class="medium">This text has a 'medium' font size.</p><p class="larger">This text has a 'larger' font size.</p><p class="px">This text has a font size of 18px.</p><p class="percent">This text has a font size of 25%.</p></body></html></pre>
Setting Font Weight
You can use the font-weight property to set the boldness of the text.
Example
In this example, we have used the font-weight property to set the boldness of the text. The valid numeric value is from 100-900 for number class.
.number {
font-weight: 600;
}
</style></head><body><h2>CSS font-weight Property</h2><p class="normal">This text has a 'normal' font-weight.</p><p class="bold">This text has a 'bold' font-weight.</p><p class="lighter">This text has a 'lighter' font-weight.</p><p class="number">This text has a font-weight of 600.</p></body></html></pre>
Setting Font Style
To set the style of the written text, we use the font-style property. The text can be set to normal, italic or oblique.
Example
In this example, we have used font-style property to set the style of the written text.
.oblique {
font-style: oblique;
}
</style></head><body><h2>CSS font-style Property</h2><p class="normal">It has 'normal' font-style.</p><p class="italic">It has 'italic' font-style.</p><p class="oblique">It has 'oblique' font-style.</p></body></html></pre>
CSS Font Shorthand Property
You can use the font shorthand property to modify size, weight, and style of texts.
Example
In this example, we have used the font shorthand property to set font style, weight, size and family.
<html><head><style>
.font-example {
/* in-order: font style, weight, size, family */
font: italic bold 20px Arial, sans-serif;
}
</style></head><body><p class="font-example">
This is an example of text with an adjusted
font style, weight, and size using the font
shorthand property.
</p></body></html></pre>
CSS Font Related Properties
The following table lists all the CSS properties related to font:
Property
Description
Example
font-family
Specifies the font for an element.
Try It
font-size
Specifies the size of the font.
Try It
font-weight
Specifies the boldness of the font.
Try It
font-style
Specifies the style of the font (normal, italic, oblique).
Try It
font-variant
Specifies whether or not a text should be displayed in a small-caps font.
CSS uses color values to specify a color. Typically, these are used to set a color either for the foreground of an element (i.e. its text) or else for the background of the element. They can also be used to affect the color of borders and other decorative effects.
You can specify your color values in various formats. Following table lists all the possible formats −
Format
Syntax
Description
Example
Keyword
<property>: <colorname>
CSS has a set of predefined color names that you can use directly.
red, blue, green, yellow, black, white, etc.
Hexadecimal Code
#RRGGBB
Starts with a hash (#) followed by six hexadecimal digits.
#FF0000 – red
Short Hexadecimal Code
#RGB
Shorter version of hexadecimal format where each of the RGB components is represented by a single digit, and the value is duplicated.
#F00 – red
RGB
rgb(red,green,blue)
Colors can be defined using the rgb() function, which takes three parameters representing the red, green, and blue values.
rgb(0, 0, 255) – blue
RGBA
rgba()
Similar to RGB, with an additional parameter for the alpha (transparency) value. 0 (fully transparent) and 1 (fully opaque)
rgba(0,0,255,0.5) – translucent blue
HSL
hsl()
Colors can be defined using the rgb() function which stands for Hue (0 to 360 degree), Saturation (%), and Lightness (%).
hsl(120, 100%, 50%) – pure green
HSLA
hsla()
Similar to HSL, with an additional parameter for the alpha (transparency) value.
hsl(120, 100%, 50%, 0.5) – translucent green
currentcolor Keyword
currentcolor
It refers to the value of the color property of the element.
color: red; /* Red text color */ border: 10px solid currentcolor; /* Red border color */
System color
as per OS or browser
CSS allows usage of system colors defined by the user’s OS or browser.
ButtonText, Window, WindowText
These formats are explained in more detail in the following sections −
CSS Colors – Keyword
CSS supports the color names to be directly passed to the property background-color and color. 140 standard color names are supported by CSS.
Few of the examples are listed in the table below:
Color
Color Name
Black
Red
Blue
Green
Aquamarine
Here is an example:
<html><head><style>
   #colorkeyword{
  background-color: aqua;
  padding: 10px;   }
</style></head><body><h3>Color Keyword - example</h3><p>As the keyword passed is aqua, the background will appear as aqua colored..</p><div id="colorkeyword">
  This div element has a colored background based on the color keyword passed, i.e aqua.   </div></body></html>
CSS Colors – Hexadecimal Codes
A hexadecimal is a 6 digit representation of a color. The first two digits(RR) represent a red value, the next two are a green value(GG), and the last are the blue value(BB).
A hexadecimal value can be taken from any graphics software like Adobe Photoshop, Jasc Paintshop Pro, or even using Advanced Paint Brush.
Each hexadecimal code will be preceded by a pound or hash sign ‘#’. Following are the examples of hexadecimal notation.
Note: To specify the hexadecimal codes, you can use upper case or lower case letters.
Color
Color Hexadecimal Code
#000000
#FF0000
#00FF00
#0000FF
#FFFF00
#00FFFF
#FF00FF
#C0C0C0
#FFFFFF
Here is an example:
<html><head><style>
#hexcode {
background-color: #00ff00;
padding: 10px;
}
</style></head><body><h3>Hexadecimal code - example</h3><p>As the hexadecimal code is #00ff00 the background will appear green.</p><div id="hexcode">
This div element has a green background.
</div></body></html></pre>
CSS Colors - Short Hexadecimal Codes
This is a shorter form of the six-digit notation. In this format, each digit is replicated to arrive at an equivalent six-digit value. For example: #6A7 becomes #66AA77.
A hexadecimal value can be taken from any graphics software like Adobe Photoshop, Jasc Paintshop Pro, or even using Advanced Paint Brush.
Each short hexadecimal code will be preceded by a pound or hash sign '#'. Following are the examples of short hexadecimal notation.
Note: To specify the hexadecimal codes, you can use upper case or lower case letters.
Color
Short Hexadecimal Code
#000
#F00
#0F0
#0FF
#FF0
#0FF
#F0F
#FFF
Here is an example:
<html><head><style>
#shorthex {
background-color: #00f;
padding: 10px;
}
</style></head><body><h3>Short Hexadecimal code - example</h3><p>As the short hexadecimal code is #00f the background will appear blue.</p><div id="shorthex">
This div element has a blue background.
</div></body></html></pre>
CSS Colors - RGB Values
This color value is specified using the rgb( ) property.
It takes three values, one each for red, green, and blue.
The value can be an integer between 0 and 255 or a percentage.
NOTE: All the browsers does not support rgb() property of color so it is recommended not to use it.
Following is the example to show few colors using RGB values.
Color
Color RGB
rgb(0,0,0)
rgb(255,0,0)
rgb(0,255,0)
rgb(0,0,255)
rgb(255,255,0)
rgb(0,255,255)
rgb(255,0,255)
rgb(192,192,192)
rgb(255,255,255)
Here is an example:
<html><head><style>
   #rgbvalue {
  background-color: rgb(255,0,255);
  padding: 10px;   }
</style></head><body><h3>RGB - example</h3><p>As the rgb(255,0,255) is set the background will appear accordingly.</p><div id="rgbvalue">
  This div element has a colored background based on the rgb values.   </div></body></html>
CSS Colors - RGBA Values
This color value is specified using the rgba( ) property.
It takes four values, one each for red, green, and blue and the last value as the alpha (transparency) value.
The alpha value can be any value between 0 and 1.
NOTE: All the browsers do not support rgba() property of color so it is not recommended.
Following is the example to show few colors using RGBA values.
}
</style></head><body><h3>RGBA - example</h3><p>As the rgba(255,0,255,0.2) is set the background will appear with transparency value of 0.2.</p><div id="rgbavalue">
This div element has a colored background based on the rgba values.
</div></body></html>
CSS Colors - HSL Values
This color value is specified using the hsl() function.
HSL stands for hue, saturation and lightness.
Hue is represented in degrees (0-360), saturation and lightness are represented as percentages (0% - 100%).
Following is the example to show few colors using HSL property.
}
</style></head><body><h3>HSL - example</h3><p>As the hsl(355,70%,50%) is set the background will appear based on the hsl values passed.</p><div id="hslvalue">
This div element has a colored background based on the hsl values hsl(355,70%,50%).
</div></body></html>
CSS Colors - HSLA Values
This color value is specified using the hsl() function.
HSLA stands for hue, saturation, lightness and alpha.
It takes four values, first for hue, second for saturation, third for lightness and fourth is the alpha (transparency) value.
Hue is represented in degrees (0-360), saturation and lightness are represented as percentages (0% - 100%), and alpha value can be in between 0 and 1.
Following is the example to show few colors using HSLA property.
}
</style></head><body><h3>HSLA - example</h3><p>As the hsla(355,70%,50%,0.4) is set the background will appear based on the hsla values passed, with high transparency.</p><div id="hslavalue">
This div element has a colored background based on the hsl values hsla(355,70%,50%,0.4).
</div></body></html>
CSS Colors - currentcolor keyword
The currentcolor keyword signifies the value of the color property of an element. It can be passed to any other styling property using the keyword currentcolor.
Here is an example:
<html><head><style>
   #currcolor {
  color: red;
  border: 5px solid currentcolor;   }
</style></head><body><h2>The currentcolor Keyword</h2><p>As the currentcolor keyword is used for border after color property is set as red, the border will also appear red.</p><div id="currcolor">
  This div element has a red text color and a red border.   </div></body></html>
CSS Colors - Building Color Codes
You can build millions of color codes using our Color Code Builder. Check the HTML Color Code Builder.
To use this tool, you would need a Java Enabled Browser.
CSS Colors - Browser Safe Colors
Here is the list of 216 colors which are supposed to be most safe and computer independent colors. These colors vary from hexa code 000000 to FFFFFF. These colors are safe to use because they ensure that all computers would display the colors correctly when running a 256 color palette −
000000
000033
000066
000099
0000CC
0000FF
003300
003333
003366
003399
0033CC
0033FF
006600
006633
006666
006699
0066CC
0066FF
009900
009933
009966
009999
0099CC
0099FF
00CC00
00CC33
00CC66
00CC99
00CCCC
00CCFF
00FF00
00FF33
00FF66
00FF99
00FFCC
00FFFF
330000
330033
330066
330099
3300CC
3300FF
333300
333333
333366
333399
3333CC
3333FF
336600
336633
336666
336699
3366CC
3366FF
339900
339933
339966
339999
3399CC
3399FF
33CC00
33CC33
33CC66
33CC99
33CCCC
33CCFF
33FF00
33FF33
33FF66
33FF99
33FFCC
33FFFF
660000
660033
660066
660099
6600CC
6600FF
663300
663333
663366
663399
6633CC
6633FF
666600
666633
666666
666699
6666CC
6666FF
669900
669933
669966
669999
6699CC
6699FF
66CC00
66CC33
66CC66
66CC99
66CCCC
66CCFF
66FF00
66FF33
66FF66
66FF99
66FFCC
66FFFF
990000
990033
990066
990099
9900CC
9900FF
993300
993333
993366
993399
9933CC
9933FF
996600
996633
996666
996699
9966CC
9966FF
999900
999933
999966
999999
9999CC
9999FF
99CC00
99CC33
99CC66
99CC99
99CCCC
99CCFF
99FF00
99FF33
99FF66
99FF99
99FFCC
99FFFF
CC0000
CC0033
CC0066
CC0099
CC00CC
CC00FF
CC3300
CC3333
CC3366
CC3399
CC33CC
CC33FF
CC6600
CC6633
CC6666
CC6699
CC66CC
CC66FF
CC9900
CC9933
CC9966
CC9999
CC99CC
CC99FF
CCCC00
CCCC33
CCCC66
CCCC99
CCCCCC
CCCCFF
CCFF00
CCFF33
CCFF66
CCFF99
CCFFCC
CCFFFF
FF0000
FF0033
FF0066
FF0099
FF00CC
FF00FF
FF3300
FF3333
FF3366
FF3399
FF33CC
FF33FF
FF6600
FF6633
FF6666
FF6699
FF66CC
FF66FF
FF9900
FF9933
FF9966
FF9999
FF99CC
FF99FF
FFCC00
FFCC33
FFCC66
FFCC99
FFCCCC
FFCCFF
FFFF00
FFFF33
FFFF66
FFFF99
FFFFCC
FFFFFF
CSS Colors - Related Properties
All the properties related to color are listed in the table below:
Property
Description
opacity
Sets the transparency level of an element.
hue
Represents the hue angle of an element.
color
Sets the foreground of an element's text and text decoration.
CSS Selectors are used to select the HTML elements you want to style on a web page. They allow you to target specific elements or groups of elements to apply styles like colors, fonts, margins, and more.
The element or elements that are selected by the selector are referred to as subject of the selector.
CSS Universal Selector
CSS universal selector is a special selector that selects all the elements in an HTML document. It is denoted by an asterisk mark (*).
Syntax
The syntax for the universal selector is as follows:
*{margin: 0;padding: 0;}
As per the above syntax, the universal selector is used to apply a margin and padding of 0 to all HTML elements.
Example
The following example demonstrates the use of a universal selector (*) to set the font size, background, and text color of the document:
}
</style></head><body><div><h1>Type selector</h1><p>div with border and text-aligned to center</p><p>paragraph with green color</p><p>h1 with an underline</p></div></body></html>
CSS Class Selector
CSS class selector selects an element with a specific class attribute. The class selector is defined using a period (.) followed by the class name.
}
</style></head><body><div class="style-div"><h1 class="style-h1">class selector</h1><p class="style-p">class .style-p applied</p><p>No class applied on this p element</p></div></body></html>
CSS ID Selector
CSS ID selector selects an element with a specific value for its id attribute. It is denoted by the “#” (hash) symbol.
}
</style></head><body><div id="style-div"><h1 id="style-h1">ID selector</h1><p id="style-p">id #style-p applied</p><p>No id applied on this p element</p></div></body></html>
CSS Attribute Selector
CSS attribute selector selects an element based on a specific attribute or attribute values on an element.
Syntax
The syntax for the attribute selector is as follows:
a[target]{background-color: peachpuff;}
You can also specify the element with an attribute having a specific value.
}
</style></head><body><h2>Attribute selector</h2><p>Styling applied to anchor element with target attribute:</p><a href="#">Tutorialspoint</a><a href="#" target="_blank">google</a><a href="#" target="_self">wikipedia</a></body></html>
CSS Group Selector
CSS group selector allow us to apply same style to multiple elements at a time. Name of elements are comma-separated. The group selector keep CSS concise and avoid redundancy.
Syntax
The syntax for the group selector is as follows:
/* Apply same background color for h1 and h2 */h1, h2{background-color: grey;}
Example
The following example shows how to use group selectors in CSS. We have set the background color for the headings and other HTML elements with reduced code.
<html><head><style>
/* This applies to both <h1> and <h2> elements */
h1, h2 {
background-color: grey;
padding: 4px;
}
/*Applies to all paragraphs, elements with class*/
/*'highlight', and element with ID 'hightlightSpan'*/
p, .highlight, #hightlightSpan {
background-color: yellow;
padding: 10px;
}
</style></head><body><h1>CSS Selectors</h1><h2>Group Selectors</h2><p>This is a paragraph.</p><div class="highlight">
This is div
</div><br><span id="hightlightSpan">
This is span
</span></body></html></pre>
CSS Pseudo-class Selector
CSS pseudo-class selector styles a specific state of an element, such as :hover is used to style an element when hovered.
Syntax
The syntax for the pseudo-class selector is as follows:
a :hover{background-color: peachpuff;color: green;font-size: 2em;}
Example
The following example demonstrates the use of a pseudo-class selector. The font size, text and background color of the link changes on hovering over it.
}
</style></head><body><h2>Pseudo-class selector</h2><p>Styling applied to anchor element with a pseudo-class:</p><a href="#">Tutorialspoint</a></body></html>
CSS Pseudo-element Selector
CSS pseudo-element selector is used to style a specific part of an element rather than the element itself.
Syntax
The syntax for the pseudo-element selector is as follows:
a::before{content:url();}
Example
The following example demonstrates the use of a pseudo-element selector (::before) and (::after):
<html><head><style>
/* Add and style contents before paragraph */
p::before {
content: "Note: ";
font-weight: bold;
color: red;
}
/* Add and style contents after paragraph */
p::after {
content: " [Read more]";
font-style: italic;
color: blue;
}
</style></head><body><h2>Pseudo-element selector</h2><p>This is a paragraph.</p></body></html>
CSS Descendant Selector
CSS descendant selector styles all the tags which are child of a particular specified tag. To mention as descendant, a single space between parent and child element is used.
Syntax
The syntax for the descendant selector is as follows:
div p{color: blue;}
The above code set text color of paragraph tags that are inside div element to blue.
Example
The following example show how to use descendant selector in css. We have changed the text color of the paragraph element that is immediate child of the div element:
<!DOCTYPE html><html lang="en"><head><style>
div{
border: 2px solid;
}
div p {
color: blue;
}
</style></head><body><div><p>
This paragraph is inside a div
and will be blue.
</p><section><p>
This paragraph is inside a
section which is inside a
div and will also be blue.
</p></section></div><p>
This paragraph is outside the div
and will not be blue.
</p></body></html>
CSS Child Selector
CSS child selector selects all the direct child of a particular element. This is denoted by '>' (Greater than) symbol.
Syntax
The syntax for the child selector is as follows:
div > p{color: blue;}
The above code set text color of paragraph tags that are directly inside div element to blue.
Example
The following example shows how to use child selector in css:
<!DOCTYPE html><html lang="en"><head><style>
div{
border: 2px solid;
}
div > p {
color: blue;
}
</style></head><body><div><p>
This paragraph is inside a div and
will be blue.
</p><section><p>
This paragraph is inside a
section which is inside a div
and will not be blue as this
is not direct child
</p></section></div><p>
This paragraph is outside the div
and will not be blue.
</p></body></html></pre>
CSS Adjacent Sibling Selectors
CSS adjacent sibling selector selects an element that is immediately preceded by a specified element. A plus symbol ( "+" ) is used to denote adjacent sibling.
Syntax
The syntax of adjacent sibling selector is as follows:
h1 + p{margin-top: 0;}
The above code sets top margin of paragraph tag just after h1 tag to 0.
Example
The following example shows how to use adjacent sibling selector in css.
<!DOCTYPE html><html lang="en"><head><style>
div{
border: 4px solid;
}
div + p {
color: blue;
}
</style></head><body><p>
This paragraph is above the div
and will not be blue
</p><div><p>
This paragraph is inside a div
and will not be blue.
</p></div><p>
This paragraph 1 after the div
and will be blue.
</p><p>This paragraph 2 after the
div and will not be blue.
</p></body></html></pre>
CSS General Sibling Selector
general sibling selector targets all the element that is preceded by a specified element. The general sibling selector is denoted by tilde symbol ( "~" ).
Syntax
The syntax of general sibling selector is as follows:
h1 ~ p{color: gray;}
The above code sets text color of all the paragraph after h1 tag to gray.
Example
The following example shows how to use general sibling selector in css:
<!DOCTYPE html><html lang="en"><head><style>
div{
border: 4px solid;
}
div ~ p {
color: blue;
}
</style></head><body><p>
This paragraph is above the div
and will not be blue
</p><div><p>
This paragraph is inside a div
and will not be blue.
</p></div><p>
This paragraph 1 after the div
and will be blue.
</p><p>This paragraph 2 after the
div and will be blue.
</p></body></html></pre>
CSS Nested Selectors
CSS nesting allows to nest one style rule inside another rule, with the selector of the child rule relative to the selector of the parent rule.
Characteristics
The nesting selector shows the relationship between the parent and child rules.
When the nested selectors are parsed by the browser, it automatically adds a whitespace between the selectors, thus creating a new CSS selector rule.
In situations where the nested rule needs to be attached to the parent rule (without any whitespace), like while using the pseudo-class or compound selectors, the & nesting selector must be prepended immediately to achieve the desired result.
In order to reverse the context of rules, the & nesting selector can be appended.
There can be multiple instances of & nesting selector.
Syntax
The syntax for the nesting selector is as follows:
CSS Units define the measurement system used to specify the values. CSS offers a number of different units for expressing length and measurement. CSS unit is used to specify the property size for a page element or its content.
There are a number of ways to specify and measure length in CSS. It is used to specify margins, padding, font size, width, height, border, etc.
For example – font-size: 50px, here number 50 has a suffix px i.e., pixel, it is a CSS measurement unit.
There should be no whitespace between the number and the unit. The unit can be left out when the value is 0.
Length Units
Length units can be categorized into two types:
Absolute units: Fixed unit lengths that does not depend on screen width.
Relative units: Responsive unit lengths that changes according to screen width.
Absolute Length Units
These units are categorized as fixed-length units, which means that lengths specified with absolute units maintain an exact, unchanged size on the screen.
These units prove to be very effective when the browser has comprehensive information about the properties of the screen, the printer being used, or other appropriate user agents.Height: 2pxHeight: 2cmHeight: 2inHeight: 2pt
The following table contains all the types of absolute units:
Unit
Description
Equivalent value
Example
mm
Refers to millimeter, it is used to specify the measurements in millimeters.
1mm = 1/10th of 1cm
font-size: 10mm;
cm
Refers to centimeter, it is used to specify the measurements in centimeters.
1cm = 37.8px = 25.2/64in
font-size: 5cm;
Q
Refers to Quarter-millimeters, it is used to specify the measurements in centimeters.
1Q = 1/40th of 1cm
font-size: 5Q;
in
Refers to inches, it is used to specify the measurement in inches.
1in = 2.54cm = 96px
font-size: 1in;
pt
Refers to point, it is used to specify the measurements in points.
1pt = 1/72 of 1in
font-size: 20pt;
pc
Refers to picas, it is used to specify the measurement in picas.
1pc = 1/6th of 1in
width: 6pc;
px
Refers to pixels, it is used to specify the measurement in pixels.
1px = 1/96th of 1in
font-size: 15px;
Absolute units prove valuable for projects where responsiveness is not a priority. However, they are less beneficial for responsive websites because they do not adjust when screen dimensions change.
Example
Here is an example of absolute units (mm, cm, in, Q) used for font sizes:
Relative length units are measured in relation to other elements or viewport of the screen.
Relative units are great for styling responsive websites because they can be adjusted proportionally based on window size or parent elements. These units define lengths relative to other length properties.Height: 3emHeight: 3exHeight: 3lhHeight: 3vh
The following table contains all the types of relative units:
Unit
Description
Example
em
Relative to the font-size of the element.
font-size: 4em;
ex
Relative to the x-height of the current font.
font-size: 4ex;
ch
Relative to width of the "0".
font-size: 4ch;
rem
Relative to font-size of the root element.
font-size: 2rem;
lh
It is relative to the line height of the element.
font-size: 4lh;
rlh
It is relative to the line height of the root element.
font-size: 4rlh;
vh
It is relative to the height of the viewport. 1vh = 1% or 1/100 of the height of the viewport.
font-size: 4vh;
vw
It is relative to the width of the viewport. 1vw = 1% or 1/100 of the width of viewport.
width: 4vw;
vmin
It is relative to the smaller dimension of the viewport. 1vmin = 1% or 1/100 of the viewport's smaller dimension.
width: 4vmin;
vmax
It is relative to the larger dimension of the viewport. 1vmax = 1% or 1/100 of the viewport's larger dimension.
width: 4vmax;
vb
It is relative to the size of the initial containing block in the direction of the root element's block axis. 1vb = 1% of containing block's size (block axis).
font-size: 4vb;
vi
It is relative to the size of the initial containing block in the direction of the root element's inline axis. 1vb = 1% of containing block's size (inline axis).
font-size: 4vi;
svw, svh
It is relative to the width and height of the smaller viewport. 1svw = 1% or 1/100 of the smaller viewport's width and 1svh = 1% or 1/100 of the smaller viewport's height.
width: 40svw; height: 40svh;
lvw, lvh
It is relative to the width and height of the larger viewport. 1lvw = 1% or 1/100 of the larger viewport's width and 1lvh = 1% or 1/100 of the larger viewport's height.
width: 40lvw; height: 40lvh;
dvw, dvh
It is relative to the width and height of the dynamic viewport. 1dvw = 1% or 1/100 of the dynamic viewport's width and 1dvh = 1% or 1/100 of the dynamic viewport's height.
width: 40dvw; height: 40dvh;
Example
Here is an example of relative units (em, rem, vw, vh, %) used for font sizes:
Units px (Pixel) and em (indicates size relative to the size of the font) are two of the measurement units of length. In order to convert px to em, try our free CSS - PX to EM Converter.
CSS stands for “Cascading Style Sheet”. It is a style sheet language used to control the layout and other visual aspects of the web pages. CSS plays an important role in modern web development by providing the tools necessary to create visually appealing, accessible, and responsive websites.
There are three types of CSS which are mentioned below.
Inline CSS
Internal CSS
External CSS
1. Inline CSS
Inline CSS is applied directly to an HTML element using the style attribute. It has the highest priority among the three methods.
Example 1
In this example we have changed the text color using color property and font of the written text using inline CSS properties.
<p>This line is styled using internal CSS.</p>
</body>
</html>
3. External CSS
External CSS is written in a separate .css file and linked to the HTML document using the <link> tag. This is the recommended method for large projects as it improves maintainability.
Example
Here is an example of External CSS having separate files for HTML and CSS.
HTML File
<!-- HTML file --><head><link rel="stylesheet" href="styles.css"></head><body><p>This line is styled using external CSS.</p></body>
You need to include the CSS file in your HTML document before using it. There are multiple ways to include CSS in an HTML file, such as writing inline CSS, internal CSS, or including a CSS file.
Styles can be associated with your HTML document in different ways, such as:
Inline CSS − The CSS styling is placed inside an HTML element tag, which has an effect only on that element.
Internal CSS − The CSS styling is placed inside the <style> tag, under the <head> tag.
External CSS − The CSS styling is placed in an external file (.css extension) inside the <link> tag, under the <head> tag.
Embedded / Inline CSS – <style> Attribute
You can use style attribute of any HTML element to define style rules. These rules will be applied to that element only.
Syntax
Here is the generic syntax −
<element style = "...style rules....">
The value of style attribute is a combination of style declarations separated by semicolon (;).
Example
The following example demonstrates the use of inline css styling:
<html><head></head><body><div style = "border: 5px inset gold; background-color: black; width: 300px; text-align: center;"><h1 style = "color:#36C;">Hello World !!!</h1><p style = "font-size: 1.5em; color: white;">This is a sample CSS code.</p></div></body></html>
Internal CSS – <style> Element
You can put your CSS rules into an HTML document using the <style> element. This tag is placed inside the <head>…</head> tag. Rules defined using this syntax will be applied to all the elements available in the document.
</style></head><body><div><h1>Hello World !!!</h1><p>This is a sample CSS code.</p></div></body></html>
Attributes associated with <style> elements are −
Attribute
Possible Values
Description
type
text/css
Specifies the style sheet language as a content-type (MIME type). This is a required attribute.
media
screenttytvprojectionhandheldprintbrailleauralall
Specifies the device the document will be displayed on. Default value is all. This is an optional attribute.
External CSS – <link> Element
The <link> element can be used to include an external stylesheet file in your HTML document.
An external style sheet is a separate text file with .css extension. You can define all the style rules in this text file and include this file in any HTML document using the <link> element.
Syntax
Here is the generic syntax of including external CSS file −
<head><link type = "text/css" href = "..." media = "..." /></head>
Attributes associated with <style> elements are −
Attribute
Possible Values
Description
type
text css
Specifies the style sheet language as a content-type (MIME type). This attribute is required.
href
URL
Specifies the style sheet file having style rules. This attribute is required.
media
screenttytvprojectionhandheldprintbrailleauralall
Specifies the device the document will be displayed on. Default value is all. This is an optional attribute.
Create a style sheet file with a name ext_style.css having the following rules −
Now you can include this file ext_style.css in any HTML document as follows −
<head><link type = "text/css" href = "ext_style.css"/></head>
Following example demonstrates how to include an external css file in an HTML file:
<html><head><link type = "text/css" href = "ext_style.css"/></head><body><div><h1>Hello World !!!</h1><p>This is a sample CSS code.</p></div></body></html>
Imported CSS – @import Rule
The @import is used to import an external stylesheet in a manner similar to the <link> element. The only key point to remember is, the @import rule must be declared on top of the document. Here is the generic syntax of @import rule.
Syntax
Refer the following two css files − style.css and demostyle.css
style.css
body {
   background-color: peachpuff;
}
demostyle.css
@import url("style.css");
h1 {
color: #36CFFF;
}
p {
font-size: 1.5em;
color: white
}
div {
border: 5px inset gold;
background-color: black;
width: 300px;
text-align: center
}
You just need to include the stylesheet, that has @import rule defined, in the <link> tag in the HTML document as follows −
<head><link type = "text/css" href = "demostyle.css"></head>
Example
Following example demonstrates the use of @import rule, where one stylesheet can be imported into another stylesheet:
<html><head><link type = "text/css" href = "demostyle.css"></head><body><div><h1>Hello World !!!</h1><p>This is a sample CSS code.</p></div></body></html>
CSS Rules Overriding
We have discussed different ways to include style sheet rules in an HTML document. Here is the rule to override any Style Sheet Rule.
Any inline style sheet takes highest priority. So, it will override any rule defined in <style>…</style> tags or rules defined in any external style sheet file.
Any rule defined in <style>…</style> tags will override rules defined in any external style sheet file.
Any rule defined in external style sheet file takes lowest priority, and rules defined in this file will be applied only when above two rules are not applicable.
CSS Comments Inclusion
Many times, you may need to put additional comments in your style sheet blocks. So, it is very easy to comment any part in style sheet. You can simple put your comments inside /*…..this is a comment in style sheet…..*/.
You can use /* ….*/ to comment multi-line blocks.
Example
<html><head><style>
  h1 {
     color: #36CFFF;
  }
  p {
     font-size: 1.5em;
     color: red;
     /* This is a single-line comment */
     text-align: center;
  }

  div {
     border: 5px inset gold;
     /* This is a multi-line comment
     background-color: black;
     width: 300px;
     text-align: center;
     */
  }   </style></head><body><div><h1>Hello World !!!</h1><p>This is a sample CSS code.</p></div></body></html>
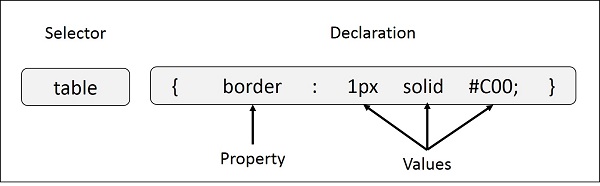
CSS stands for Cascade Style Sheet is popular stylesheet language used to design an interactive webpage. In this tutorial we will learn CSS syntax and usages of CSS along with HTML.
CSS Syntax
Following is the syntax of styling using CSS.
selector{property: value;}
Selector: CSS selectors are used to select the HTML element or groups of elements you want to style on a web page.
Property: A CSS property is an aspect or characteristic of an HTML element that can be styled or modified using CSS, such as color, font-size, or margin.
Value: Values are assigned to properties. For example, color property can have value like red, green etc.
For Example:
Multiple Style Rules
If you want to define multiple rules for a single selectors you can specify those in single block separated by a semicolon (;).
/* Style all the paragraphs */
p {
background-color: black;
color: white;
padding: 5px;
}
/* Style all elements with class 'special' */
.special {
color: lightblue; /* Change text color */
}
</style></head><body><p>
This a normal paragraph...
</p><br><p class="special">
This is a paragraph with class special...
</p><br><div class="special">
This is a div with class special...
</div></body></html></pre>
CSS Selectors Syntax
CSS Selectors are used to select the HTML elements you want to style on a web page. They allow you to target specific elements or groups of elements to apply styles like colors, fonts, margins, and more. Different types of selectors are mentioned below:
Universal Selector
Universal selectors select and apply styles to all elements in an HTML document.
*{font-family: Verdana, sans-serif;color: green;}
Element Selectors
Element selectors select specific HTML elements.
h1{color: #04af2f;}
Class Selectors
Class selectors select and style an element with a specific value for its class attribute.
.myDiv{color: #04af2f;}
Id Selectors
Id selectors select a single element with a particular value for the id attribute.
#myDiv{color: #04af2f;}
Attribute Selectors
Attribute selectors select an element based on a specific attribute value.
a[target]{background-color: peachpuff;}
Example: This example demonstrates the types of selectors mentioned above.
<h3>CSS selectors Example</h3>
<div id="myDiv">This is a div element.</div>
<p class="para">This is a paragraph element.</p>
<a href="/css/css_padding.htm" target="_blank">This is a Link</a>
</body>
</html>
CSS Grouping and Nesting Syntax
Grouping and nesting selectors allow us to apply the same style to multiple elements at a time.
CSS Grouping Selector Syntax
Grouping selectors are comma-separated and used to select multiple elements and style them at a time.
div, p{background-color: #04af2f;color: white;}
CSS Nesting Syntax
Nesting allows the nesting of one specific style rule within another.
div p{background-color: #04af2f;color: white;font-size: 20px;letter-spacing: 1px;}
CSS Pseudo-Classes & Pseudo-Elements Syntax
Pseudo-class and pseudo-element, both select specific types of elements. The pseudo class defines the style for a specific state while the pseudo element targets a specific part of an element./p>
CSS Pseudo-Element Syntax
CSS pseudo-element styles specific parts of an element.
p:before{content:"NOTE:";font-weight: bold;}
CSS Pseudo-Class Syntax
CSS pseudo-class in CSS is used to select and style elements based on their state.
a:hover{color: red;}
CSS Inclusion Syntax
CSS can be used in any HTML document using three different methods which are: inline CSS, internal CSS, and external CSS.
Inline CSS Syntax
Inline CSS are used directly within HTML tags.
<div style="color: #04af2f;">Welcome to TutorialsPoint.</p>
Internal CSS Syntax
Internal CSS is used within the head section of an HTML document using a style tag.
<style>
body {
background-color: #04af2f;
}
</style>
External CSS Syntax
External CSS is written in a separate file having a .css extension and linked to the HTML document using link tag.
CSS media queries apply different CSS styles based on the screen size, resolution, and other characteristics and are often used for creating responsive designs.