Category: Basic

  • Image Gallery

    CSS Image gallery is used to organize and display images in responsive and visually appealing format. CSS properties can be used to control the layout of images, size, shape, spacing, spanning and lot of other visual effects. In this tutorial we will learn all of those.

    CSS image galleries are commonly used on websites to display products, portfolios, or other visual content in a visually appealing way.

    Following is a simple example of image gallery of courses.

    Gallery Image 2
    Gallery Image 3
    Gallery Image 4
    Gallery Image 5

    Table of Contents

    • Create a Image Gallery In CSS
    • Example of CSS Image Gallery
    • Design Simple Image Gallery
    • Image Gallery With Hover Effect
    • Horizontal Scroll Image Gallery
    • Vertical Scroll Image Gallery
    • CSS Grid Layout Image Gallery
    • Responsive Image Gallery
    • CSS Tabbed Image Gallery
    • CSS Image Gallery Slideshow

    To create a simple image gallery, you can follow these steps:

    • Set Up the HTML Structure: Create a container (e.g., a <div>) to hold all your images. And use <img> tag to render images one by one.
    • Prepare Images: Ensure all images have consistent dimension. If images are of different dimension, fix a common height (or in some case width) for all images in layout so that width can be adjusted according to height.
    • Style the Layout: Use CSS grid layout system to define layout of container. You can then define number of columns needed for gallery or spanning of large images using various properties of grid layout system.
    • Make It Responsive: Use CSS media queries to adjust the number of columns or the size of the images based on the screen size.
    • Add Hover Effects: Use CSS :hover pseudo-class add effects like scaling, border changes, or shadow effects when user hovers mouse over images.

    To display a simple image gallery we can use flexbox layout system. Flexbox is one dimensional layout system, that can be used to display images or any html elements either horizontally or vertically. Even though we have flex wrap property to multiple rows as shown in example, we does not have complete control of two dimensional display as there in grid layout.

    Example

    <!DOCTYPE html><html><head><style>
    
        .image-gallery {
            display: flex;
            gap: 20px;
            flex-flow: row wrap;
            justify-content: space-around;
            align-items: center;
        }
        .image-gallery img {
            width: auto;
            height: 70px;
            border: 3px solid #555;
            border-radius: 10px;
        }
    &lt;/style&gt;&lt;/head&gt;&lt;body&gt;&lt;div class="image-gallery"&gt;&lt;img src="/css/images/css.png" alt="css"&gt;&lt;img src="/css/images/html.png" alt="html"&gt;&lt;img src="/css/images/css.png" alt="css"&gt;&lt;img src="/css/images/html.png" alt="html"&gt;&lt;img src="/css/images/css.png" alt="css"&gt;&lt;img src="/css/images/html.png" alt="html"&gt;&lt;img src="/css/images/css.png" alt="css"&gt;&lt;img src="/css/images/html.png" alt="html"&gt;&lt;/div&gt;&lt;/body&gt;&lt;/html&gt;</pre>

    We can use pseudo-class :hover to style mouse over image state. Effect like increased size, border color change will make image gallery looks interactive to user.

    Example

    <!DOCTYPE html><html><head><style>
    
        .image-gallery {
            display: flex;
            gap: 20px;
            flex-flow: row wrap;
            justify-content: space-around;
            align-items: center;
        }
        .image-gallery img {
            width: auto;
            height: 70px;
            border: 3px solid #555;
            border-radius: 10px;
        }
        img:hover{
            transform: scale(1.1);
            border: 3px solid #555;
        }
    &lt;/style&gt;&lt;/head&gt;&lt;body&gt;&lt;div class="image-gallery"&gt;&lt;img src="/css/images/css.png" alt="css"&gt;&lt;img src="/css/images/html.png" alt="html"&gt;&lt;img src="/css/images/css.png" alt="css"&gt;&lt;img src="/css/images/html.png" alt="html"&gt;&lt;img src="/css/images/css.png" alt="css"&gt;&lt;img src="/css/images/html.png" alt="html"&gt;&lt;img src="/css/images/css.png" alt="css"&gt;&lt;img src="/css/images/html.png" alt="html"&gt;&lt;/div&gt;&lt;/body&gt;&lt;/html&gt;</pre>

    The example shows how to create an image gallery with a horizontal scrollable layout using the overflow property

    Example

    <!DOCTYPE html><html><head><style>
    
    
        .image-gallery {
            display: flex;
            flex-direction: row; /* Arrange images horizontally */
            gap: 20px;
            height: 200px;
            width: 900px; /* Set a fixed width for the gallery */
            overflow-x: auto; /* Enable vertical scrolling */
            padding: 10px;
        }
    
        .image-gallery img {
            width: auto;
            height: 70px;
            border: 3px solid #555;
            border-radius: 10px;
        }
    
        img:hover {
            transform: scale(1.1);
            border: 3px solid #555;
        } 
    
    &lt;/style&gt;&lt;/head&gt;&lt;body&gt;&lt;div class="image-gallery"&gt;&lt;img src="/css/images/css.png" alt="css"&gt;&lt;img src="/css/images/html.png" alt="html"&gt;&lt;img src="/css/images/css.png" alt="css"&gt;&lt;img src="/css/images/html.png" alt="html"&gt;&lt;img src="/css/images/css.png" alt="css"&gt;&lt;img src="/css/images/html.png" alt="html"&gt;&lt;img src="/css/images/css.png" alt="css"&gt;&lt;img src="/css/images/html.png" alt="html"&gt;&lt;/div&gt;&lt;/body&gt;&lt;/html&gt;</pre>

    The following example shows how to create an image gallery with a vertical scrollable layout using the overflow property.

    Example

    <!DOCTYPE html><html><head><style>
    
    
        .image-gallery {
            display: flex;
            flex-direction: column; /* Arrange images vertically */
            gap: 20px;
            justify-content: flex-start;
            align-items: center;
            height: 300px; /* Set a fixed height for the gallery */
            overflow-y: auto; /* Enable vertical scrolling */
            padding-right: 10px;
        }
    
        .image-gallery img {
            width: auto;
            height: 70px;
            border: 3px solid #555;
            border-radius: 10px;
        }
    
        img:hover {
            transform: scale(1.1);
            border: 3px solid #555;
        }
    
    &lt;/style&gt;&lt;/head&gt;&lt;body&gt;&lt;div class="image-gallery"&gt;&lt;img src="/css/images/css.png" alt="css"&gt;&lt;img src="/css/images/html.png" alt="html"&gt;&lt;img src="/css/images/css.png" alt="css"&gt;&lt;img src="/css/images/html.png" alt="html"&gt;&lt;img src="/css/images/css.png" alt="css"&gt;&lt;img src="/css/images/html.png" alt="html"&gt;&lt;img src="/css/images/css.png" alt="css"&gt;&lt;img src="/css/images/html.png" alt="html"&gt;&lt;/div&gt;&lt;/body&gt;&lt;/html&gt;</pre>

    CSS grid layout is most commonly used layout system for designing image gallery, with this we can align images in 2 dimensional manner. Let us see an example for this.

    Example

    <!DOCTYPE html><html><head><style>
    
        /* Gallery container */
        .gallery {
            display: grid;
            gap: 10px;
            padding: 10px;
            font-family: Arial, sans-serif;
        }
        /* style image items */
        .gallery img {
            width: 100%;
            height: 100px; /* Set a same height for all images */
            object-fit: fit;
            display: block;
            border-radius: 8px;
            border: 3px solid #ccc;
            transition: all 0.3s ease;
        }
        /* Spanning the first image across two rows */
        .gallery img:first-child {
            grid-row: span 2;
            height: 210px; /* Double the height of regular images */
        }
        /* Spanning the sixth image across two columns */
        .gallery img:nth-child(6) {
            grid-column: span 2;
        }
        /* Hover effect */
        .gallery img:hover {
            transform: scale(1.02);
            border-color: #555 ; 
        }
    &lt;/style&gt;&lt;/head&gt;&lt;body&gt;&lt;div class="gallery"&gt;&lt;img src="/w3css/images/w3css_pdfcover.jpg" alt="Gallery Image 1"&gt;&lt;img src="/css/images/html.png" alt="Gallery Image 2"&gt;&lt;img src="/css/images/css.png" alt="Gallery Image 3"&gt;&lt;img src="/css/images/html.png" alt="Gallery Image 4"&gt;&lt;img src="/css/images/css.png" alt="Gallery Image 5"&gt;&lt;img src="/html/images/logo.png" alt="Gallery Image 6"&gt;&lt;/div&gt;&lt;/body&gt;&lt;/html&gt;</pre>

    We can use CSS media queries to create a responsive image gallery that scales and rearranges its content based on the screen width, providing an optimal viewing experience on different devices and screen sizes. On smaller screens, the images will be wider and more spaced apart.

    @media [screen width condition] {
    
    /* CSS rules to apply if the media query matches */
    }

    With media queries we can also define style for specific orientation (landscape or portrait) of user device. The default value for this is portrait.

    Example

    <!DOCTYPE html><html><head><style>
    
        /* Gallery container */
        .gallery {
            display: grid;
            gap: 10px;
            padding: 10px;
            font-family: Arial, sans-serif;
        }
        /* 4 columns in case of large screen */
        @media (min-width: 600px) {
            .gallery {
                grid-template-columns: repeat(4, 1fr);
            }
        }
        /* 1 column in case of small screen */
        @media (max-width: 599px) {
            .gallery {
                grid-template-columns: 1fr;
            }
        }
        /* Individual image items */
        .gallery img {
            width: 100%;
            height: 100px; /* Set a same height for all images */
            object-fit: fit; /* Ensure images fits the area */
            display: block;
            border-radius: 8px;
            border: 3px solid #ccc; /* Default border color */
            transition: all 0.3s ease;
        }
        /* Spanning the first image across two rows */
        .gallery img:first-child {
            grid-row: span 2;
            height: 210px; /* Double the height of regular images */
        }
        /* Spanning the sixth image across two columns */
        .gallery img:nth-child(6) {
            grid-column: span 2;
        }
        /* Hover effect */
        .gallery img:hover {
            transform: scale(1.02);
            border-color: #555 ; 
        }
    &lt;/style&gt;&lt;/head&gt;&lt;body&gt;&lt;div class="gallery"&gt;&lt;img src="/w3css/images/w3css_pdfcover.jpg" alt="Gallery Image 1"&gt;&lt;img src="/css/images/html.png" alt="Gallery Image 2"&gt;&lt;img src="/css/images/css.png" alt="Gallery Image 3"&gt;&lt;img src="/css/images/html.png" alt="Gallery Image 4"&gt;&lt;img src="/css/images/css.png" alt="Gallery Image 5"&gt;&lt;img src="/html/images/logo.png" alt="Gallery Image 6"&gt;&lt;/div&gt;&lt;/body&gt;&lt;/html&gt;</pre>

    A tabbed image gallery means images are arranged in such a way that initially smaller version of images will be displayed and when you click on that small image, a larger version of the same image will open. Let's see how to design it.

    Example

    <!DOCTYPE html><html><head><style>
    
        .image-gallery {
            display: flex;
            justify-content: space-around;
            gap: 20px;
            height: 200px;
        }
        .image-container { 
            display: flex;
            justify-content: center;
            align-items: center;
            width: 25%;
            height: 200px;
        }
        .image-container img {
            width: auto;
            height: 50px;
            cursor: pointer; 
        }
        .gallery-tab {
            display: none;
            position: fixed;
            left: 0;
            top: 0;
            width: 100%;
            height: 100%;
            background-color: rgba(0, 0, 0, 0.8);
            justify-content: center;
            align-items: center;
        }
        .tab-content {
            display: flex;
            justify-content: space-around;
            width: 80%;
            max-height: 80%;
        }
        .tab-content img {
            width: 150px;
            height: auto;
        }
    &lt;/style&gt;&lt;/head&gt;&lt;body&gt;&lt;h1&gt;Click on the images:&lt;/h1&gt;&lt;div class="image-gallery"&gt;&lt;div class="image-container" onclick="opentab('img2')"&gt;&lt;img src="/css/images/html.png" alt="Gallery Image 2" id="img2"&gt;&lt;/div&gt;&lt;div class="image-container" onclick="opentab('img3')"&gt;&lt;img src="/css/images/css.png" alt="Gallery Image 3" id="img3"&gt;&lt;/div&gt;&lt;div class="image-container" onclick="opentab('img4')"&gt;&lt;img src="/css/images/html.png" alt="Gallery Image 4" id="img4"&gt;&lt;/div&gt;&lt;div class="image-container" onclick="opentab('img5')"&gt;&lt;img src="/css/images/css.png" alt="Gallery Image 5" id="img5"&gt;&lt;/div&gt;&lt;/div&gt;&lt;div id="tab" class="gallery-tab" onclick="closetab()"&gt;&lt;div class="tab-content"&gt;&lt;img id="tabImg"&gt;&lt;/div&gt;&lt;/div&gt;&lt;script&gt;
        function opentab(imageId) {
            var tab = document.getElementById("tab");
            var tabImg = document.getElementById("tabImg");
            tab.style.display = "flex";
            tabImg.src = document.getElementById(imageId).src;
        }
        function closetab() {
            document.getElementById("tab").style.display = "none";
        }
    &lt;/script&gt;&lt;/body&gt;&lt;/html&gt;</pre>

    By using CSS and JavaScript we can create a simple slideshow gallery. The gallery has several images, and only one image is shown at a time. You can click the left and right arrows to move through the images. To understand code, you have to be well versed with JavaScript.

    Example

    <!DOCTYPE html><html><head><style>
    
        .container{
            display: flex;
            flex-direction: column;
            justify-content: space-around;
            width: 60%;
        }
        .slideshow-container {
            position: relative;
            width: 100%;
            overflow: hidden;
        }
        .image-gallery {
            display: flex;
            transition: transform 0.5s ease-in-out;
        }
        .image-container {
            width: 100%;
            height: 100%;
        }
        .image-container img {
            width: 100%;
            height: 100%;
        }
        .prev-img, .next-img {
            cursor: pointer;
            position: absolute;
            top: 50%;
            width: auto;
            padding: 16px;
            margin-top: -22px;
            background-color: rgba(0, 0, 0, 0.5);
            color: white;
            font-weight: bold;
            font-size: 18px;
            transition: 0.6s ease;
        }
        .next-img {
            right: 0;
        }
        .prev-img:hover, .next-img:hover {
            background-color: rgba(0, 0, 0, 0.8);
        }
        .bottom-img-container {
            text-align: center;
            margin-top: 20px;
        }
        .bottom-img {
            height: 40px; 
            width: 50px; 
            margin: 0 10px; 
            cursor: pointer;
            opacity: 0.5; 
        }
        .bottom-img.current-bottom-img {
            opacity: 1; 
        }
    &lt;/style&gt;&lt;/head&gt;&lt;body&gt;&lt;div class="container"&gt;&lt;div class="slideshow-container"&gt;&lt;div class="image-gallery"&gt;&lt;div class="image-container"&gt;&lt;img src="/css/images/scenery.jpg" &gt;&lt;/div&gt;&lt;div class="image-container"&gt;&lt;img src="/css/images/scenery3.jpg" &gt;&lt;/div&gt;&lt;div class="image-container"&gt;&lt;img src="/css/images/scenery4.jpg"&gt;&lt;/div&gt;&lt;/div&gt;&lt;a class="prev-img" onclick="slides(-1)"&gt;&lt;/a&gt;&lt;a class="next-img" onclick="slides(1)"&gt;&lt;/a&gt;&lt;/div&gt;&lt;div class="bottom-img-container"&gt;&lt;img class="bottom-img current-bottom-img" 
             src="/css/images/scenery.jpg" onclick="activeSlides(1)"&gt;&lt;img class="bottom-img" 
             src="/css/images/scenery3.jpg" onclick="activeSlides(2)"&gt;&lt;img class="bottom-img" 
             src="/css/images/scenery4.jpg" onclick="activeSlides(3)"&gt;&lt;/div&gt;&lt;/div&gt;&lt;script&gt;
        var index = 1;
        displaySlides(index);
        function slides(n) {
            displaySlides(index += n);
        }
        function activeSlides(n) {
            displaySlides(index = n);
        }
        function displaySlides(n) {
            var i;
            var allSlides = document.getElementsByClassName("image-container");
            var allThumbnails = document.getElementsByClassName("bottom-img");
            if (n &gt; allSlides.length) {
                index = 1;
            }
            if (n &lt; 1) {
                index = allSlides.length;
            }
            for (i = 0; i &lt; allSlides.length; i++) {
                allSlides[i].style.display = "none";
            }
            for (i = 0; i &lt; allThumbnails.length; i++) {
                allThumbnails[i].className = 
                        allThumbnails[i].className.replace(" current-bottom-img", "");
                allThumbnails[i].style.filter = "brightness(50%)";
            }
            allSlides[index - 1].style.display = "block";
            allThumbnails[index - 1].className += " current-bottom-img";
            allThumbnails[index - 1].style.filter = "brightness(100%)";
        }
    &lt;/script&gt;&lt;/body&gt;&lt;/html&gt;</pre>
  • Icons

    CSS icons are used to add graphical representations, symbols, or small images to web elements. They serve several purposes in web development, such as:

    Table of Contents

    • Importance of Icon
    • How to add Icons to a Webpage?
    • Icons using SVG
    • Icons using icon fonts
    • Icons using images
    • Icons using Pseudo-Elements
    • Icons using Google Icons
    • Bootstrap Icons

    Importance of Icon

    • Enhanced user experience: Provides visual cues and context to various elements on a webpage, like instead of adding the text save, delete, etc. you may add an icon to represent them.
    • Reduced load time: CSS icons are often lightweight compared to traditional image icons, which means they can load quickly, reducing the overall page load time.
    • Scalability: CSS icons can be easily scaled up or down without loss of quality. It is important for responsive web designing.
    • Customization: CSS icons can be customized by changing their size, color, and other visual properties using CSS rules. This flexibility allows you to match the icons to your website’s overall design and branding.
    • Accessibility: CSS icons can be styled to meet accessibility standards, such as providing alternative text for screen readers.
    • Reduced HTTP Requests: Using CSS icons can reduce the number of HTTP requests made by a webpage since they are often part of the stylesheet.

    How to Add Icons to a Webpage?

    • Inline SVGs: Involves embedding SVG (Scalable Vector Graphics) directly into your HTML code. You can create or obtain SVG icons and insert them as inline elements.
    • Icon fonts: Icon fonts are custom fonts that contain icons as glyphs. You can use these fonts to display icons by setting the appropriate font-family and specifying the icon’s Unicode character.
    • CSS background images: You can use CSS background images to display icons by setting the background-image property on an element.
    • Pseudo-elements: Involves using the ::before and ::after pseudo-elements to insert content before or after an HTML element and then styling that content to display an icon.
    • CSS Libraries and Frameworks: Many CSS libraries and frameworks, like Font Awesome, Material Icons, and Google Icons, provide pre-designed sets of icons that you can easily include in your projects. They often come with ready-to-use classes or utility classes.

    Icons Using SVG

    In HTML <svg> tag can be used to create custom icons using d attribute of <path>.

    The d attribute of the <path> tag in SVG defines the shape of the path using a series of commands and parameters in a predefined syntax, representing lines, curves, and other geometric shapes. These commands include moveto (M), lineto (L), curveto (C), and others, each followed by coordinates or control points that specify the path’s structure.

    Example

    <!DOCTYPE html><html><head><style>
    
        .icon {
            width: 24px; 
            height: 24px; 
            fill: #000; 
            margin-left: 15px;
        }
    &lt;/style&gt;&lt;/head&gt;&lt;body&gt;&lt;h1&gt;SVG Icons&lt;/h1&gt;&lt;!-- Search Icon --&gt;&lt;svg class="icon" xmlns="http://www.w3.org/2000/svg" viewBox="0 0 24 24"&gt;&lt;path d="M23.707 22.293l-6.364-6.364C18.454 14.68 19 13.418
                 19 12c0-3.866-3.134-7-7-7s-7 3.134-7 7 3.134 7 7 7c1.418 
                 0 2.68-.546 3.929-1.071l6.364 6.364a1 1 0 0 0 1.414-1.414zM5 
                 12c0-3.309 2.691-6 6-6s6 2.691 6 6-2.691 6-6 6-6-2.691-6-6z"/&gt;&lt;/svg&gt;&lt;!-- Download Icon --&gt;&lt;svg class="icon" xmlns="http://www.w3.org/2000/svg" viewBox="0 0 24 24"&gt;&lt;path d="M19 14v7H5v-7H3v7c0 1.1.9 2 2 2h14c1.1 0 2-.9 2-2v-7h-2zm-7-9h2v7h3l-4 4-4-4h3V5zm-1-2h4V0h-4v3z"/&gt;&lt;/svg&gt;&lt;!-- Cloud Icon --&gt;&lt;svg class="icon" xmlns="http://www.w3.org/2000/svg" viewBox="0 0 24 24"&gt;&lt;path d="M19.35 10.04c.63-.34 1.22-.79 1.68-1.35C21.47 6.39 19.76 4 
                 17 4c-2.33 0-4.31 1.45-5.13 3.5H11.5C8.42 7.5 6 9.92 6 13s2.42
                 5.5 5.5 5.5h7c3.04 0 5.5-2.46 5.5-5.5-.01-2.52-1.65-4.67-4-5.46l.35.5z"/&gt;&lt;/svg&gt;&lt;!-- Home Icon --&gt;&lt;svg class="icon" xmlns="http://www.w3.org/2000/svg" viewBox="0 0 24 24"&gt;&lt;path d="M12 2l10 9h-3v11h-6V14H9v8H3V11H0l12-9z"/&gt;&lt;/svg&gt;&lt;/body&gt;&lt;/html&gt;</pre>

    Icons Using Icon Fonts

    To use icon fonts in your web project, you need to follow this steps:

    • Include the icon font library, Popular choices include Font Awesome, Material Icons, or custom icon fonts.
    • Use <i> tag in HTML and apply the icon font class to it. Then, specify the Unicode character for the desired icon.

    Example

    <!DOCTYPE html><html><head><!-- Include Font Awesome --><link rel="stylesheet" 
    
          href=
    "https://cdnjs.cloudflare.com/ajax/libs/font-awesome/6.0.0-beta3/css/all.min.css"><style>
        .icon {
            /* Specify Font Awesome family */
            font-family: "Font Awesome 5 Free"; 
            /* Minimum Font weight for Font Awesome */
            font-weight: 600;
            font-size: 24px; 
            color: #000; 
            margin-right: 15px; 
        }
    &lt;/style&gt;&lt;/head&gt;&lt;body&gt;&lt;h1&gt;CSS font Awesome Icons&lt;/h1&gt;&lt;span class="icon"&gt; &amp;amp#xf002; &lt;/span&gt;&lt;span class="icon"&gt; &amp;amp#xf019; &lt;/span&gt;&lt;span class="icon"&gt; &amp;amp#xf0c2; &lt;/span&gt;&lt;span class="icon"&gt; &amp;amp#xf015; &lt;/span&gt;&lt;/body&gt;&lt;/html&gt;</pre>

    Icons Using Images

    The background-image property in CSS can also used to display icons that are stored at system storage.

    Example

    Following example demonstrates using background image as an icon:

    <DOCTYPE html><html><head><style>
    
        .icon-img {
            width: 30px;
            height: 30px;
            background-image: url('/css/images/logo.png');
            background-size: cover;
        }
    &lt;/style&gt;&lt;/head&gt;&lt;body&gt;&lt;div class="icon-img"&gt;&lt;/div&gt;&lt;/body&gt;&lt;/html&gt;</pre>

    Icons Using Pseudo-Elements

    Pseudo-elements like ::before and ::after can be used to insert an icon before or after an element as demonstrated in the following example.

    To know more about pseudo-elements check out tutorial on CSS Pseudo-Elements.

    Example

    Here in this example we use pseudo element to render icons.

    <DOCTYPE html><html><head><style>
    
        li {
            list-style: none;
        }
        li::before {
            content: url(/css/images/smiley.png);
            margin-right: 15px;
            font-size: 20px;
        }
        p::after {
            content: url(/css/images/smiley.png);
            margin-left: 15px;
            font-size: 5px;
        }
    &lt;/style&gt;&lt;/head&gt;&lt;body&gt;&lt;ul&gt;&lt;li&gt;Butterscotch&lt;/li&gt;&lt;li&gt;Chocolate&lt;/li&gt;&lt;li&gt;Coconut&lt;/li&gt;&lt;/ul&gt;&lt;p&gt; 
        In the above list we made custom label using 
        before pseudo-element, we added icon at the end 
        of this paragraph using ::after pseudo-element. 
    &lt;/p&gt;&lt;/body&gt;&lt;/html&gt;</pre>

    Icons Using Google Icons

    We can also use icons provided by Google Icons in our webpage. This way you can call any icon by just mentioning the name of icon.

    You just need to add the following link in the head section of your html code:

    <link rel="stylesheet" 
    
      href=
    "https://fonts.googleapis.com/icon?family=Material+Icons">

    Note: There is no need to install or download Google icons.

    Example

    Following example demonstrates using Google Icons.

    <DOCTYPE html><html><head><link rel="stylesheet" 
    
          href=
    "https://fonts.googleapis.com/icon?family=Material+Icons"></head><body><h1> Google Fonts Icon </h1><span class="material-icons" style="font-size:40px;">
        pets 
    &lt;/span&gt;&lt;span class="material-icons" style="font-size:40px;"&gt;
        settings
    &lt;/span&gt;&lt;span class="material-icons" style="font-size:40px;"&gt;
        attachment
    &lt;/i&gt;&lt;span class="material-icons" style="font-size:40px;"&gt;
        person
    &lt;/span&gt;&lt;/body&gt;&lt;/html&gt;</pre>

    Bootstrap Icons

    To use Bootstrap icon add following code in head section of your webpage.

    <link rel="stylesheet" 
    
      href=
    "https://maxcdn.bootstrapcdn.com/bootstrap/3.3.7/css/bootstrap.min.css">

    Example

    Following example demonstrates using Bootstrap Icons:

    <!DOCTYPE html><html><head><link rel="stylesheet" 
    
          href=
    "https://maxcdn.bootstrapcdn.com/bootstrap/3.3.7/css/bootstrap.min.css"></head><body><h1> Bootstrap Icons </h3><span class="glyphicon glyphicon-cloud"></span><span class="glyphicon glyphicon-remove"></span><span class="glyphicon glyphicon-user"></span><span class="glyphicon glyphicon-envelope"></span><span class="glyphicon glyphicon-thumbs-up"></span></body></html>
  • Align

    The term alignment, in context of web design and CSS, refers to the positioning and arrangement of elements or content within a layout, typically with respect to specific guidelines or reference points. Alignment is used to create visually pleasing and organized designs by ensuring that elements are positioned relative to each other or to the layout structure in a consistent and harmonious way.

    Alignment can be applied to various types of elements, including text, images, buttons, and more, to create a cohesive and polished design. CSS provides various properties that can be used to align the elements.

    There are two main aspects of alignment:

    • Horizontal alignment: This refers to the positioning of elements along the horizontal axis, which typically runs from left to right. Common horizontal alignment options include:
      • Left alignment: Elements are aligned to the left side of a container or layout.
      • Center alignment: Elements are positioned in the center of a container or layout horizontally.
      • Right alignment: Elements are aligned to the right side of a container or layout.
    • Vertical alignment: This refers to the positioning of elements along the vertical axis, which typically runs from top to bottom. Common vertical alignment options include:
      • Top alignment: Elements are aligned to the top of a container or layout.
      • Middle or Center alignment: Elements are centered vertically within a container or layout.
      • Bottom alignment: Elements are aligned to the bottom of a container or layout.

    CSS Align – position Property

    There are several ways to align an element to left. Let us see few ways to achieve this.

    With the use of the CSS property position, the alignment of elements can be adjusted.

    Here is an example of setting alignment using position:

    <html><head><style>
       .right-alignment {
    
      position: absolute;
      right: 0px;
      width: 100px;
      border: 3px solid #0d1601;
      background-color: rgb(244, 244, 135);
      padding: 10px;
    } .left-alignment {
      position: relative;
      left: 0px;
      width: 100px;
      border: 3px solid #0c1401;
      background-color: blanchedalmond;
      padding: 10px;
    } .center-alignment {
      margin: auto;
      border: 3px solid black;
      padding: 5px;
      background-color: rgb(241, 97, 126);
      width: 120px;
      position: relative;
    } </style></head><body><div class="right-alignment"><h3>Right align</h3><strong>Right align with position:absolute</strong></div><div class="left-alignment"><h3>Left align</h3><strong>Left align with position:relative</strong></div><div class="center-alignment"><h3>Center align</h3><strong>Vertically & horizontally centered using position:relative and margin:auto.</strong></div></body></html>

    Note: Absolute positioned elements are removed from the normal flow, and can overlap elements.

    CSS Align – float Property

    With the use of the CSS property float, the alignment of elements can be adjusted.

    Here is an example of setting alignment using float:

    <html><head><style>
       .right-alignment {
    
      float: right;
      width: 100px;
      border: 3px solid #0d1601;
      background-color: rgb(244, 244, 135);
      padding: 10px;
    } .left-alignment {
      float: left;
      left: 0px;
      width: 100px;
      border: 3px solid #0c1401;
      background-color: blanchedalmond;
      padding: 10px;
    } </style></head><body><div class="right-alignment"><h3>Right align</h3><strong>Right align with float:right</strong></div><div class="left-alignment"><h3>Left align</h3><strong>Left align with float:left</strong></div></body></html>

    CSS Align – text-align Property

    To align the text inside an element, use the property text-align.

    Here is an example to align the text inside a <div> element:

    <html><head><style>
       div {
    
      width: 300px;
      border: 3px solid #0d1601;
      padding: 10px;
      margin-bottom: 1cm;
    } .right-alignment {
      text-align: right; 
      color:red;
    } .left-alignment {
      text-align:left;
      color:green;
    } .center-alignment {
      text-align: center;
      color:blue;
    } </style></head><body><div class="right-alignment"><h3>Right align</h3><strong>Text right aligned</strong></div><div class="left-alignment"><h3>Left align</h3><strong>Text left aligned</strong></div><div class="center-alignment"><h3>Center align</h3><strong>Text center aligned</strong></div></body></html>

    CSS Align – padding Property

    A piece of text can be centered vertically using padding CSS property.

    <html><head><style>
       .center-alignment { 
    
      padding: 100px 0;
      border: 3px solid black; 
      margin: 5px;
      background-color: lightblue;
    } </style></head><body><div class="center-alignment"><p>Vertically centerd using padding.</p></div></body></html>

    CSS Align – Center Text

    Here is an example if you want to center the text vertically as well as horizontally, you need to use text-align:center along with padding:

    <html><head><style>
       .center-alignment { 
    
      padding: 100px 0;
      text-align: center;
      border: 3px solid black; 
      margin: 5px;
      background-color: lightblue;
    } </style></head><body><div class="center-alignment"><p>Vertically & horizontally centerd using padding and text-align properties.</p></div></body></html>

    CSS Align – justify-content Property

    Here is an example if you want to center the text vertically as well as horizontally, using flex and justify-content properties:

    <html><head><style>
       .center-alignment {
    
      display: flex;
      justify-content: center;
      align-items: center;
      height: 300px;
      border: 3px solid black; 
      font-size: larger;
      background-color: lightblue;
    } </style></head><body><div class="center-alignment"><p>Vertically & horizontally centered using flex and justify-content.</p></div></body></html>

    CSS Align – Related Properties

    Following table lists all the properties related to alignment:

    PropertyDescription
    align-contentAligns the content of a flex container along the cross-axis or a grid’s block axis.
    align-itemsControls the alignment of items of a flex container along the cross-axis.
    align-selfControls the alignment of an individual item within a container.
    vertical-alignDetermines the vertical alignment of inline, inline-block or a table cell text.
    line-heightSets the distance between lines of text.
    text-alignSets the horizontal alignment of inline, inline-block or a table cell text.
    marginShorthand for margin values that can modify the alignment.
  • Forms

    Forms are required, when you want to collect some data from the site visitor. They have input fields for users to enter information, labels to identify the input fields, and buttons to submit the form or perform an action.

    We can style HTML forms by changing the appearance of form elements, such as text fields, checkboxes, radio buttons, select menus, and submit buttons.

    HTML Form Sample

    This is a simple form that accept First and Last name with the desired tutorial you wants to learn. Submit button will auto redirect you to our courses page.First Name:Last Name:Tutorial:         Select Tutorial         HTML         CSS         Python         JavaScript     

  • Overlay

    An overlay is a transparent layer of content that is placed on top of another element. It can be used to create different effects, such as a modal window, a tooltip, or a popover.

    The overlay element should be positioned absolutely and have a higher z-index than the content element. This will ensure that the overlay is displayed on top of the content.

    Example of Overlay Effect

    Here you can see overlay effect when you hover mouse on top of TutorialsPoint logo. This types of styling give a dynamic experience for users that are visiting to your webpage.

    Learn CSS

    Table of Contents

    • How to Create Overlay Effect?
    • CSS Overlay Basic Example
    • Overlay Effect Using Javascript
    • CSS Overlay Top to Bottom Sliding
    • CSS Overlay Bottom to Top Sliding
    • CSS Overlay Left to Right Sliding
    • CSS Overlay Right to Left Sliding
    • CSS Overlay Fade Effect
    • CSS Overlay Image Title
    • CSS Image Icon Overlay

    How to Create Overlay Effect?

    To create an overlay using CSS, follow these steps:

    • Create the Container: Use a container element to hold the content you want to overlay. A container can be div element, span element or even an image.
    • Set Up the Positioning: Make the container position: relative so that any absolutely positioned elements inside it will be positioned relative to this container.
    • Add the Overlay Element: Inside the container, add another element (the overlay) and set position: absolute to ensure it covers the entire container. Also make sure the overlay’s top, left properties are set to 0 and width, height properties are set to 100%, so it fully covers the container.
    • Style the Overlay: Set the background color of the overlay using rgba() function to give a semi-transparent effect. And initially, set the opacity of the overlay to 0 to make it invisible by default.
    • Add Hover Effect: Use hover pseudo-class to the overlay container to change the overlay’s opacity from 0 to 1 when user moves mouse over container.

    CSS Overlay Basic Example

    The following example shows how to create a simple overlay effect in CSS using above steps.

    Example

    <!DOCTYPE html><html lang="en"><head><style>
    
        .container {
            height: 150px;
            display: flex;
            justify-content: center;
            align-items: center;
            font-family: Arial, sans-serif;
            background-color: #f0f0f0;
        }
        .overlay-container {
            position: relative;
            width: auto; 
            height: auto; 
            display: inline-block;
        }
        img {
            display: block;
            width: 100%;
            height: auto;
        }
        .overlay {
            position: absolute;
            top: 0;
            left: 0;
            width: 100%;
            height: 100%;
            background-color: rgba(0, 128, 0, 0.5); 
            opacity: 0;
            transition: opacity 0.5s ease;
            display: flex;
            justify-content: center;
            align-items: center;
        }
        .overlay-container:hover .overlay {
            opacity: 1;
        }
        .login-button {
            padding: 10px 20px;
            background-color: #ffffff;
            color: #228B22;
            border: 2px solid #228B22;
            border-radius: 5px;
            text-decoration: none;
            font-size: 16px;
            font-weight: bold;
            transition: background-color 0.3s, color 0.3s;
        }
        .login-button:hover {
            background-color: #228B22;
            color: #ffffff;
        }
    &lt;/style&gt;&lt;/head&gt;&lt;body&gt;&lt;div class="container"&gt;&lt;div class="overlay-container"&gt;&lt;img src="/html/images/test.png" alt="Image"&gt;&lt;div class="overlay"&gt;&lt;a href="/css/index.htm" 
               target="_blank" class="login-button"&gt;
                    Learn CSS
            &lt;/a&gt;&lt;/div&gt;&lt;/div&gt;&lt;/div&gt;&lt;/body&gt;&lt;/html&gt;</pre>

    Overlay Effect Using JavaScript

    The following example uses javascript to create an overlay effect that appears when you click a button and disappears when you click anywhere on the page.

    JavaScript can be used to show and hide the overlay div element by using the 'querySelector()' method to get the overlay element. When the button is clicked, a function is executed that toggles the display property of the overlay container between block (visible) and none (hidden).

    Example

    <!DOCTYPE html><html lang="en"><head><style>
    
        .container {
            position: fixed;
            display: none;
            width: 100%;
            height: 100%;
            text-align: center;
            background-color: rgba(213, 86, 207, 0.3);
            z-index: 999; 
            cursor: pointer;
        }
        .content {
            padding: 20px;
        }
        .button {
            background-color: #38dc29; 
            color: white; 
            border: none;
            padding: 20px;
            cursor: pointer;
            font-size: 20px;
            text-align: center; 
            display: block; 
            margin: 50px auto;  
        }
    &lt;/style&gt;&lt;/head&gt;&lt;body&gt;&lt;div class="container" onclick="overlay()"&gt;&lt;h1&gt;TutorialsPoint CSS Overlay&lt;/h1&gt;&lt;/div&gt;&lt;div style="padding:20px"&gt;&lt;button class="button" onclick="overlay()"&gt;
            Click on Button
        &lt;/button&gt;&lt;/div&gt;&lt;script&gt;
        let Visible = false;
        function overlay() {
            const overlay = document.querySelector(".container");
            overlay.style.display = Visible ? "none" : "block";
            Visible = !Visible;
        }
    &lt;/script&gt;&lt;/body&gt;&lt;/html&gt;</pre>

    CSS Overlay Top to Bottom Sliding

    The following example shows an image with an overlay that slides down from the top of the image to the bottom when the user hovers over it

    Example

    <!DOCTYPE html><html lang="en"><head><style> 
    
        img { 
            width: 200px; 
            height: 200px; 
            margin-left: 40%;
        } 
        .overlay-container { 
            position: relative; 
            width: 25%; 
            height: auto;
        }  
        .overlay-container:hover .top-bottom { 
            opacity: 1; 
            height: 200px; 
        } 
        .top-bottom{ 
            position: absolute; 
            transition: 0.9s ease; 
            opacity: 0.3; 
            width: 200px; 
            border-radius: 5px;
            height: 0; 
            top: 0; 
            left: 40%;  
            background-color: #d346e6; 
            text-align: center;
            color: #ffffff;
        }
        h2 {
            text-align: center;
        }   
    &lt;/style&gt;&lt;/head&gt;&lt;body&gt;&lt;h2&gt; Hover your cursor over the image.&lt;/h2&gt;&lt;div class="overlay-container"&gt;&lt;img src= "/css/images/tutimg.png"&gt;&lt;div class="top-bottom"&gt;&lt;h2&gt; Top to Bottom Image Overlay &lt;/h2&gt;&lt;/div&gt;&lt;/div&gt;&lt;/body&gt;&lt;/html&gt;</pre>

    CSS Overlay Bottom to Top Sliding

    The following example shows an image with an overlay effect that slides up from the bottom of the image to the top when the user hovers over it

    Example

    <!DOCTYPE html><html lang="en"><head><style> 
    
        img { 
            width: 200px; 
            height: 200px; 
        } 
        .overlay-container { 
            position: relative; 
            width: 25%; 
            height: auto;
        }  
        .overlay-container:hover .bottom-top { 
            opacity: 1; 
            height: 200px; 
        } 
        .bottom-top { 
            position: absolute; 
            transition: 0.9s ease; 
            opacity: 0.3; 
            width: 200px; 
            border-radius: 5px;
            height: 0; 
            bottom: 0; 
            background-color: #d346e6; 
            text-align: center;
            color: #ffffff;
        }
        h2 {
            text-align: center;
        }   
    &lt;/style&gt;&lt;/head&gt;&lt;body&gt;&lt;h2&gt;Hover your cursor over the image.&lt;/h2&gt;&lt;div class="overlay-container"&gt;&lt;img src= "/css/images/tutimg.png"&gt;&lt;div class="bottom-top"&gt;&lt;h2&gt;Bottom to Top Image Overlay&lt;/h2&gt;&lt;/div&gt;&lt;/div&gt;&lt;/body&gt;&lt;/html&gt;</pre>

    CSS Overlay Left to Right Sliding

    The following example shows an image with an overlay effect that slides from left to right when you hover over it

    Example

    <!DOCTYPE html><html lang="en"><head><style>
    
        img {
            width: 200px;
            height: 200px;             
        }
        .overlay-container {
            position: relative;
            width: 25%;
            height: auto;
        }
        .overlay-container:hover .left-right { 
            opacity: 1;
            width: 200px;
        }
        .left-right { 
            position: absolute;
            transition: 0.9s ease;
            opacity: 0.3;
            width: 0; 
            border-radius: 5px;
            height: 200px; 
            top: 0;
            left: 0; 
            background-color: #d346e6;
            text-align: center;
            color: #ffffff;
        }
        h2 {
            text-align: center;
        }
    &lt;/style&gt;&lt;/head&gt;&lt;body&gt;&lt;h2&gt;Hover your cursor over the image.&lt;/h2&gt;&lt;div class="overlay-container"&gt;&lt;img src="/css/images/tutimg.png"&gt;&lt;div class="left-right"&gt;&lt;h2&gt;Left to Right Image Overlay&lt;/h2&gt;&lt;/div&gt;&lt;/div&gt;&lt;/body&gt;&lt;/html&gt;</pre>

    CSS Overlay Right to Left Sliding

    The following example shows an image with an overlay effect that slides from right to left when you hover over it

    <!DOCTYPE html><html lang="en"><head><style>
    
        img {
            width: 200px;
            height: 200px;           
        }
        .overlay-container {
            position: relative;
            width: 67%;
            height: auto;
        }
        .overlay-container:hover .right-left { 
            opacity: 1;
            width: 200px; 
        }
        .right-left { 
            position: absolute;
            transition: 0.9s ease;
            opacity: 0.3;
            width: 0; 
            border-radius: 5px;
            height: 200px; 
            top: 0;
            background-color: #d346e6;
            text-align: center;
            color: #ffffff;
        }
        h2 {
            text-align: center;
        }
    &lt;/style&gt;&lt;/head&gt;&lt;body&gt;&lt;h2&gt;Hover your cursor over the image.&lt;/h2&gt;&lt;div class="overlay-container"&gt;&lt;img src="/css/images/tutimg.png"&gt;&lt;div class="right-left"&gt;&lt;h2&gt;Right to Left Image Overlay&lt;/h2&gt;&lt;/div&gt;&lt;/div&gt;&lt;/body&gt;&lt;/html&gt;</pre>

    CSS Overlay Fade Effect

    The following example shows how to create an overlay that appears on top of an image when the user hovers over it

    Example

    <!DOCTYPE html><html lang="en"><head><style> 
    
        img { 
            width: 200px; 
            height: 200px;       
        } 
        .overlay-container { 
            position: relative; 
            width: 25%; 
        }  
        .overlay-container:hover .fade-effect { 
            opacity: 0.9; 
            height: 200px; 
        } 
        .fade-effect { 
            position: absolute; 
            transition: 0.9s ease; 
            opacity: 0; 
            width: 200px; 
            height: 200px; 
            border-radius: 5px;
            top: 0; 
            background-color: #d346e6; 
            text-align: center;
            color: #ffffff;
        }
        h2 {
            text-align: center;
        }   
    &lt;/style&gt;&lt;/head&gt;&lt;body&gt;&lt;h2&gt;Hover your cursor over the image.&lt;/h2&gt;&lt;div class="overlay-container"&gt;&lt;img src= "/css/images/tutimg.png"&gt;&lt;div class="fade-effect"&gt;&lt;h2&gt;Fade Overlay Effect&lt;/h2&gt;&lt;/div&gt;&lt;/div&gt;&lt;/body&gt;&lt;/html&gt;</pre>

    CSS Overlay Image Title

    Here is an example of an overlay that displays the title of an image when the user hovers over it

    <!DOCTYPE html><html lang="en"><head><style> 
    
        img { 
            width: 200px; 
            height: 200px;            
        } 
        .overlay-container { 
            position: relative; 
            width: 25%; 
        }  
        .overlay-container:hover .title-overlay { 
            opacity: 0.9; 
            height: 80px; 
        } 
        .title-overlay { 
            position: absolute; 
            transition: 0.9s ease; 
            opacity: 0; 
            width: 200px; 
            height: 80px; 
            border-radius: 5px;
            bottom: 0;  
            background-color: #f0f0f0; 
            text-align: center;
        }
        h1 {
            text-align: center;
            color: black;
        }   
    &lt;/style&gt;&lt;/head&gt;&lt;body&gt;&lt;h2&gt;Hover your cursor over the image.&lt;/h2&gt;&lt;div class="overlay-container"&gt;&lt;img src= "/css/images/tutimg.png"&gt;&lt;div class="title-overlay"&gt;&lt;h1&gt;TutorialsPoint&lt;/h1&gt;&lt;/div&gt;&lt;/div&gt;&lt;/body&gt;&lt;/html&gt;</pre>

    CSS Image Icon Overlay

    Here is an example of an overlay that displays the icons over an image when the user hovers over it

    Example

    <!DOCTYPE html><html lang="en"><head><link rel="stylesheet" 
    
    href=
    "https://cdnjs.cloudflare.com/ajax/libs/font-awesome/4.7.0/css/font-awesome.min.css"><style>
        .overlay-container {
            position: relative;
            width: 200px; 
            height: 200px; 
        }  
        img { 
            width: 100%; 
            height: 100%;
        }
        .icon-overlay {
            position: absolute; 
            transition: 0.9s ease; 
            opacity: 0; 
            width: 100%;
            height: 100%; 
            top: 0;
            background-color: rgba(211, 70, 230, 0.9); 
            text-align: center;
            color: #ffffff;
            display: flex;
            justify-content: center;
            align-items: center;
        }
        .overlay-container:hover .icon-overlay {
            opacity: 1;
        }
        .display-icon {
            color: rgb(60, 235, 50);
            font-size: 100px;
            position: absolute;
            top: 50%;
            left: 50%;
            transform: translate(-50%, -50%);
        } 
        h2 {
            text-align: center;
        }
    &lt;/style&gt;&lt;/head&gt;&lt;body&gt;&lt;h2&gt;Hover your cursor over the image.&lt;/h2&gt;&lt;div class="overlay-container"&gt;&lt;img src="/css/images/tutimg.png"&gt;&lt;div class="icon-overlay"&gt;&lt;a href="#" class="display-icon"&gt;&lt;i class="fa fa-star"&gt;&lt;/i&gt;&lt;/a&gt;&lt;/div&gt;&lt;/div&gt;&lt;/body&gt;&lt;/html&gt;</pre>
  • Navigation Bar

    Navigation bar is a section of a graphical user interface (GUI) that helps users navigate through a website, app, or other software. It is essential for users to quickly and easily navigate to the content they are looking for.

    The navigation bar can be horizontal or vertical, that contains links to important pages or features.

    Table of Contents

    • How to Design a Responsive Navbar?
    • CSS Horizontal Navbar
    • CSS Vertical Navbar
    • CSS Fixed Navbar
    • Divider Lines for Navbar
    • Fixed Vertical Navbar
    • CSS Dropdown Navbar

    How to Design a Responsive Navbar?

    Following are common steps followed to design a navbar in CSS:

    • HTML Structure: Use anchor tag ( <a> ) inside unordered list ( <ul> ) to obtain structure of navbar.
    • Remove Default Styles: Use the property ‘list-style-type: none’ to remove default styling and label of unordered list.
    • Flex Layout: Use the property display: flex for ul element and set flex-direction as row or column depending upon horizontal or vertical flexbox needed.
    • Responsive Design: Use CSS media queries to change between horizontal and vertical layout of navbar depending upon user screen width.
    • Hamburger Menu: Create a hamburger menu icon that toggles the visibility of the list on smaller screens.

    Navbars can also contain other elements, such as the logo of the website or app, search bar, or social media icons. Navbars can be styled using CSS to change their appearance.

    CSS Horizontal Navbar

    Following example shows a horizontal navigation bar, which is the most common type of navigation bar displayed across the top of a web page as shown below

    Example

    <!DOCTYPE html><html><head><style>
    
        body{
            color: #4CAF50;
        }
        ul {
            background-color: #333;
            overflow: hidden;
            list-style-type: none;
            margin: 0;
            padding: 0;
            width: 100%; 
            display: flex;
            flex-direction: row;
        }
        li a {
            display: block;
            color: #f2f2f2;
            text-align: center;
            padding: 14px 20px;
            text-decoration: none;
            font-size: 18px;
            transition: background-color 0.3s, color 0.3s;
        }
        li a:hover {
            background-color: #575757;
            color: #ffffff;
        }
        .active-link {
            background-color: #4CAF50;
            color: white;
         }
    &lt;/style&gt;&lt;/head&gt;&lt;body&gt;&lt;ul&gt;&lt;li class="active-link"&gt;&lt;a href="#" &gt;Tutorialspoint&lt;/a&gt;&lt;/li&gt;&lt;li&gt;&lt;a href="#"&gt;Home&lt;/a&gt;&lt;/li&gt;&lt;li&gt;&lt;a href="#"&gt;Articles&lt;/a&gt;&lt;/li&gt;&lt;li&gt;&lt;a href="#"&gt;Courses&lt;/a&gt;&lt;/li&gt;&lt;/ul&gt;&lt;h1&gt; Welcome to TutorialsPoint &lt;/h1&gt;&lt;h3&gt; Simple Easy Learning at your fingertips &lt;/h3&gt;&lt;/body&gt;&lt;/html&gt;</pre>

    CSS Vertical Navbar

    A vertical navigation bar is also known as a sidebar menu. It is typically positioned on the left or right side of the screen.

    Example

    <!DOCTYPE html><html><head><style>
    
        body{
            color: #4CAF50;
            display: flex;
            flex-direction: row;
            gap: 10px;
        }
        ul {
            background-color: #333;
            overflow: hidden;
            list-style-type: none;
            margin: 0;
            padding: 0;
            display: flex;
            flex-direction: column;
        }
        li a {
            display: block;
            color: #f2f2f2;
            text-align: center;
            padding: 14px 20px;
            text-decoration: none;
            font-size: 18px;
            transition: background-color 0.3s, color 0.3s;
        }
        li a:hover {
            background-color: #575757;
            color: #ffffff;
        }
        .active-link {
            background-color: #4CAF50;
            color: white;
         }
    &lt;/style&gt;&lt;/head&gt;&lt;body&gt;&lt;ul&gt;&lt;li class="active-link"&gt;&lt;a href="#" &gt;Tutorialspoint&lt;/a&gt;&lt;/li&gt;&lt;li&gt;&lt;a href="#"&gt;Home&lt;/a&gt;&lt;/li&gt;&lt;li&gt;&lt;a href="#"&gt;Articles&lt;/a&gt;&lt;/li&gt;&lt;li&gt;&lt;a href="#"&gt;Courses&lt;/a&gt;&lt;/li&gt;&lt;/ul&gt;&lt;div&gt;&lt;h1&gt; Welcome to TutorialsPoint &lt;/h1&gt;&lt;h3&gt; Simple Easy Learning at your fingertips &lt;/h3&gt;&lt;/div&gt;&lt;/body&gt;&lt;/html&gt;</pre>

    CSS Dropdown Navbar

    A dropdown navbar is a navigation bar with a drop-down menu that appears when a user hovers over a link. Dropdown menus are a way to show a list of related items in a small space.

    Example

    <!DOCTYPE html><html><head><link rel="stylesheet" 
    
         href=
    "https://cdnjs.cloudflare.com/ajax/libs/font-awesome/4.7.0/css/font-awesome.min.css"><style>
        .navbar {
            background-color: #2c3e50;
            overflow: hidden;
        }
        .navbar a {
            display: block;
            float: left;
            color: #ecf0f1;
            text-align: center;
            padding: 14px 20px;
            text-decoration: none;
            font-size: 16px;
            transition: background-color 0.3s, color 0.3s;
        }
        .navbar a:hover {
            background-color: #34495e;
            color: #ecf0f1;
        }
        .active-link {
            background-color: #4CAF50;
            color: white;
        }
        .dropdown {
            float: left;
        }
        .dropdown .dropbtn {
            border: none;
            color: #ecf0f1;
            padding: 14px 20px;
            background-color: #2c3e50;
            font-size: 16px;
            cursor: pointer;
            transition: background-color 0.3s, color 0.3s;
        }
        .dropdown .dropbtn:hover {
            background-color: #4CAF50;
            color: #ecf0f1;
        }
        .dropdown-content {
            display: none;
            position: absolute;
            background-color: #34495e;
            min-width: 160px;
            box-shadow: 0px 8px 16px 0px rgba(0,0,0,0.2);
            z-index: 1;
        }
        .dropdown-content a {
            float: none;
            color: #ecf0f1;
            padding: 12px 16px;
            text-decoration: none;
            display: block;
            text-align: left;
            transition: background-color 0.3s, color 0.3s;
        }
        .dropdown-content a:hover {
            background-color: #4CAF50;
            color: white;
        }
        .dropdown:hover .dropdown-content {
            display: block;
        }
    &lt;/style&gt;&lt;/head&gt;&lt;body&gt;&lt;nav class="navbar"&gt;&lt;a href="#" class="active-link"&gt;Tutorialspoint&lt;/a&gt;&lt;a href="#"&gt;Home&lt;/a&gt;&lt;div class="dropdown"&gt;&lt;button class="dropbtn"&gt;Articles
                &lt;i class="fa fa-caret-down"&gt;&lt;/i&gt;&lt;/button&gt;&lt;div class="dropdown-content"&gt;&lt;a href="#"&gt;HTML&lt;/a&gt;&lt;a href="#"&gt;CSS&lt;/a&gt;&lt;a href="#"&gt;Bootstrap&lt;/a&gt;&lt;/div&gt;&lt;/div&gt;&lt;a href="#"&gt;Courses&lt;/a&gt;&lt;/nav&gt;&lt;h1&gt; Welcome to TutorialsPoint &lt;/h1&gt;&lt;h3&gt; Simple Easy Learning at your fingertips &lt;/h3&gt;&lt;/body&gt;&lt;/html&gt;</pre>

    CSS Fixed Navbar

    A fixed navbar is a navigation bar that sticks to the top of the screen when the user scrolls down the page. To make a navbar fixed, you can use the position: fixed property.

    Example

    <!DOCTYPE html><html><head><style>
    
        body {
            margin: 0;
            font-family: Arial, sans-serif;
            height: 2000px;
            background-color: #e6e451;
        }
        .navbar {
            position: fixed;
            top: 0;
            width: 100%;
            margin: 0;
            padding: 0;
            overflow: hidden;
            background-color: #2c3e50;
        }
        .navbar a {
            display: block;
            float: left;
            color: #ecf0f1;
            text-align: center;
            padding: 14px 20px;
            text-decoration: none;
            font-size: 17px;
            transition: background-color 0.3s, color 0.3s;
        }
        .navbar a:hover {
            background-color: #34495e;
            color: #ecf0f1;
        }
        .active-link {
            background-color: #4CAF50;
            color: white;
        }
        .heading {
            padding-top: 70px;
            text-align: center;
            background-color: #e6e451;
            padding-bottom: 300px;
        }
    &lt;/style&gt;&lt;/head&gt;&lt;body&gt;&lt;nav class="navbar"&gt;&lt;a href="#" class="active-link"&gt;
            Tutorialspoint
        &lt;/a&gt;&lt;a href="#"&gt;Home&lt;/a&gt;&lt;a href="#"&gt;Articles&lt;/a&gt;&lt;a href="#"&gt;Courses&lt;/a&gt;&lt;/nav&gt;&lt;div class="heading"&gt;&lt;h1&gt; Welcome to TutorialsPoint &lt;/h1&gt;&lt;h2&gt; Tutorialspoint CSS Fixed Navbar &lt;/h2&gt;&lt;h3&gt;Scrolldown....&lt;/h3&gt;&lt;/div&gt;&lt;/body&gt;&lt;/html&gt;</pre>

    Divider Lines for Navbar

    You can also add a divider line between the links in the navbar using the border-right property as shown below

    Example

    <!DOCTYPE html><html><head><style>
    
        body{
            color: #4CAF50;
        }
        ul {
            background-color: #333;
            overflow: hidden;
            list-style-type: none;
            margin: 0;
            padding: 0;
            width: 100%; 
            display: flex;
            flex-direction: row;
        }
        li a {
            display: block;
            color: #f2f2f2;
            text-align: center;
            padding: 14px 20px;
            text-decoration: none;
            font-size: 18px;
            border-right: 5px solid green;
            transition: background-color 0.3s, color 0.3s;
        }
        li a:hover {
            background-color: #575757;
            color: #ffffff;
        }
        .active-link {
            background-color: #4CAF50;
            color: white;
         }
    &lt;/style&gt;&lt;/head&gt;&lt;body&gt;&lt;ul&gt;&lt;li class="active-link"&gt;&lt;a href="#" &gt;Tutorialspoint&lt;/a&gt;&lt;/li&gt;&lt;li&gt;&lt;a href="#"&gt;Home&lt;/a&gt;&lt;/li&gt;&lt;li&gt;&lt;a href="#"&gt;Articles&lt;/a&gt;&lt;/li&gt;&lt;li&gt;&lt;a href="#"&gt;Courses&lt;/a&gt;&lt;/li&gt;&lt;/ul&gt;&lt;h1&gt; Welcome to TutorialsPoint &lt;/h1&gt;&lt;h3&gt; Simple Easy Learning at your fingertips &lt;/h3&gt;&lt;/body&gt;&lt;/html&gt;</pre>

    Fixed Vertical Navbar

    The following example demonstrates how the position: fixed property can be used to create a fixed vertical navbar, which ensures that the navbar stays on the left side of the screen, even when the user scrolls down the page.

    Example

    <!DOCTYPE html><html><head><style>
    
        div{
            height: 1000px;
            margin-left: 35%;
        }
        ul {
            background-color: #333;
            overflow: hidden;
            list-style-type: none;
            position: fixed;
            width: 30%;
            margin: 0;
            padding: 0;
            display: flex;
            flex-direction: column;
        }
        li a {
            display: block;
            color: #f2f2f2;
            text-align: center;
            padding: 14px 20px;
            text-decoration: none;
            font-size: 18px;
            transition: background-color 0.3s, color 0.3s;
        }
        li a:hover {
            background-color: #575757;
            color: #ffffff;
        }
        .active-link {
            background-color: #4CAF50;
            color: white;
         }
    &lt;/style&gt;&lt;/head&gt;&lt;body&gt;&lt;ul&gt;&lt;li class="active-link"&gt;&lt;a href="#" &gt;Tutorialspoint&lt;/a&gt;&lt;/li&gt;&lt;li&gt;&lt;a href="#"&gt;Home&lt;/a&gt;&lt;/li&gt;&lt;li&gt;&lt;a href="#"&gt;Articles&lt;/a&gt;&lt;/li&gt;&lt;li&gt;&lt;a href="#"&gt;Courses&lt;/a&gt;&lt;/li&gt;&lt;/ul&gt;&lt;div&gt;&lt;h1&gt; Welcome to TutorialsPoint &lt;/h1&gt;&lt;h3&gt; Simple Easy Learning at your fingertips &lt;/h3&gt;&lt;/div&gt;&lt;/body&gt;&lt;/html&gt;</pre>
  • bottom Property

    CSS bottom property is used to set the bottom position of a positioned element. It specifies the distance between the bottom edge of the element and the bottom edge of its containing element. Based on the value of the position property, the effect of bottom property, is determined.

    Syntax

    bottom: auto | length | percentage | initial | inherit;

    Property Values

    ValueDescription
    autoIt lets the browser calculate the element’s bottom edge position. Default.
    lengthIt sets the element’s bottom edge position in length units (eg.10px, 20px etc.). Negative value are valid.
    percentageIt sets the element’s bottom edge position in percentage of containing element(e.g. 10%, 20% etc.). Negative values are valid.
    initialIt sets the property to its default value.
    inheritIt inherits the property from the parent element.

    Examples of CSS Border Property

    The following examples explain the bottom property with different values.

    Bottom Property with Absolute Position

    To use bottom property with absolute position, the element must be contained within a parent which itelf should be positioned. The element will then be placed relative to the parent. The distance from the bottom of the parent container edge can be specified in length or percentage values (e.g. 10px, 20% etc.) or auto value. This is shown in the following example.

    Example

    <!DOCTYPE html><html><head><style>
    
      .container {
         position: relative;
         background-color: lightgray;
         height: 400px;
      }
      
      .boxes{
         position: absolute;
         border: 3px solid black;
         padding: 10px;
         width: 20%;
      }
      .box {
         bottom: 150px;
         background-color: lightcoral;
      }
      .box2{
         bottom: 10%;
         background-color: lightgreen;
      }
      .box3{
         bottom: auto;
         background-color: lightblue;
      }
    </style></head><body><h2>
      CSS bottom property
    </h2><p>
      Position: Absolute, the absolute position
      places the element relative to its positioned
      parent element.
    </p><p>
      For all the boxes, the parent is the grey
      container with 'relative' position, so it
      they have been placed at 10%, 150px and
      auto from the bottom edge of their parent.
    </p><div class="container"><div class=" boxes box">
         Position: Absolute, bottom: 150px
      &lt;/div&gt;&lt;div class=" boxes box2"&gt;
         Position: Absolute, bottom: 10%
      &lt;/div&gt;&lt;div class="boxes box3"&gt;
         Position: Absolute, bottom: auto
      &lt;/div&gt;&lt;/div&gt;&lt;/body&gt;&lt;/html&gt;</pre>

    Bottom Property with Relative Position

    When the bottom property is used with relative position, the element will be placed relative to its normal position. The distance from the bottom of its normal position can be specified in length or percentage values (e.g. 10px, 20% etc.) or auto value. This is shown in the following example.

    Example

    <!DOCTYPE html><html><head><style>
    
      .container {
         position: relative;
         background-color: lightgray;
         height: 300px;
      }
      .boxes {
         position: relative;
         border: 3px solid black;
         padding: 10px;
         width: 20%;
      }
      .box {
         bottom: auto;
         background-color: lightcoral;
      }
      .box2 {
         bottom: 55%;
         background-color: lightgreen;
      }
      .box3 {
         bottom: 25px;
         background-color: lightblue;
      }
    </style></head><body><h2>
      CSS bottom property
    </h2><p>
      Position: Relative, the relative position
      places the element relative to its normal
      position.
    </p><p>
      For all the boxes, the parent is the grey
      container with 'relative' position, so they
      have been placed at 25px, auto and 55% from
      their normal positions.
    </p><br/><br/><br/><br/><div class="container"><div class=" boxes box">
         Position: Relative, bottom: auto
      &lt;/div&gt;&lt;div class=" boxes box2"&gt;
         Position: Relative, bottom: 55%
      &lt;/div&gt;&lt;div class="boxes box3"&gt;
         Position: Relative, bottom: 25px
      &lt;/div&gt;&lt;/div&gt;&lt;/body&gt;&lt;/html&gt;</pre>

    Bottom Property with Fixed Position

    The fixed position places an element at a specific position, the element stays at the position despite scroll. The position of the element from the bottom can be specified in length or percentage (e.g. 10px, 20% etc.) or auto value. This is shown in the following example.

    Example

    <!DOCTYPE html><html><head><style>
    
      .container {
         position: relative;
         background-color: lightgray;
         height: 700px;
      }
      .boxes {
         position: fixed;
         border: 3px solid black;
         padding: 10px;
         width: 20%;
      }
      .box {
         bottom: auto;
         background-color: lightcoral;
      }
      .box2 {
         bottom: 75px;
         background-color: lightgreen;
      }
      .box3 {
         bottom: 2%;
         background-color: lightblue;
      }
    </style></head><body><h2>
      CSS bottom property
    </h2><p>
      Position: Fixed, the fixed position places
      the element at a fixed position even during
      a scroll.
    </p><p>
      For all the boxes, the parent is the grey
      container with 'relative' position, so they
      have been placed at auto, 75px and 2% from
      the parent's bottom edge.
    </p><div class="container"><div class=" boxes box">
      Position: Fixed, bottom: auto
      &lt;/div&gt;&lt;div class=" boxes box2"&gt;
      Position: Fixed, bottom: 75px
      &lt;/div&gt;&lt;div class="boxes box3"&gt;
      Position: Fixed, bottom: 2%
      &lt;/div&gt;&lt;/div&gt;&lt;/body&gt;&lt;/html&gt;</pre>

    Bottom Property with Sticky Position

    The sticky position keeps an element fixed relative to its container when scrolling past a specified point. With the bottom property, we can control the distance from the containers bottom edge. Values like auto, 10px, or 10% adjust its sticking behavior accordingly. This is shown in the following example.

    Example

    <!DOCTYPE html><html><head><style>
    
      .container {
         position: relative;
         background-color: lightgray;
         height: 100vh;
      }
      .boxes {
         position: sticky;
         border: 3px solid black;
         padding: 10px;
         width: 20%;
      }
      .box {
         bottom: auto;
         background-color: lightcoral;
      }
      .box2 {
         bottom: 10px;
         background-color: lightgreen;
      }
      .box3 {
         bottom: 10%;
         background-color: lightblue;
      }
    </style></head><body><h2>
      CSS Bottom Property with Sticky Position
    </h2><p>
      Position: Sticky, the bottom property affects
      how the element sticks to its container's bottom
      edge.
    </p><p>
      The parent container has a height of 700px,
      so the sticky elements are positioned at auto,
      10px, and 10% from the container's bottom edge.
    </p><div class="container"><div class="boxes box">
         Position: Sticky, bottom: auto
      &lt;/div&gt;&lt;div class="boxes box2"&gt;
         Position: Sticky, bottom: 10px
      &lt;/div&gt;&lt;div class="boxes box3"&gt;
         Position: Sticky, bottom: 10%
      &lt;/div&gt;&lt;/div&gt;&lt;/body&gt;&lt;/html&gt;</pre>
  •  z index Property

    The z-index Property

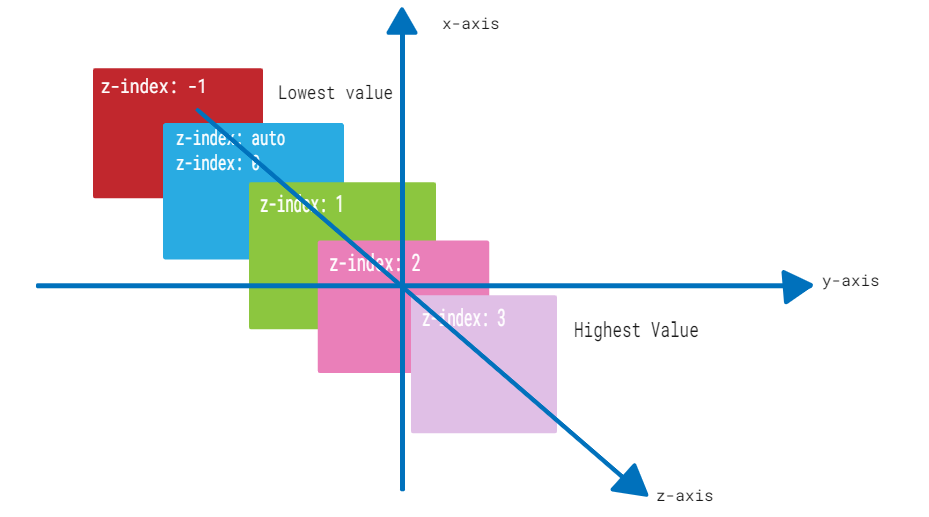
    CSS z-index property controls the stacking order of elements in a web page when they overlap in the same stacking context. Elements with a higher z-index value appear in front of elements with lower values.

    The following diagram demonstrates the z-index layout for reference:

    z-index

    CSS z-index property can be used with positioned elements that are nested inside of other positioned elements.

    Syntax

    The syntax for z-index property is as follows:

    z-index: auto | number | initial | inherit;

    Property Values

    ValueDescription
    autoIt is the default value. The stack order is equal to that of the parent element.
    <Integer>It represents a positive or negative integer. It sets the element’s stack level to the given value.
    initialIt is used to set this property to it’s default value.
    inheritIt is used to inherit the property of it’s parent element.

    Applies to

    All positioned elements.

    CSS z-index With auto Value

    CSS z-index: auto sets the z-index of an element to its parent element’s stack order. It is the default value for the z-index property.

    Example

    The following example demonstrates the z-index property with auto value.

    <html><head><style>
       .box1 {
    
      position: absolute;
      height: 200px;
      width: 280px;
      background-color: #f0baba;
      z-index: auto;
      text-align: center;
      padding: 3px;
      left: 10px;
      top: 10px;
    } .box2 {
      position: absolute;
      height: 120px;
      width: 200px;
      background-color: #eae98f;
      z-index: 1;
      text-align: center;
      padding: 5px;
      margin: 20px;
      left: 30px;
      top: 30px;
    } p {
      margin-top: 250px;
    } </style></head><body><p>The element with z-index value of auto appears behind the element with the z-index value of 1.</p><div class="box1"><span>CSS z-index: auto</span><div class="box2"><span>CSS z-index: 1</span></div></div></body></html>

    CSS z-index With Positive Integer

    CSS z-index property can have a positive integer value. The element with a higher integer value will appear above elements with lower values in the stacking order.

    Example

    The following example demonstrates the z-index property with a positive integer value.

    <html><head><style>
       .box1 {
    
      position: absolute;
      height: 200px;
      width: 280px;
      background-color: #f0baba;
      z-index: 1;
      text-align: center;
      padding: 3px;
      left: 10px;
      top: 10px;
    } .box2 {
      position: absolute;
      height: 140px;
      width: 220px;
      background-color: #eae98f;
      z-index: 2;
      text-align: center;
      padding: 5px;
      margin: 10px;
      left: 30px; 
      top: 30px;
    } .box3 {
      position: absolute;
      height: 90px;
      width: 160px;
      background-color: #b7c8ae;
      z-index: 3;
      text-align: center;
      padding: 5px;
      margin: 20px;
      left: 50px; 
      top: 50px;
    } p {
      margin-top: 250px;
    } </style></head><body><p>The element with z-index value of 1 appears behind the element with the z-index value of 2 and 3.</p><div class="box1">
      CSS z-index: 1
    </div><div class="box2">
      CSS z-index: 2
    </div><div class="box3">
      CSS z-index: 3
    </div></body></html>

    CSS z-index With Negative Integer

    You can also use negative integer values for the z-index property. An element with a negative z-index value will be stacked below elements with a higher z-index value.

    Example

    The following example demonstrates the z-index property with a negative integer value.

    <html><head><style>
       .box1 {
    
      position: absolute;
      height: 200px;
      width: 280px;
      background-color: #f0baba;
      z-index: -3;
      text-align: center;
      padding: 3px;
      left: 10px; 
      top: 10px;
    } .box2 {
      position: absolute;
      height: 140px;
      width: 220px;
      background-color: #eae98f;
      z-index: -2;
      text-align: center;
      padding: 5px;
      margin: 10px;
      left: 30px; 
      top: 30px;
    } .box3 {
      position: absolute;
      height: 90px;
      width: 160px;
      background-color: #b7c8ae;
      z-index: -1;
      text-align: center;
      padding: 5px;
      margin: 20px;
      left: 50px; 
      top: 50px;
    } p {
      margin-top: 250px;
    } </style></head><body><p>The element with z-index value of -3 appears behind the element with the z-index value of -2 and -1.</p><div class="box1">
      CSS z-index: -3
    </div><div class="box2">
      CSS z-index: -2
    </div><div class="box3">
      CSS z-index: -1
    </div></body></html>

    Placing Text Over Image

    The z-index property can be used for placing a text over an image and vice-versa.

    Example

    In this example, we are placing a text over an image using CSS z-index property and position property.

    <!DOCTYPE html><html lang="en"><head><title>Displaying Text Over Image</title><style>
    
        .container {
            position: relative;
            width: 500px;
        }
        img {
            display: block;
        }
        .txt {
            position: absolute;
            top: 20%;
            left: 35%;
            transform: translate(-50%, -50%);
            color: white;
            font-family: Verdana, sans-serif;
            font-size: 16px;
            background: rgba(0, 0, 0, 0.5);
        }
    &lt;/style&gt;&lt;/head&gt;&lt;body&gt;&lt;h2&gt;CSS z-index Property&lt;/h2&gt;&lt;div class="container"&gt;&lt;img src="/html/images/test.png" alt="Logo"&gt;&lt;p class="txt"&gt;This text displays over the photo.&lt;/p&gt;&lt;/div&gt;&lt;/body&gt;&lt;/html&gt;</pre>

    CSS z-index With Sticky Position

    The z-index can be used with position:sticky to fix the element's position on scroll.

    Example

    In this example, we have used the sticky value with z-index property to fix the position of div boxes on scroll.

    <html><head><style>
       .box1 {
    
      position: sticky;
      height: 200px;
      width: 280px;
      background-color: #f0baba;
      z-index: 1;
      text-align: center;
      padding: 3px;
      margin: 10px;
      left: 10px; 
      top: 80px;
    } .box2 {
      position: sticky;
      height: 140px;
      width: 220px;
      background-color: #eae98f;
      z-index: 2;
      text-align: center;
      padding: 5px;
      margin: 10px;
      left: 40px; 
      top: 200px;
    } .box3 {
      position: sticky;
      height: 90px;
      width: 160px;
      background-color: #b7c8ae;
      z-index: 3;
      text-align: center;
      padding: 5px;
      margin: 10px;
      left: 70px; 
    } </style></head><body><p>Move cursor upward to see the effect.</p><div class="box1">
      CSS z-index: 1
    </div><div class="box2">
      CSS z-index: 2
    </div><div class="box3">
      CSS z-index: 3
    </div></body></html>

    CSS z-index With Fixed Position

    The z-index property is used with the position:fixed value to fix an element at the top of the content when the user scrolls down.

    Example

    In the example, we have used position:fixed value to fix the text content on top while scrolling.

    <html><head><style>
       .container {
    
      position: relative;
      height: 350px;
    } .box1 {
      position: fixed;
      height: 200px;
      width: 280px;
      background-color: #f0baba;
      z-index: -3;
      text-align: center;
      padding: 3px;
      left: 10px; 
      top: 10px;
    } .box2 {
      position: fixed;
      height: 140px;
      width: 220px;
      background-color: #eae98f;
      z-index: -2;
      text-align: center;
      padding: 5px;
      margin: 10px;
      left: 30px; 
      top: 30px;
    } .box3 {
      position: fixed;
      height: 90px;
      width: 160px;
      background-color: #b7c8ae;
      z-index: -1;
      text-align: center;
      padding: 5px;
      margin: 20px;
      left: 50px; 
      top: 50px;
    } h3 {
         margin-top: 320px;
    } </style></head><body><h3>Scroll down the content to see the effect.</h3><div class="container"><div class="box1">
         CSS z-index: -3
      &lt;/div&gt;&lt;div class="box2"&gt;
         CSS z-index: -2
      &lt;/div&gt;&lt;div class="box3"&gt;
         CSS z-index: -1
      &lt;/div&gt;&lt;/div&gt;&lt;/body&gt;&lt;/html&gt;</pre>

    CSS z-index With Static Position

    The position:static property value makes the use of z-index property ineffective. The z-index property does not affect the stacking order of elements that have the static value of position property.

    Example

    The following example shows that the z-index property is ineffective when position:static property is used:

    <html><head><style>
       .box1 {
    
      position: static;
      height: 200px;
      width: 280px;
      background-color: #f0baba;
      z-index: 1;
      text-align: center;
      padding: 3px;
      margin: 10px;
      left: 10px;
      top: 10px;
    } .box2 {
      position: static;
      height: 140px;
      width: 220px;
      background-color: #eae98f;
      z-index: 2;
      text-align: center;
      padding: 5px;
      margin: 10px;
      left: 30px; 
      top: 30px;
    } .box3 {
      position: static;
      height: 90px;
      width: 160px;
      background-color: #b7c8ae;
      z-index: 3;
      text-align: center;
      padding: 5px;
      margin: 10px;
      left: 50px; 
      top: 50px;
    } </style></head><body><p>The z-index property has no effect on the stacking order of elements if the position property is set to static.</p><div class="box1">
      CSS z-index: 1
    </div><div class="box2">
      CSS z-index: 2
    </div><div class="box3">
      CSS z-index: 3
    </div></body></html>

    CSS z-index With Relative Position

    The position:relative property can be used with z-index property to position the element relative to its original position in the document flow.

    Example

    The following example demonstrates use of position:relative property value with z-index property.

    The example shows that when elements have the position: relative property, the z-index property positions the element relative to its original position in the document flow.

    <html><head><style>
       .box1 {
    
      position: relative;
      height: 200px;
      width: 280px;
      background-color: #f0baba;
      z-index: 1;
      text-align: center;
      padding: 3px;
      margin: 10px;
      left: 10px;
      top: 10px;
    } .box2 {
      position: relative;
      height: 140px;
      width: 220px;
      background-color: #eae98f;
      z-index: 2;
      text-align: center;
      padding: 5px;
      margin: 10px;
      left: 30px; 
      top: 30px;
    } .box3 {
      position: relative;
      height: 90px;
      width: 160px;
      background-color: #b7c8ae;
      z-index: 3;
      text-align: center;
      padding: 5px;
      margin: 10px;
      left: 50px; 
      top: 50px;
    } </style></head><body><p>The z-index property positions the element relative to its original position if position is relative.</p><div class="box1">
      CSS z-index: 1
    </div><div class="box2">
      CSS z-index: 2
    </div><div class="box3">
      CSS z-index: 3
    </div></body></html>
  • opacity Property

    The opacity Property

    CSS opacity property controls the transparency of an element. It determines how much of a hidden element’s content is visible. The property can be used on various elements, whether they contain text, images, or serve as backgrounds.

    CSS opacity Example

    Here is an example of the opacity property. You can change the slider and see the change in opacity and the value of opacity.

    Slide this slider to see the change in opacity.

    Adjust Opacity:

    0.5

    Syntax

    The syntax for the CSS opacity property is as follows:

    opacity: number | percentage | initial | inherit;

    Property Values

    ValueDescription
    numberIt specifies the opacity level of elements using numeric values between 0 (fully transparent) and 1 (Visible).
    percentageIt specifies the opacity level of elements using percent values between 0% (fully transparent) and 100% (Visible).
    initialIt sets the property to its default value.
    inheritIt inherits the property from the parent element.

    CSS opacity Property with Numeric Values

    To set the transparency level of an element, we can specify numeric values between 0 and 1 including them with the opacity property.

    Example

    In this example, we have used numeric values to specify the opacity level of div elements.

    <!DOCTYPE html><html><head><style>
    
      .props {
         height: 50px;
         padding: 20px;
         text-align: center;
         font-weight: bold;
         font-size: 20px;
         background-color: lightgreen;
      }
      .first {
         opacity: 0.3;
      }
      .second {
         opacity: 0.6;
      }
      .third {
         opacity: 1;
      }
    </style></head><body><h2>
      CSS opacity property
    </h2><h4>
      opacity: 0.3
    </h4><div class="props first">
      This div has opacity: 0.3
    </div><h4>
      opacity: 0.6
    </h4><div class="props second">
      This div has opacity: 0.6
    </div><h4>
      opacity: 1
    </h4><div class="props third">
      This div has opacity: 1
    </div></body></html>

    CSS opacity Property with Percentage Values

    To set the transparency level of an element, we can specify percentage values between 0% and 100% including them with the opacity property.

    Example

    In this example, we have used the percent value to specify the opacity level of div elements.

    <!DOCTYPE html><html><head><style>
    
      .props {
         height: 50px;
         padding: 20px;
         text-align: center;
         font-weight: bold;
         font-size: 20px;
         background-color: lightgreen;
      }
      .first {
         opacity: 30%;
      }
      .second {
         opacity: 60%;
      }
      .third {
         opacity: 100%;
      }
    </style></head><body><h2>
      CSS opacity property
    </h2><h4>
      opacity: 30%
    </h4><div class="props first">
      This div has opacity: 30%
    </div><h4>
      opacity: 60%
    </h4><div class="props second">
      This div has opacity: 60%
    </div><h4>
      opacity: 100%
    </h4><div class="props third">
      This div has opacity: 100%
    </div></body></html>

    CSS opacity for Images

    You can use the opacity property to set the transparency level of images. Setting the transparency level of an image can help in creating an overlay.

    Example

    In this example, we have used the opacity property to set the transparency level of the logo at different levels.

    <!DOCTYPE html><html><head><style>
    
      .props {
         width: 300px;
         height: 150px;
      }
      .first-img {
         opacity: 0.1;
      }
      .second-img {
         opacity: 50%;
      }
      .third-img {
         opacity: 1;
      }
    </style></head><body><h2>
      CSS opacity property
    </h2><h4>
      opacity: 0.1
    </h4><img class="first-img props" src="/css/images/logo.png" alt="Tutorials point"><h4>
      opacity: 50%
    </h4><img class="second-img props" src="/css/images/logo.png" alt="Tutorials point"><h4>
      opacity: 1
    </h4><img class="third-img props" src="/css/images/logo.png" alt="Tutorials point"></body></html>

    CSS opacity Property with RGBA Color Values

    The opacity property applies transparency to an element and its child elements. To avoid this and still achieve transparency, we can use the rgba() values. These values specify colors along with opacity only to the desired element.

    Example

    In this example, we have used the opacity and rgba() functions to highlight the difference between these two.

    <!DOCTYPE html><html><head><style>
    
      div {
         width: 200px;
         padding: 10px;
         text-align: center;
      }
      .first-color {
         background-color: rgba(77, 77, 255);
      }
      .decimal-opacity1 {
         opacity: 0.1;
      }
      .decimal-opacity2 {
         opacity: 0.3;
      }
      .decimal-opacity3 {
         opacity: 0.6;
      }
      .decimal-opacity4 {
         opacity: 0.9;
      }
      .rgba-opacity1 {
         background-color: rgba(77, 77, 255, 0.1);
      }
      .rgba-opacity2 {
         background-color: rgba(77, 77, 255, 0.3);
      }
      .rgba-opacity3 {
         background-color: rgba(77, 77, 255, 0.6);
      }
      .rgba-opacity4 {
         background-color: rgba(77, 77, 255, 0.9);
      }
      .container {
         font-weight: bolder;
         margin-left: 50px;
         float: left;
      }
    </style></head><body><h2>
      CSS opacity property
    </h2><p>
      It is clear from the 
    <strong>
      transparent element
    </strong>
      portion below, that the opacity property is 
      applied to all other elements present within 
      the element that uses opacity property. 
    </p><p>
      To prevent this, we can make use of the 
    <strong>
      rgba values
    </strong>
      which define the color along with opacity. The 
      opacity is applied only to the particular element 
      and not to the elements present within it.
    </p><div class="container"><h4>
         Transparent element
      &lt;/h4&gt;&lt;div class=" first-color decimal-opacity1"&gt;
         CSS Opacity 0.1
      &lt;/div&gt;&lt;div class="first-color decimal-opacity2"&gt;
         CSS Opacity 0.3
      &lt;/div&gt;&lt;div class="first-color decimal-opacity3"&gt;
         CSS Opacity 0.6
      &lt;/div&gt;&lt;div class="first-color decimal-opacity4"&gt;
         CSS Opacity 0.9
      &lt;/div&gt;&lt;/div&gt;&lt;div class="container"&gt;&lt;h4&gt;
         With RGBA color values
      &lt;/h4&gt;&lt;div class="rgba-opacity1"&gt;
         CSS Opacity 10%
      &lt;/div&gt;&lt;div class="rgba-opacity2"&gt;
         CSS Opacity 30%
      &lt;/div&gt;&lt;div class="rgba-opacity3"&gt;
         CSS Opacity 60%
      &lt;/div&gt;&lt;div class="rgba-opacity4"&gt;
         CSS Opacity 90%
      &lt;/div&gt;&lt;/div&gt;&lt;/body&gt;&lt;/html&gt;</pre>
  • Width Property

    The width property sets the width of an element’s content area. In case, the box-sizing is set to border-box, the property width sets the width of the border area.

    The value specified by the width property remains within the values defined by min-width and max-width properties.

    Refer the image for the understanding of width of an element.

    width

    Possible Values

    • <length>: A specific length value such as pixels (px), centimeters (cm), inches (in), etc.
    • <percentage>: A percentage of the width of the containing element.
    • auto: The browser will calculate the width automatically based on the content. It is the default value.
    • max-content: Defines the intrinsic preferred width.
    • min-content: Defines the intrinsic minimum width.
    • fit-content: Fits the content in the available space, but never more than max-content.
    • fit-content: fit-content formula is used, i.e, min(max-content, max(min-content, <length-percentage>)).

    Applies to

    All the HTML elements except non-replaced inline elements, table rows, and row groups.

    DOM Syntax

    object.style.width = "100px";
    

    CSS Width – Length Unit

    Here is an example of adding a width to a div element in length units:

    <html><head><style>
       div {
    
      border: 1px solid black;
      margin-bottom: 5px;
    } div.a {
      width: 100px;
      background-color: rgb(230, 230, 203);
    } div.b {
      width: 5em;
      background-color: rgb(230, 230, 203);
    } </style></head><body><div class="a">This div element has a width of 100px.</div><div class="b">This div element has a width of 5em.</div></body></html>

    CSS Width – Percentage Value

    Here is an example of adding a width to a div element in percentage values:

    <html><head><style>
       div {
    
      border: 1px solid black;
      margin-bottom: 5px;
    } div.a {
      width: 120%;
      background-color: yellow;
    } div.b {
      width: 20%;
      background-color: rgb(236, 190, 190);
    } </style></head><body><div class="a">This div element has a width of 120%.</div><div class="b">This div element has a width of 20%.</div></body></html>

    CSS Width – Auto

    Here is an example of adding a width to a div element as auto:

    <html><head><style>
       div {
    
      border: 1px solid black;
      margin-bottom: 5px;
    } div.auto {
      width: auto;
      background-color: yellow;
    } </style></head><body><div class="auto">This div element has a width set as auto.</div></body></html>

    CSS Width – Using max-content and min-content

    Here is an example of width equal to max-content and min-content:

    <html><head><style>
       div {
    
      border: 1px solid black;
      margin-bottom: 5px;
    } div.c {
      width: max-content;
      background-color: bisque;
    } div.d {
      width: min-content;
      background-color: darkseagreen;
    } </style></head><body><div class="c">This div element has a width as max-content.</div><div class="d">This div element has a width of min-content.</div></body></html>

    CSS width – Image

    Here is an example of adding width to an image:

    <html><head><style>
       div {
    
      border: 1px solid black;
      margin-bottom: 5px;
    } .demoImg {
      margin-top: 15px;
      width: 300px;
      margin-right: 0.5in;
    } </style></head><body><img class="demoImg" src="images/scancode.png" alt="image-width"></body></html>

    CSS width – Using fit-content

    Here is an example of fit-content value set for width of a list:

    <html><head><style>
       ul {
    
      background-color: beige;
      width: fit-content;
      padding: 1.5em;
      border: 2px solid black;
    } li {
      display: inline-flex;
      background-color: orange;
      border: 2px solid black;
      padding: 0.5em;
    } </style><body><ul><li>Item1</li><li>Item2</li><li>Item3</li><li>Item4</li></ul></body></html>

    CSS Width – Related Properties

    Following is the list of related CSS properties of width:

    propertyvalue
    max-widthSets an upper bound on the width of an element.
    min-widthSets a lower bound on the width of an element.
    min-contentSets intrinsic minimum width of the content.
    max-contentSets intrinsic maximum width of the content.
    fit-contentFits the content depending on the available size.
    fit-content()Clamps a given size based on the formula min(maximum size, max(minimum size, argument)).